Parallel Compression in Modern Sound Engineering

Key takeaways
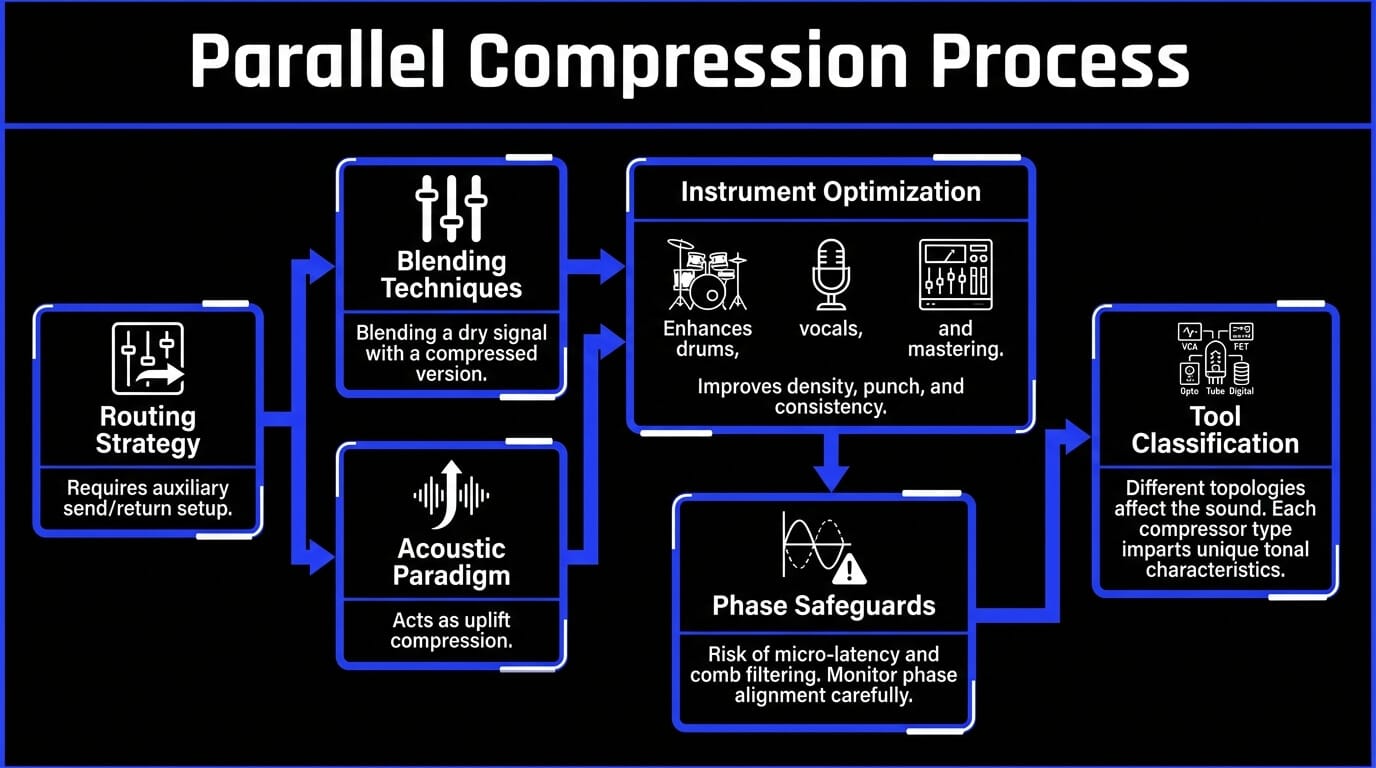
- Parallel compression blends a dry signal with a heavily compressed duplicate, helping a track sound fuller and louder while keeping the original transients intact.
- The technique works especially well on drums, vocals, bass, synths, strings, and full mixes when you want more body, sustain, presence, or cohesion without flattening the performance.
- The compressed parallel path usually needs aggressive settings. If the compression is too gentle, the blend may only make the track louder instead of adding real density or character.
- Routing matters. You can use duplicated tracks, aux sends, return channels, or plugin mix controls, but phase alignment and delay compensation must be checked to avoid thin or hollow results.
- ACE Studio can improve the source material before compression by helping isolate stems, create vocal or instrument layers, and build parts that give the parallel bus better detail to enhance.
Foundational Principles of Audio Dynamics and Signal Processing
Managing these audio dynamics requires a deep understanding of psychoacoustics, electrical engineering, and digital signal processing.
The primary objective of dynamic range compression is to restrict this variance, ensuring that a performance fits within the technical constraints of modern playback mediums while translating across diverse consumer audio systems.
During music production, signal manipulation often relies on traditional downward compression. This tool monitors an incoming signal, and when the amplitude exceeds a user-defined threshold, it reduces the gain based on a specific compression ratio.
While this effectively manages runaway peaks, it alters the initial transient response—the crucial beginning impact of a sound, such as the strike of a drum stick or the consonant of a vocal phrase. If an engineer applies excessive downward compression to control the average volume, the track can become lifeless, flat, and devoid of performance dynamics.
Mechanics of Signal Manipulation and Waveform Dynamics
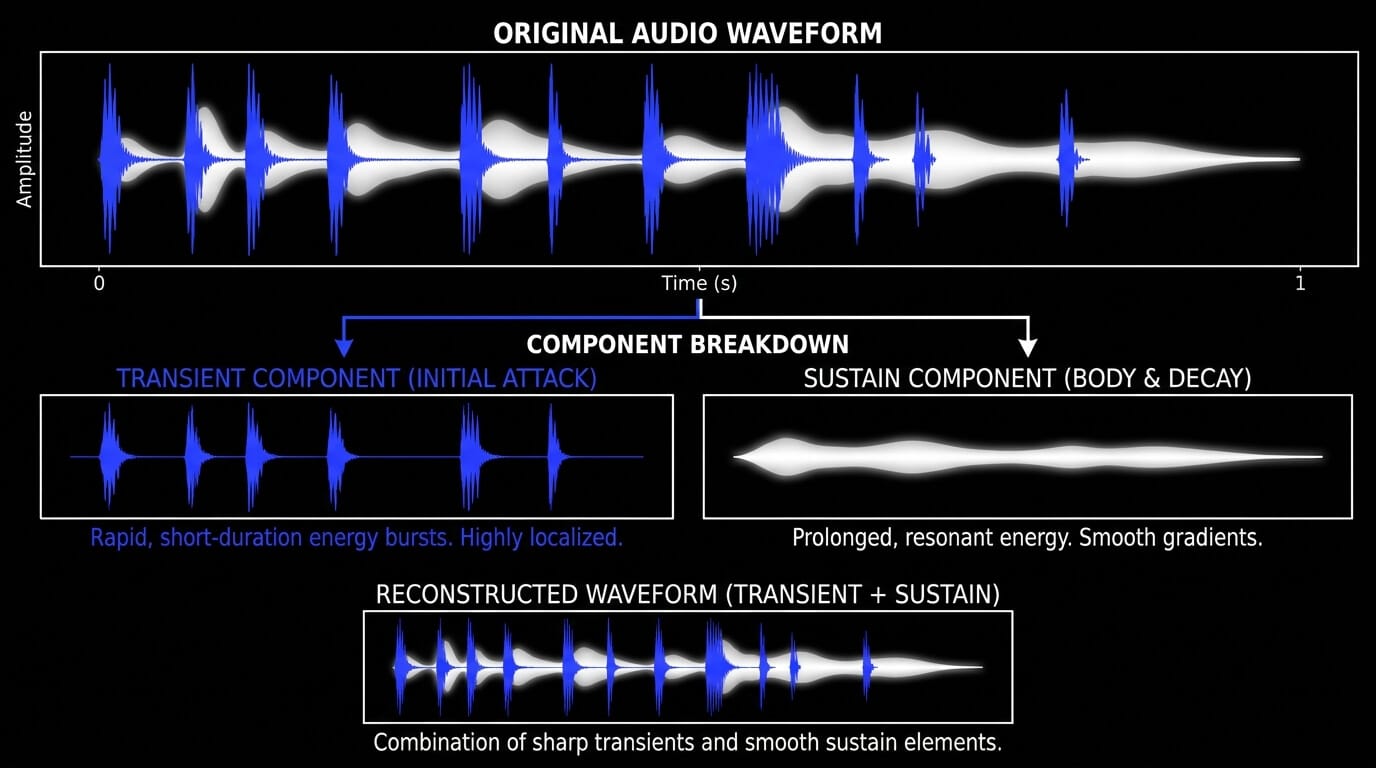
To understand why alternative mixing techniques are necessary, one must analyze the physical structure of an audio waveform. A standard waveform consists of two primary components:
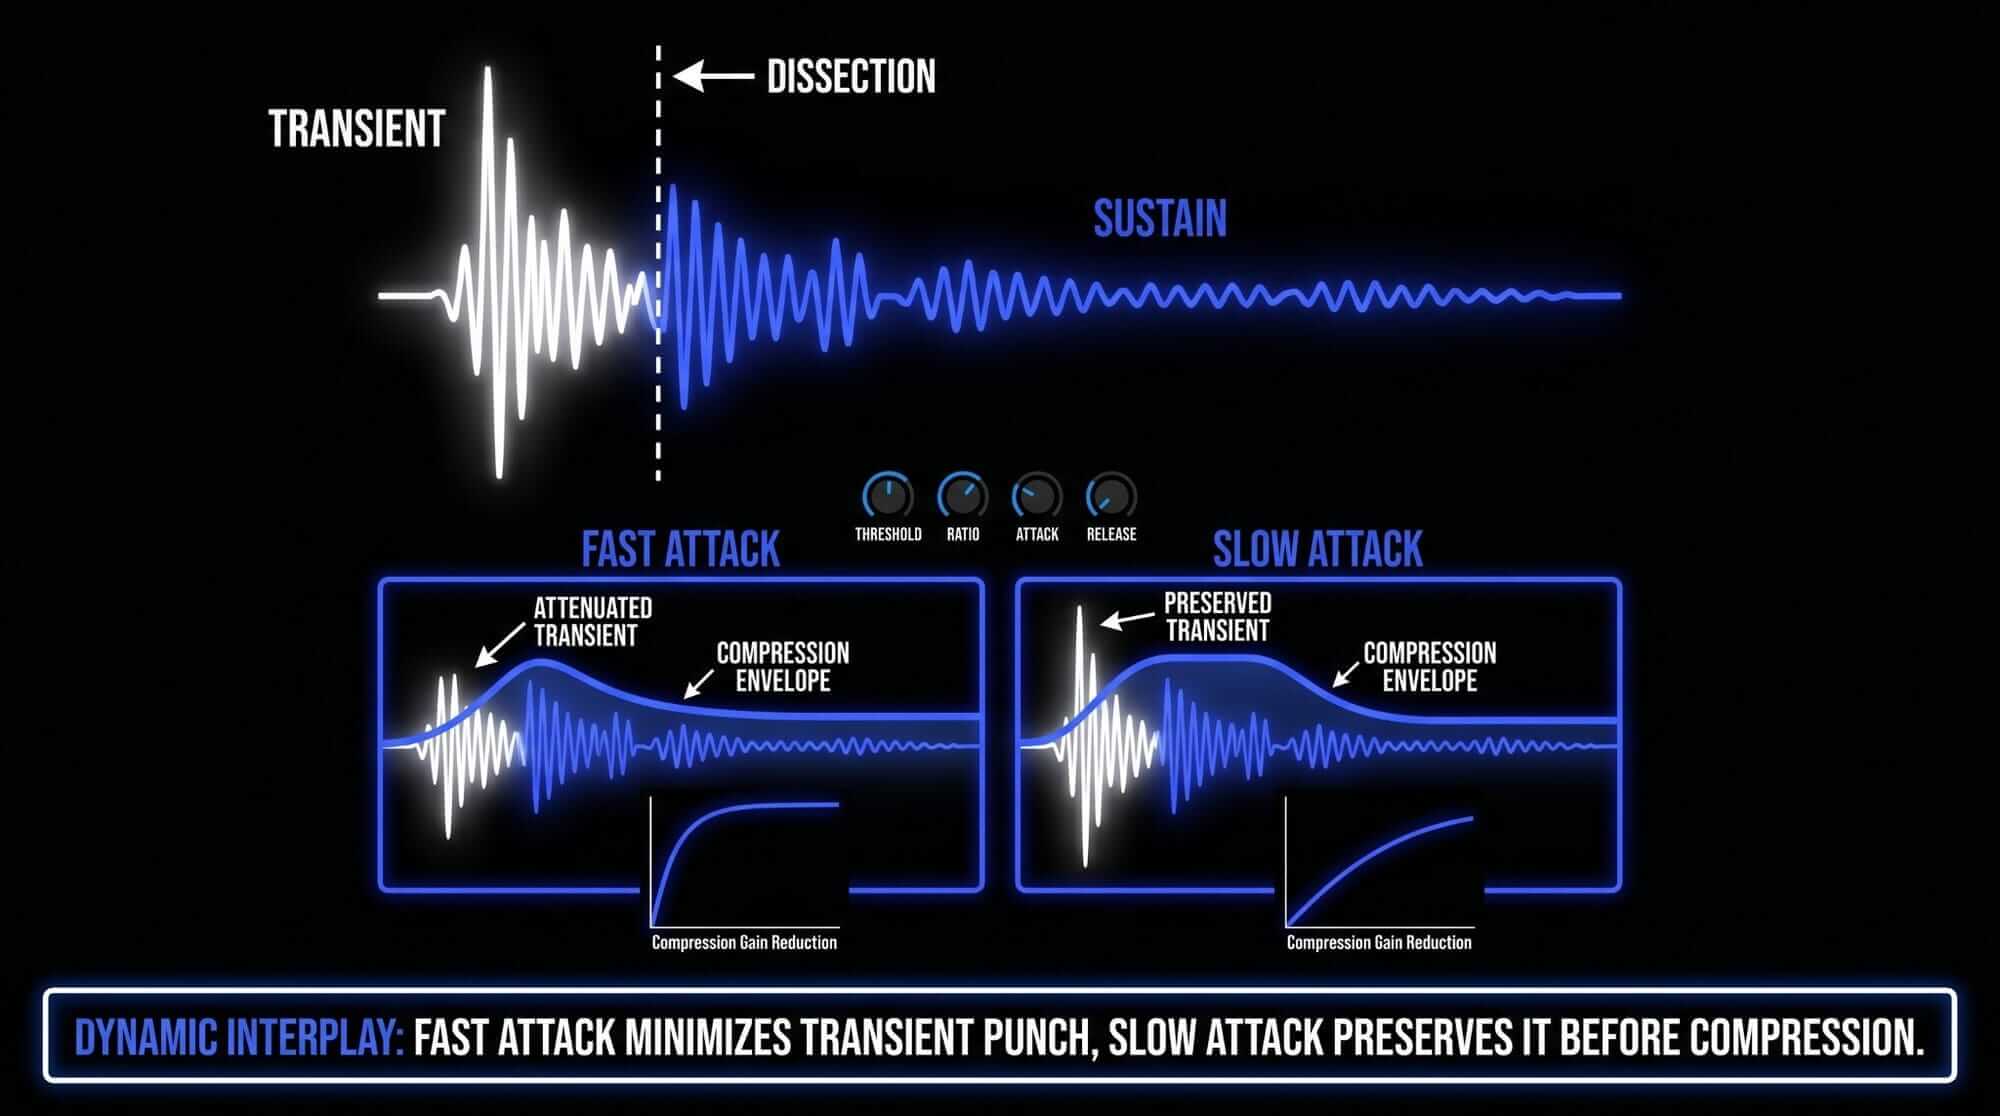
- Transients: High-energy, short-duration spikes that dictate the punch, articulation, and spatial placement of an instrument.
- Sustain/Body: The lower-amplitude, longer-duration tail of the sound wave containing the foundational pitch, harmonic richness, and low-level ambient details.
Standard peak-limiting and high-ratio signal compression focus exclusively on reducing transient energy. When a compressor possesses a fast attack time, it clamps down on the transient immediately. This achieves loudness control but alters the frequency response and strips away the impact of the sound.
Conversely, choosing a slow attack time preserves the transient but can cause the compressor to react late, causing the sustain portion to pump unpredictably. This challenge led to the development of parallel processing, an approach designed to manage audio dynamics without compromising transient impact.
The Core Mechanics of Parallel Processing
Defining Parallel Compression
Parallel compression, historically known as New York compression due to its widespread adoption by mixing engineers in that region during the late 20th century, is an audio processing method wherein a dry, uncompressed signal is mixed alongside a highly compressed duplicate of that same signal.
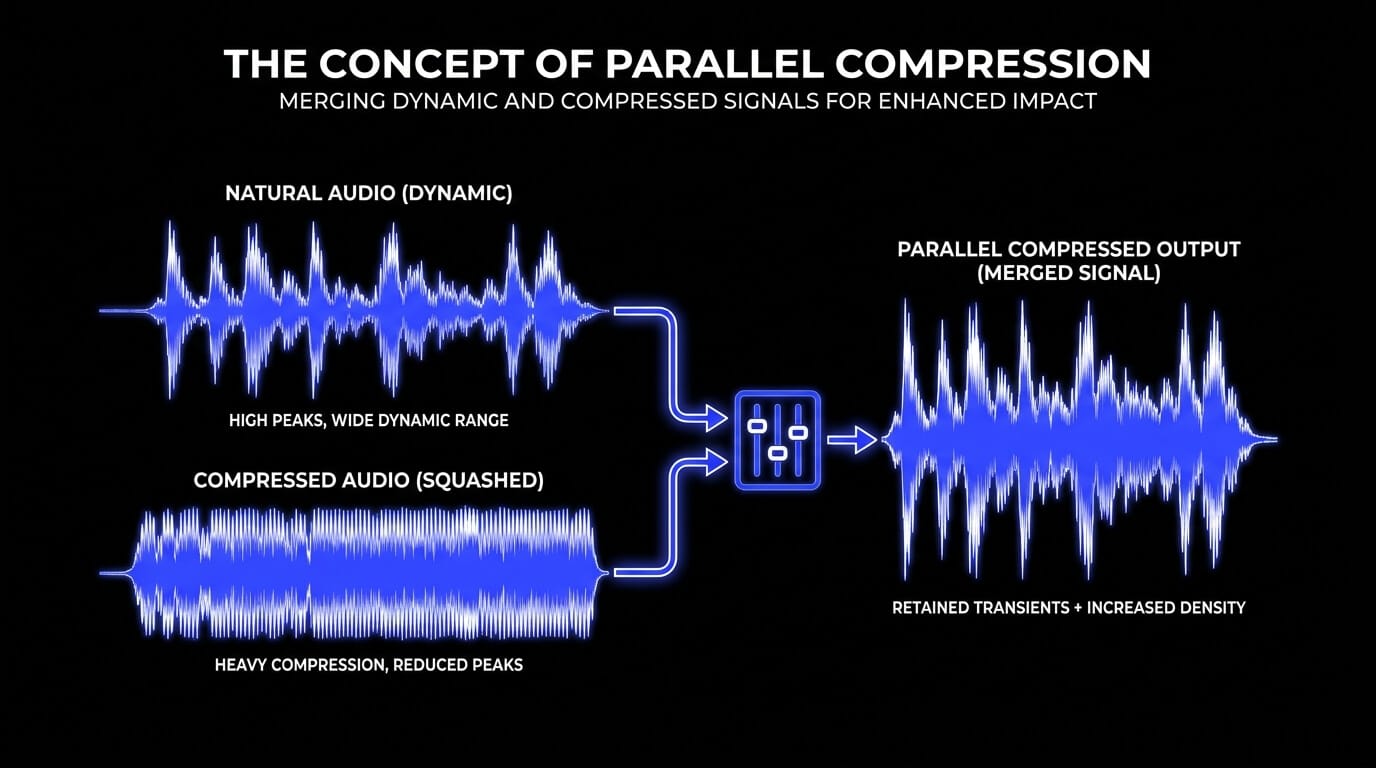
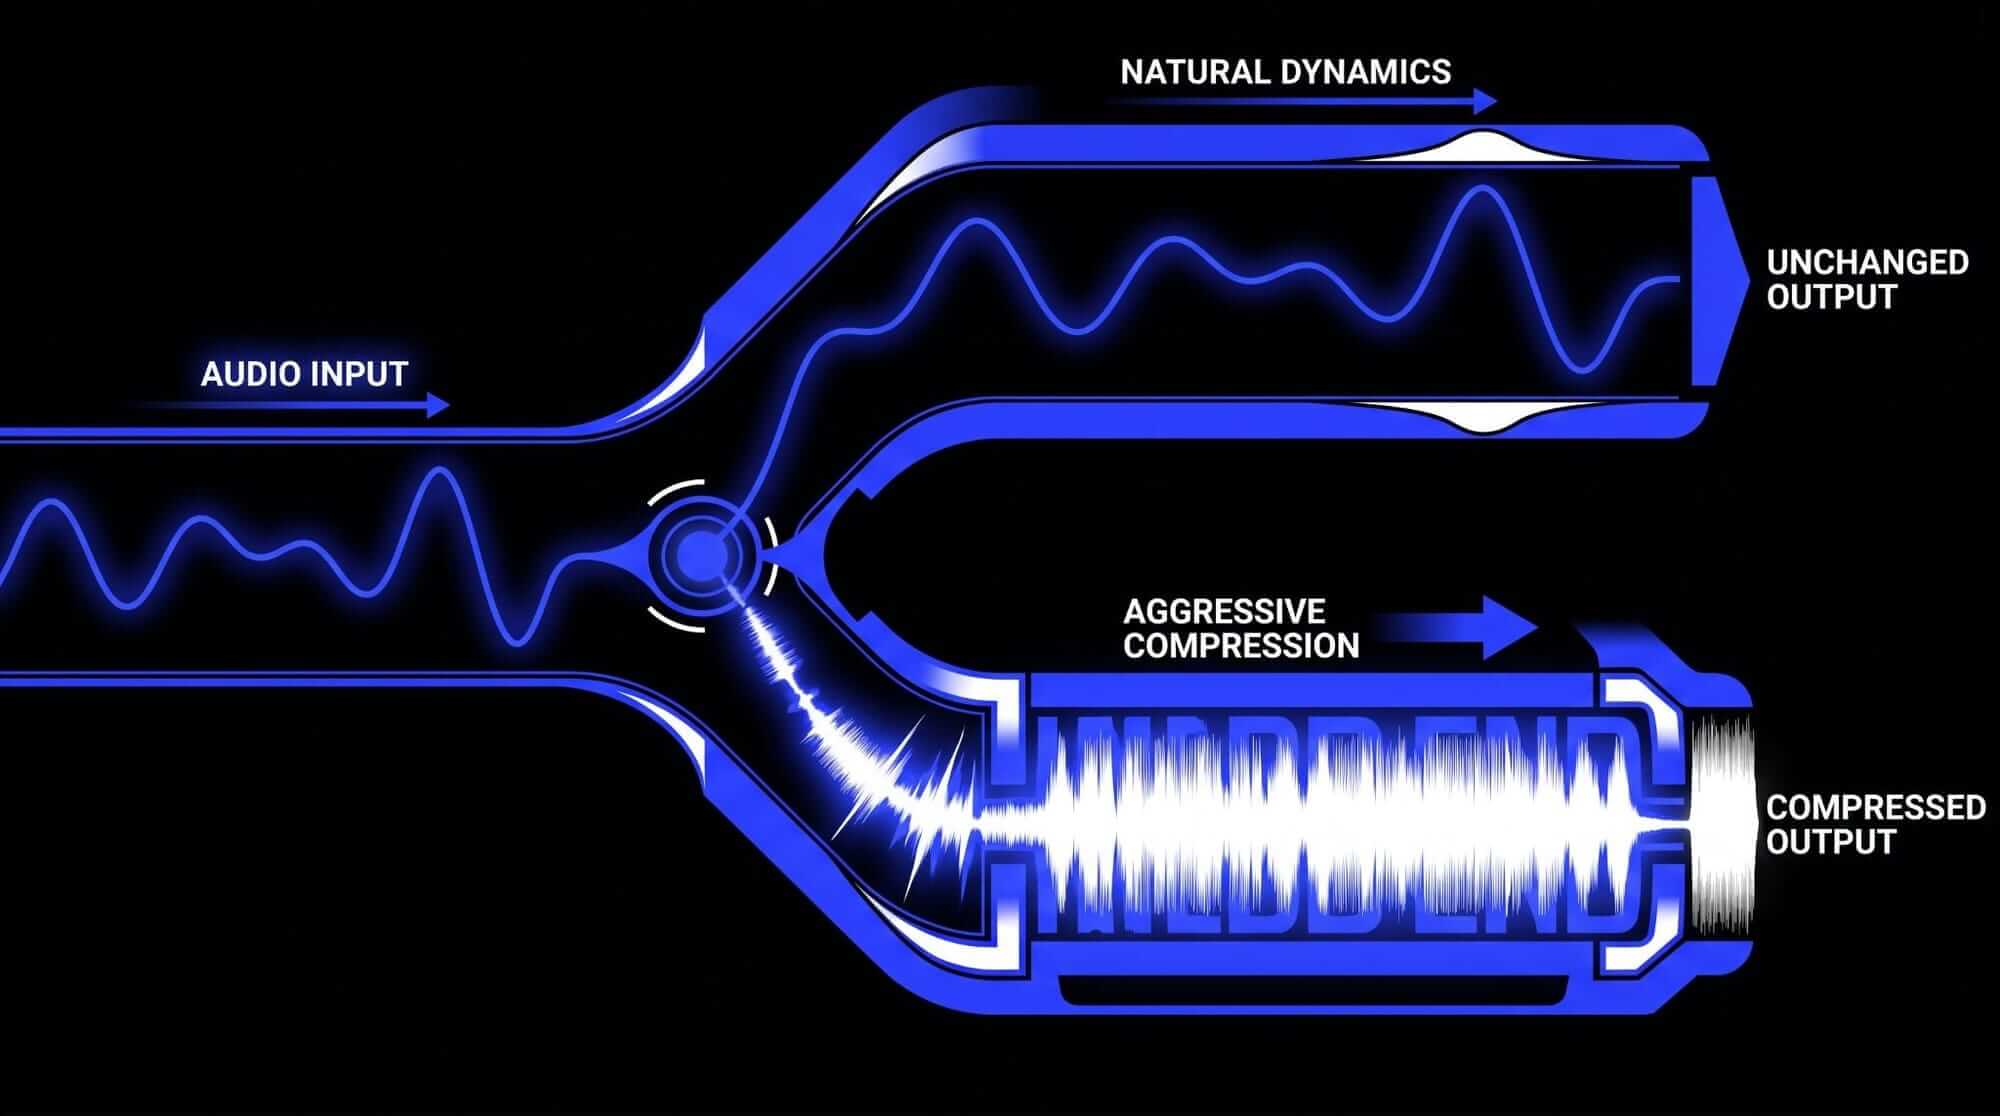
Instead of routing the entire audio path through a single processor, the signal splits into two or more simultaneous streams. One stream remains untouched to preserve natural waveform dynamics, while the parallel path undergoes aggressive compression to alter its envelope and harmonic structure.
The Fundamental Dichotomy: Downward Compression vs. Parallel Processing

The operational distinction centers on how the dynamic envelope is altered. Downward compression works from the top down, while parallel compression functions from the bottom up by creating a dense block of audio where low-level information is elevated.
Parallel compression functions from the bottom up. By heavily compressing the duplicate track, the engineer creates a dense block of audio where low-level information is elevated to a consistent high amplitude, while the peaks are completely flattened.
When this heavily processed track blends at a lower volume into the primary uncompressed track, it does not attenuate the original peaks. Instead, it raises the low-level details of the overall performance.
The loud transients of the dry track pass through to the master bus unaffected, while the quiet details, subtle room acoustics, and harmonic sustains from the parallel track fill the sonic valleys. This results in an effective reduction of the dynamic range while preserving the perceived punch and initial impact of the performance.
| Parameter / Feature | Traditional Downward Compression | Parallel Compression Processing |
| Primary Objective | Peak attenuation and macro-dynamic control | Elevating low-level details and increasing density |
| Transient Impact | Often attenuated or rounded off | Preserved entirely via the unprocessed path |
| Noise Floor | Attenuated or maintained proportionally | Elevated and stabilized within the mix |
| Typical Ratios | 1.5:1 to 4:1 | 4:1 to 20:1 (Limiting) |
| Gain Reduction | 2 dB to 6 dB | 10 dB to 25 dB |
| Sonics | Transparent to noticeably compressed | Aggressive on the bus, natural in the final blend |
The Phenomenon of Uplift Compression and Upward Mobility

This bottom-up methodology is often classified as uplift compression or upward mobility. True upward compression increases the gain of a signal when it falls below a certain threshold, requiring specialized expander-style topologies. Parallel processing achieves an identical psychoacoustic outcome using standard, readily available downward compressors.
By stabilizing the lower-amplitude segments of an audio file on a secondary channel, the engineer ensures that low-level information remains consistently audible. This upward mobility allows subtle details—such as the ring of a snare drum shell, the breathiness of a vocal performance, or the decay of an acoustic space—to remain clear and present even within dense, modern, high-volume arrangements.
Primary Operational Benefits of Parallel Processing
Preserving Transients While Maximizing Density
The principal benefit of integrating parallel processing into a mixing workflow is the ability to break the traditional compromise between transient punch and track density. In competitive genres like rock, pop, hip-hop, and electronic music, tracks require high average energy (RMS) to compete on modern streaming networks. Relying solely on direct inline compression to achieve this density can quickly ruin transient punch.
Parallel architectures sidestep this limitation. Because the uncompressed channel retains its original crest factor—the decibel ratio between peak and RMS levels—the listener's brain registers the initial impact as punchy and powerful. Simultaneously, the parallel channel fills the space immediately following the peak, adding weight, power, and perceived loudness without overdriving the master bus or triggering digital clipping.
Enhancing Low-Level Information and Perceived Loudness
A major challenge in sound mixing is making low-level details audible without turning up the fader so high that it masks other instruments. For instance, ghost notes on a snare drum, the subtle tail of a hardware reverb, or the lower chest register of a vocalist can easily get buried under a wall of distorted electric guitars or synthesized basslines.
Parallel paths solve this by acting as a magnifying glass for low-level audio processing. By squashing the duplicate signal with extreme compression ratios, these faint details are pulled out of the noise floor and locked into a narrow, predictable volume range.
When mixed subtly beneath the primary track, these details become clear and intelligible, boosting the perceived loudness and emotional impact of the performance without increasing its absolute peak meter readings.
Systematic Step-by-Step Engineering Setup
The Dual-Track Duplication Method
The dual-track duplication method is the simplest way to set up parallel compression, making it highly effective for processing individual mono or stereo sources within a digital audio workstation (DAW).
- Step 1: Select the target track (e.g., a lead vocal) within the DAW timeline.
- Step 2: Duplicate the track exactly, creating an identical secondary channel that copies all underlying audio regions, edits, and automation.
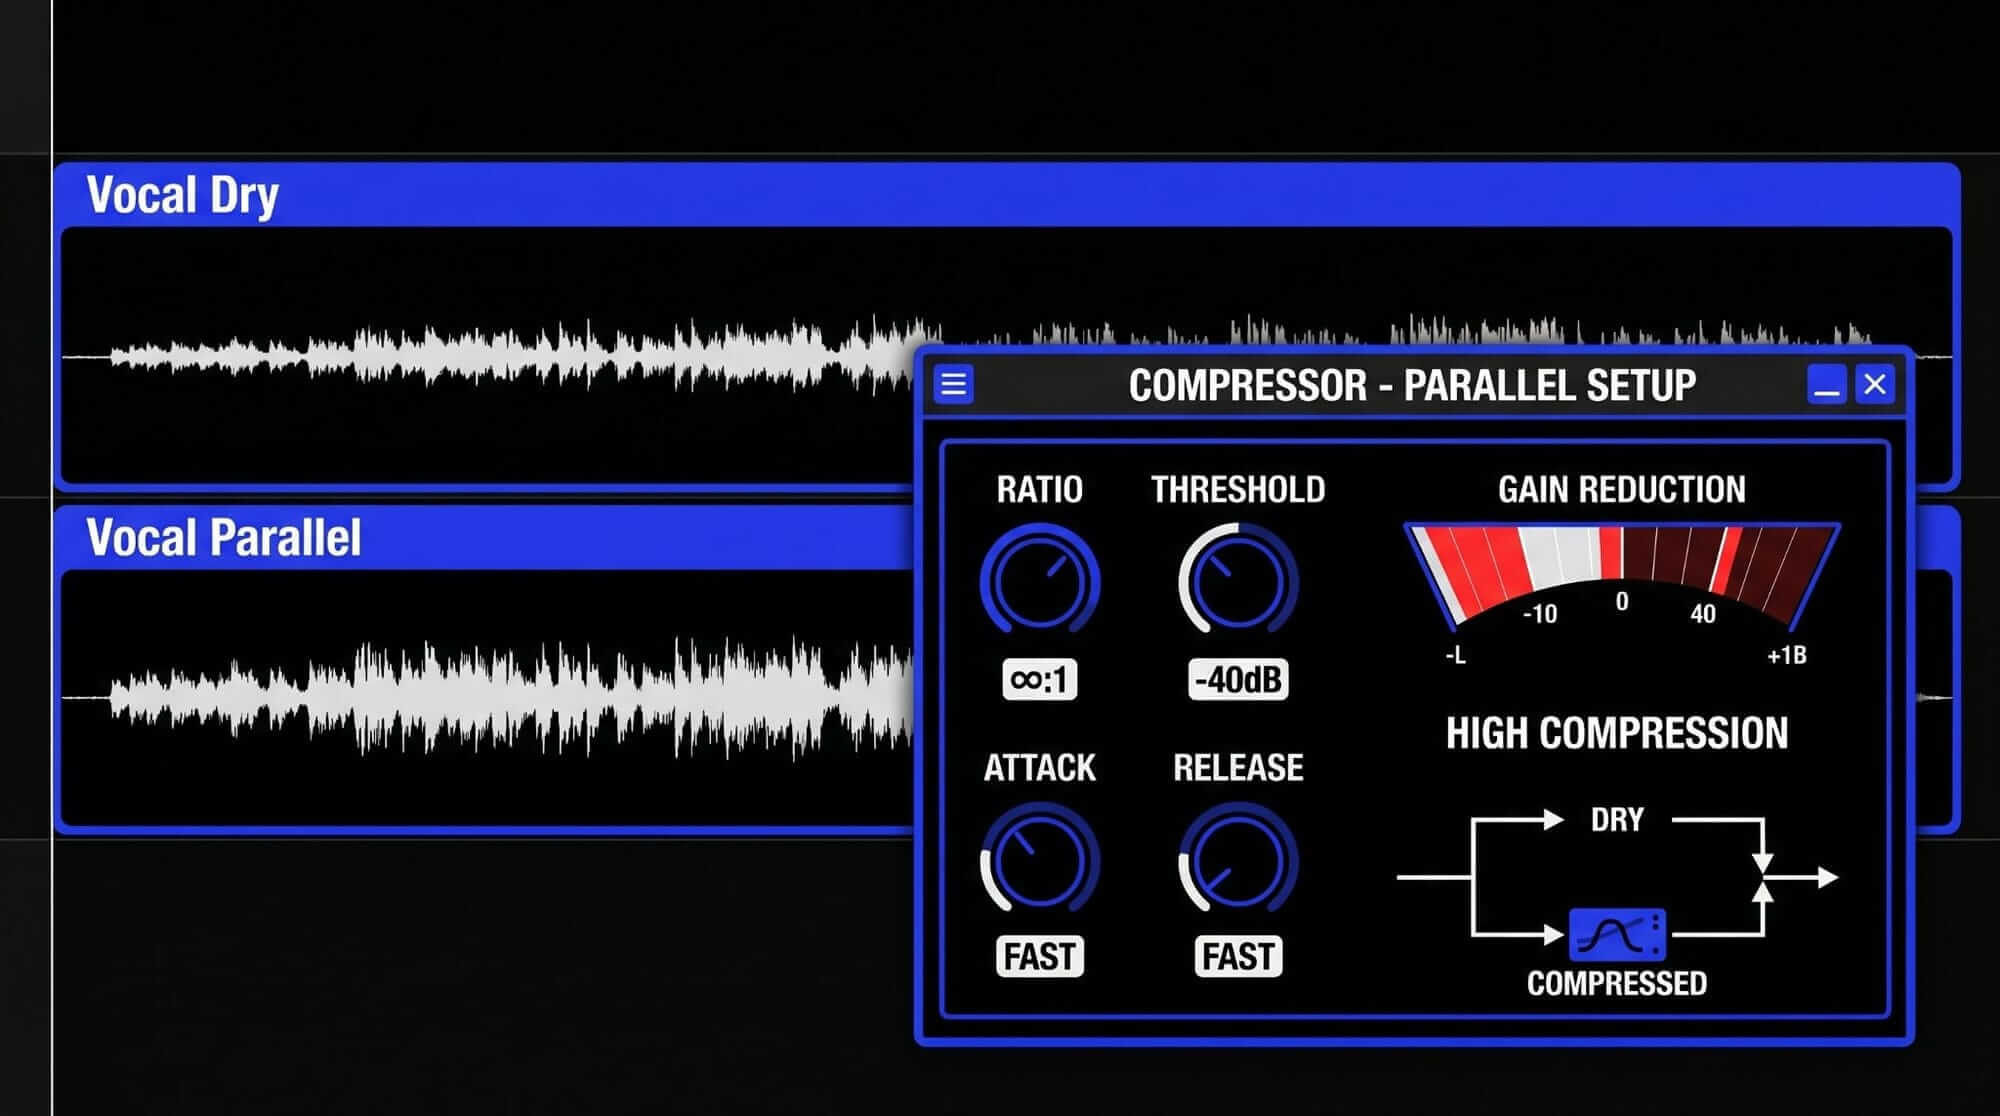
- Step 3: Rename the original channel to Vocal Dry and the duplicated channel to Vocal Parallel.
- Step 4: Insert an aggressive dynamics processor directly onto the Vocal Parallel channel insertion slot.
- Step 5: Configure the compressor on the parallel channel with a high compression ratio (e.g., 8:1 or higher), a fast attack time to flatten the transients, and a fast release time to accentuate the sustain. Lower the threshold until the meter shows 10 dB to 15 dB of constant gain reduction.
- Step 6: Pull the fader of the Vocal Parallel channel completely down to infinity.
- Step 7: Play the project and gradually raise the Vocal Parallel fader, blending the heavily compressed audio into the Vocal Dry track until you achieve the desired density and body.
The Auxiliary Send and Return Routing Topology
When managing complex, multi-miked instruments like drum kits, or when applying a single parallel processor across multiple distinct mix elements, the auxiliary send and return routing topology is the industry-standard workflow.
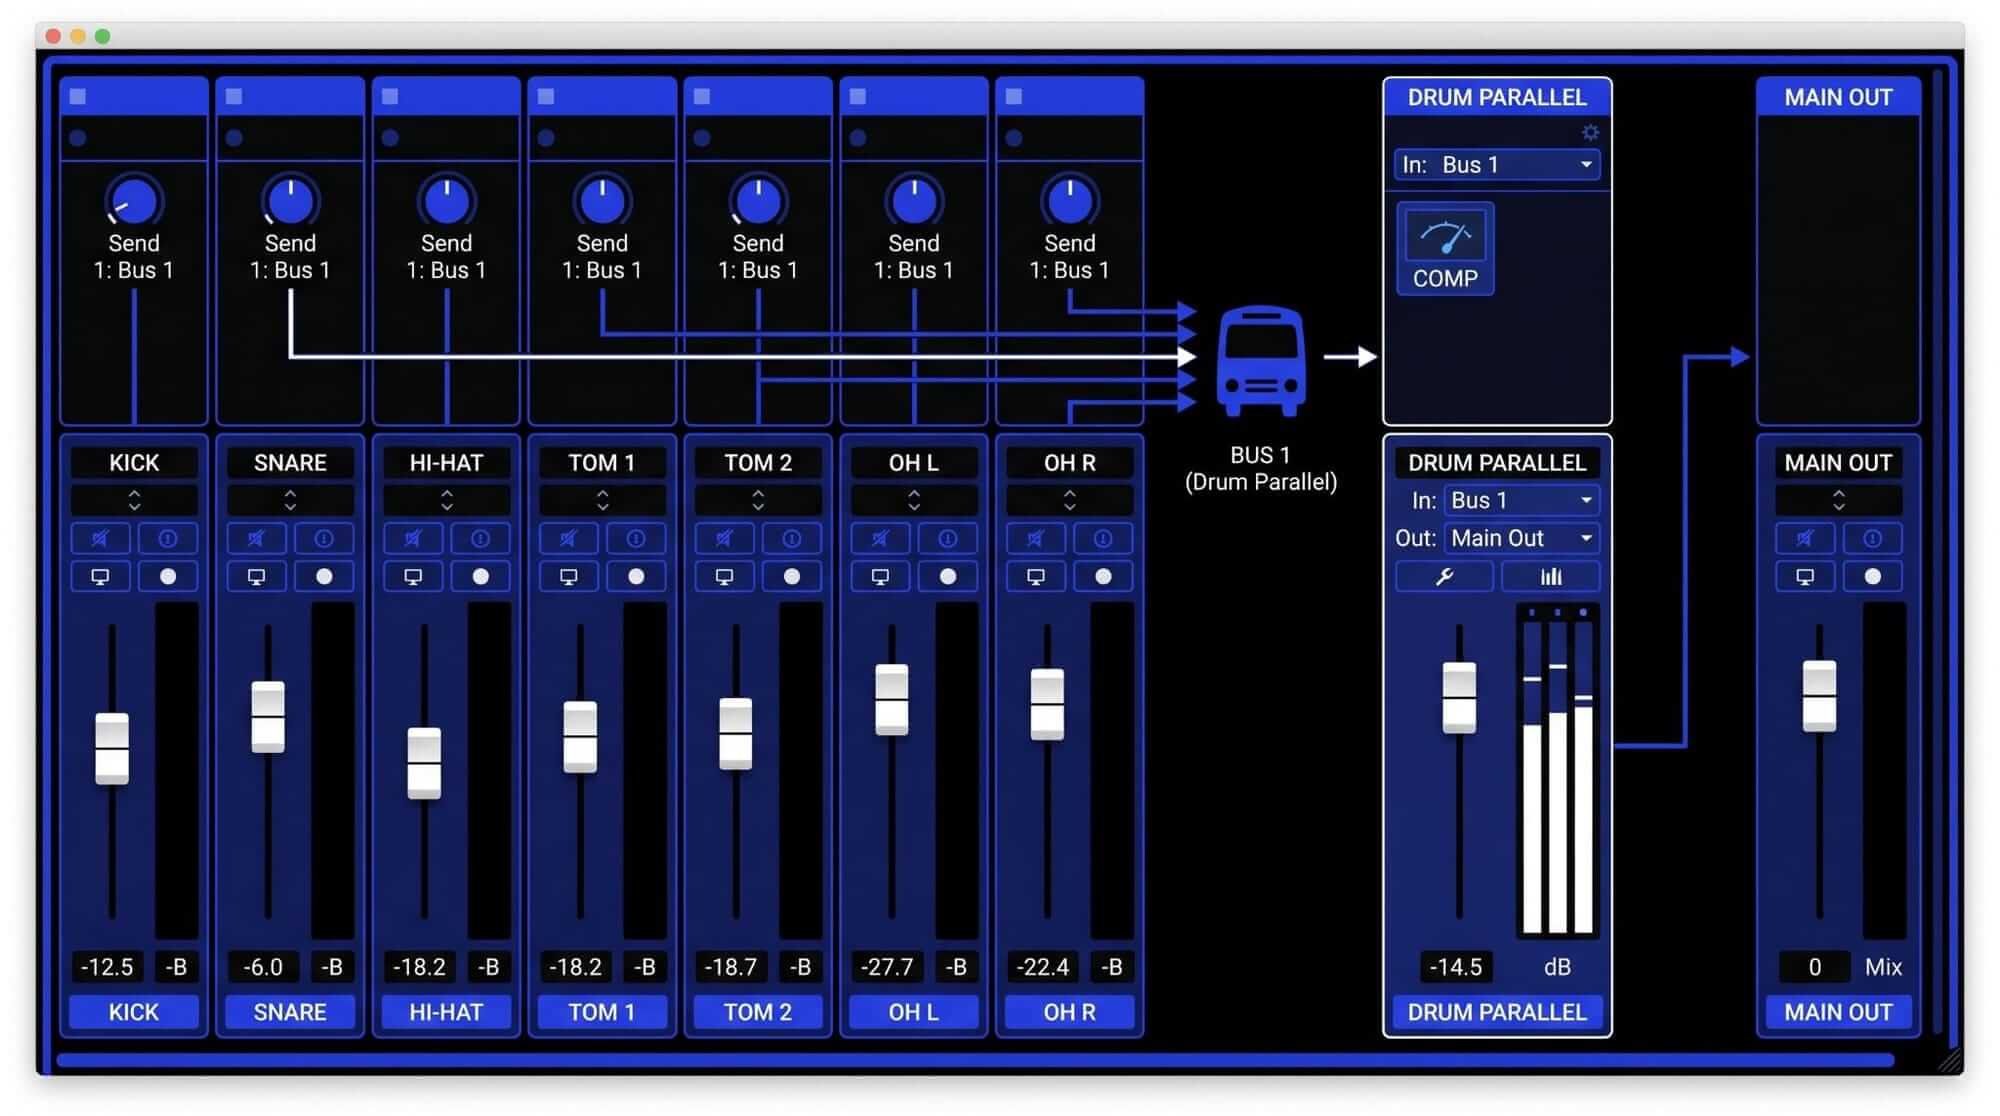
- Step 1: Create a new Auxiliary Input track (or Bus Return channel) within the DAW mixer window and label it Drum Parallel.
- Step 2: Assign a vacant stereo bus (e.g., Bus 11-12) as the input source for this new Auxiliary Input channel.
- Step 3: Navigate to the source tracks that require parallel processing, such as individual kick, snare, and tom channels.
- Step 4: Instantiate an auxiliary send pointing to Bus 11-12 on each of those individual source tracks.
- Step 5: Set the auxiliary sends to post-fader routing. This ensures that any volume adjustments made to the dry tracks during a mix maintain a proportional balance into the parallel compression bus.
- Step 6: Raise the auxiliary send levels to unity gain (0.0 dB) to feed a healthy, balanced signal to the parallel path.
- Step 7: Insert a high-quality compressor onto the Drum Parallel auxiliary channel. Set the parameters for heavy gain reduction, making sure to apply makeup gain to compensate for the severe attenuation.
- Step 8: Mute or lower the Drum Parallel return fader, then blend it up into the main mix, balancing it against the primary stereo drum bus.
Digital Audio Workstation Routing Specifics
Modern DAWs offer unique workflows for setting up parallel routing structures:
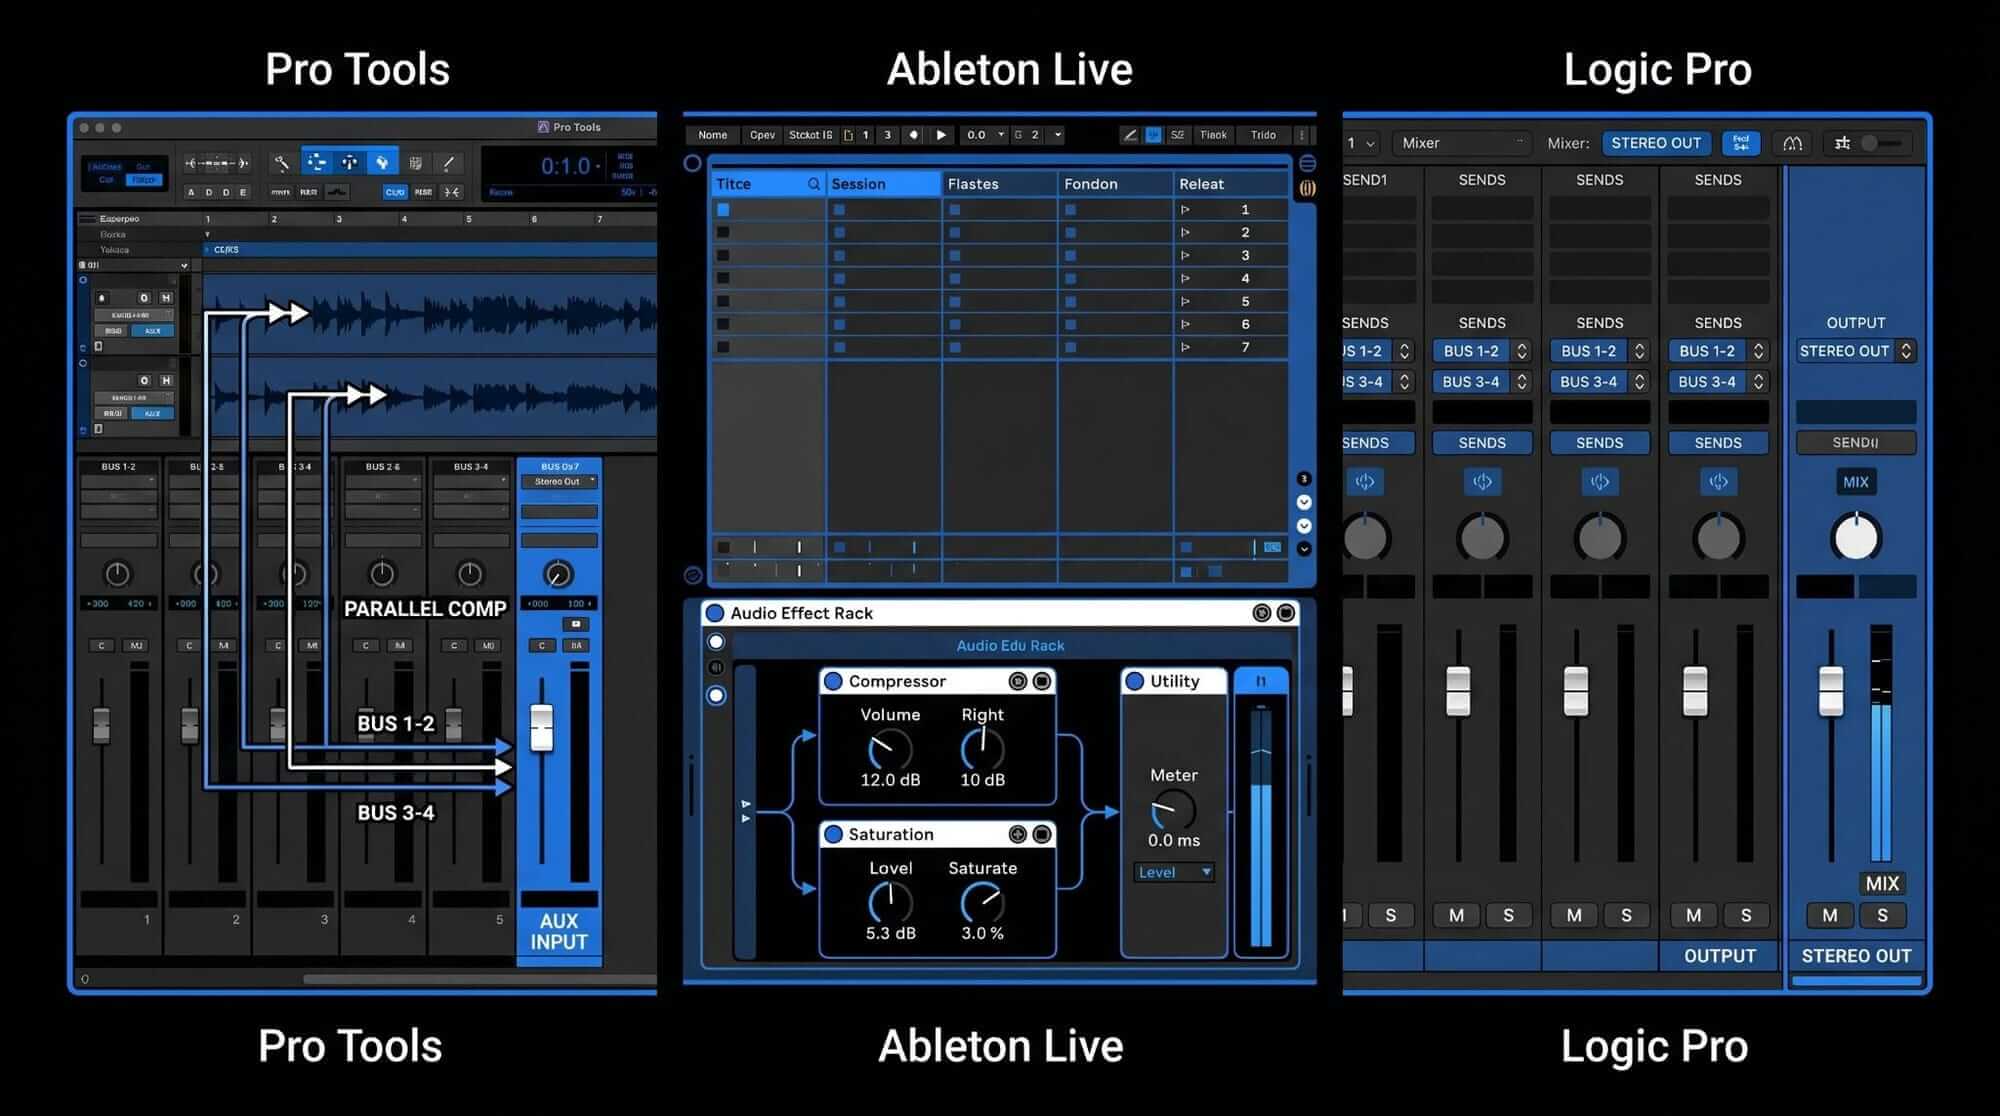
- Pro Tools: Requires manually establishing an Auxiliary Input track, setting up a bus path, and sending signals via track sends. Ensure Delay Compensation is active under the Options menu to avoid phase issues.
- Ableton Live: Features an Audio Effect Rack device. Users can create a dual-chain architecture within a single device slot—one chain left empty for the dry signal, and a second chain loading a stock or third-party compressor for the parallel path.
- Logic Pro: Automatically creates an auxiliary return channel as soon as a send bus is assigned on a channel strip. Alternatively, you can use the built-in Mix slider found on many stock plugins, which functions as an internal parallel routing path.
Advanced Applications Across Key Mix Elements
Optimizing Rhythm Sections and Drum Processing
Drums are highly transient instruments, making them excellent candidates for parallel processing. The goal here is to build a solid, energetic foundation without choking the natural air and overhead clarity of the kit.
Establishing Punch and Weight on Kick and Snare Tracks
To add weight and punch to individual kick and snare tracks, instantiate a parallel auxiliary bus fed by the close microphones. For this application, choose a Field-Effect Transistor (FET) style compressor or an aggressive VCA processor.
By allowing the initial transient through on the parallel track via a slower attack time, you reinforce the punch of the dry track. The fast release time then emphasizes the low-end resonance of the kick drum shell and the snare wires. When you blend this path in, the rhythm section sounds larger, more cohesive, and full of energy.
Establishing Vocal Presence and Consistency
Modern vocal mixing demands that lyrics remain consistently intelligible, sitting right at the front of the mix regardless of whether the vocalist is whispering or shouting.
Balancing Low-Level Detail with Intelligibility
To achieve this level of vocal consistency without introducing harsh compression artifacts, set up a dedicated parallel vocal path using an optical (Opto) compressor or a transparent digital processor.
This parallel track will sound squashed, dense, and unnaturally close when listened to in isolation. However, blending it beneath the main, untreated lead vocal track brings up the low-level consonants, breath details, and trailing notes. This approach keeps the vocal locked firmly in place at the front of the soundstage, without stripping away the performance's emotional, uncompressed peaks.
Signal Processing Protocols for Stringent Mastering Audio
In the final mastering audio stage, parallel compression serves as an excellent tool to glue the entire mix together and boost perceived loudness without destroying the mix engineer's transient relationships.
Achieving Loudness Normalization and Cohesion
During mastering techniques, any dynamic adjustments must be incredibly precise. The goal is to optimize the track for streaming loudness normalization protocols (such as the -14 LUFS standard utilized by major distribution networks) without crushing the master's frequency response.
For mastering applications, consider utilizing multi-band compression in a parallel configuration. This allows you to split the parallel path into distinct frequency bands (e.g., Low, Mid, High). You can then apply subtle parallel reinforcement to the low end (below 100 Hz) to solidify the foundation, or to the upper midrange (2 kHz to 5 kHz) to enhance clarity and detail across the full stereo spectrum.
Using ACE Studio to Create Better Source Tracks for Parallel Compression
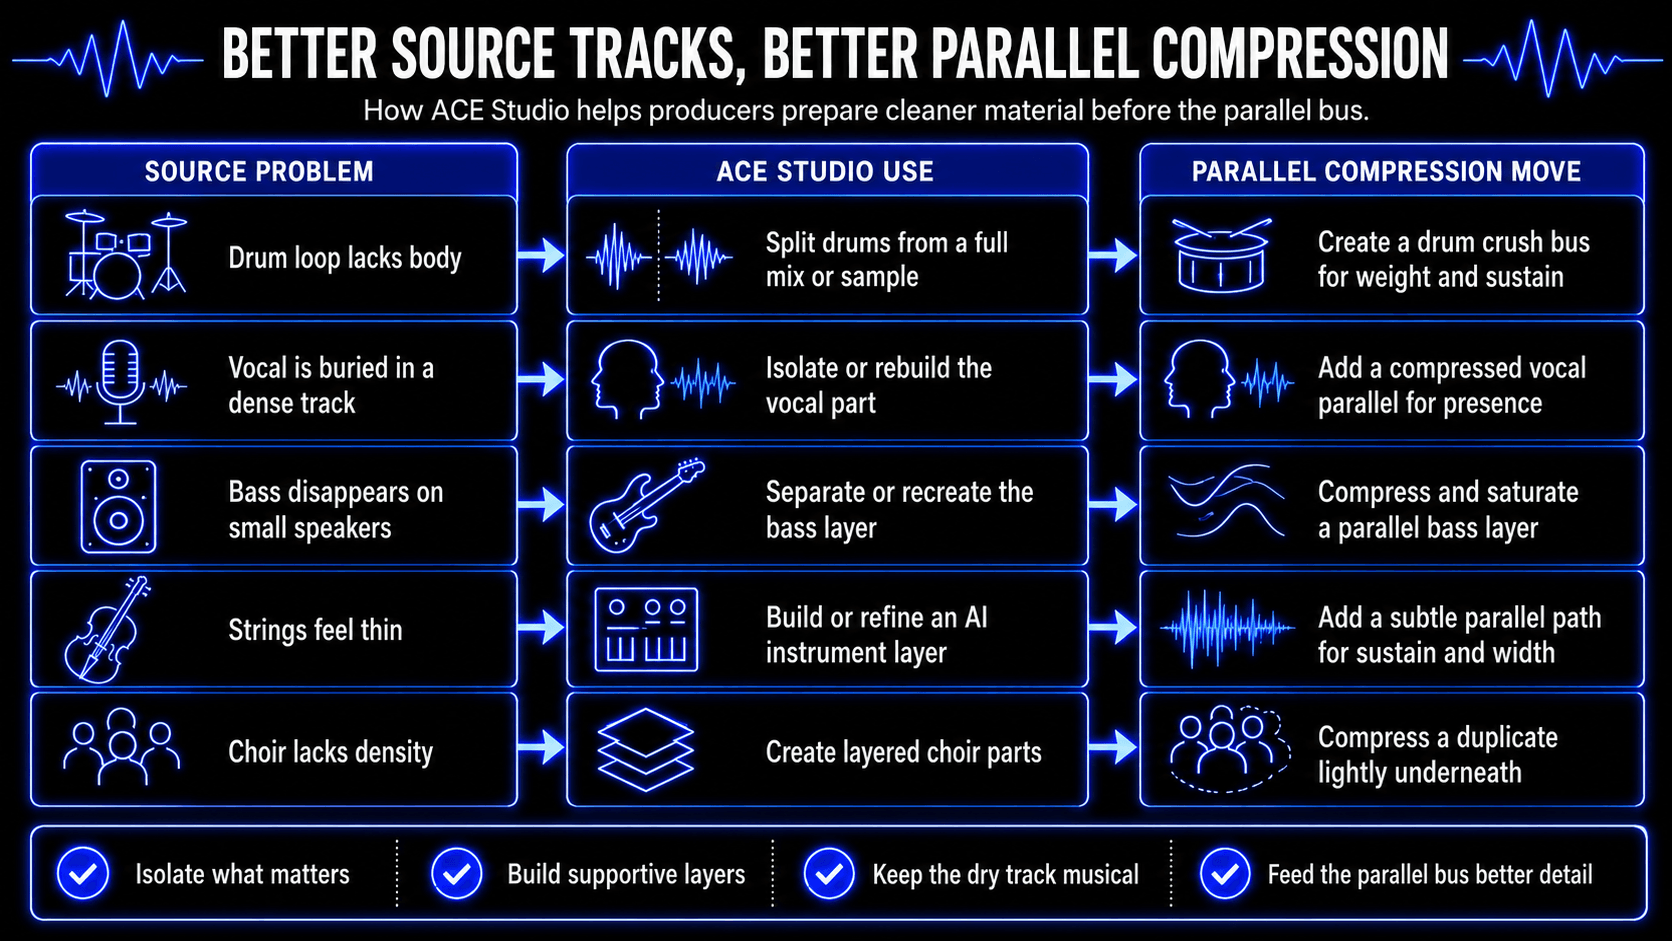
Parallel compression works best when the source material already has something worth lifting. A parallel bus can bring out room tone, breath, low-level sustain, snare wire detail, string movement, vocal texture, and harmonic density. But it can also exaggerate problems. If the source track has weak phrasing, messy bleed, uneven articulation, or a buried stem, heavy compression will make those issues more obvious.
This is where ACE Studio becomes useful before the compressor ever enters the chain. Instead of treating parallel compression as a fix for a flat or incomplete sound, producers can use ACE Studio to shape cleaner, more intentional source material first. The dry signal keeps its musical identity, while the compressed parallel path has better detail, tone, and movement to enhance.
That matters because parallel compression is not just about making something louder. It is about deciding what deserves more density. A vocal may need more breath and consonant detail. A drum loop may need body under the transient. A bassline may need more low-mid definition. A string or choir layer may need sustain without crowding the arrangement. ACE Studio gives producers more control over those ingredients before they start blending compressed returns into the mix.
Preparing Stems Before Parallel Compression
If you are working with a full mix, a loop, a reference idea, or a bounced demo, Stem Splitter can separate the audio into core components such as vocals, drums, bass, and other instruments. That gives you more control over what gets compressed in parallel.
Instead of crushing an entire stereo file and hoping the result adds energy, you can isolate the element that actually needs density.
This keeps the parallel compression decision focused. You are no longer compressing everything at once. You are choosing the part that needs more weight, more sustain, or more forward motion.
Using Add a Layer to Build Material That Takes Compression Well
Add a Layer is one of the most useful ACE Studio features for parallel compression because it lets producers create a specific supporting part for a specific mix problem. The feature generates new audio layers directly on the Canvas from text prompts, including instrumentals, vocals, stem/sample loops, basslines, drum loops, or short musical phrases. The producer first selects a timeline range, then defines the kind of layer they want.
For example, if a chorus feels thin, you might create a soft synth layer, a low vocal double, a choir texture, or a short rhythmic loop. That new layer does not need to dominate the arrangement. It can sit quietly underneath the main part, routed to a parallel bus, and compressed until it adds sustain, body, or motion.
For a hip-hop or electronic track, Add a Layer can help create a bass-support layer or percussion loop that exists mainly to feed the parallel chain. The dry kick and snare keep the transient impact. The compressed support layer fills the space around them. For a pop hook, a generated harmony or pad-like vocal texture can be blended under the lead and compressed gently to add width and emotional lift.
The advantage is precision. You are not adding more tracks just to make the session bigger. You are creating a layer with a job:
- Add sustain behind a short sound
- Reinforce the low mids without raising the main bass
- Add movement under a static synth
- Give a chorus more lift without pushing the lead vocal louder
- Create a texture that can be compressed hard without damaging the main performance
A Better Way to Think About AI Vocals and Parallel Compression
For vocal production, ACE Studio gives the producer a clear advantage: the vocal performance is editable before it becomes a mixing problem. If a word disappears, you can refine the note length, pitch movement, phoneme, or delivery. If a phrase needs more intimacy, you can shape breath and tone. If the hook needs more lift, you can create harmonies or supporting vocal layers before building the parallel bus.
That is different from forcing one recorded vocal to carry every role in the mix. A traditional vocal parallel chain often tries to make one take sound bigger, closer, and more consistent at the same time. With ACE Studio, you can create separate parts with a clear purpose:
- A main lead vocal with natural dynamics
- A quiet harmony layer for width
- A soft double for thickness
- A choir-style layer for impact
- A compressed parallel vocal return for low-level detail
Once those parts are rendered or connected through ACE Bridge 2, they can be balanced in your standard DAW and processed with normal mixing tools. ACE Bridge 2 is available as a VST3, AU, and AAX plugin and supports audio and MIDI synchronization between ACE Studio and a DAW.
Using ACE Studio for Instrument Layers That Support Parallel Compression
Parallel compression is not only a vocal or drum technique. It can also work beautifully on instrument layers, especially when the goal is sustain, density, or emotional lift.
A string line is a good example. If the arrangement needs more warmth behind a chorus, you can build an AI instrument part in ACE Studio, shape the MIDI performance, and then compress a parallel version underneath the dry instrument. The dry track keeps articulation and note definition. The compressed return adds body and movement.
The same idea works for brass-style stabs, cinematic layers, background textures, melodic counterlines, and choir parts. A controlled parallel layer can make one section feel more finished without forcing the whole mix to become louder.
This is especially useful when a production feels thin, but adding more parts would make the arrangement crowded. ACE Studio gives you a way to create a focused layer, then use compression to place it exactly where it belongs: behind the main idea, supporting the energy, not stealing attention.
Why This Matters for Better Compression Decisions
Parallel compression is powerful, but it is not a rescue tool for every weak track. It rewards intention. ACE Studio gives producers more control over that intention before the signal reaches the compressor. The benefit is simple: better source material creates better compression results.
When the vocal phrasing is clear, the drum stem is isolated, the bass layer has definition, or the instrument part already carries the right emotion, parallel compression can do what it does best. It can lift quiet details, thicken the body, and preserve the transient impact that keeps the music alive.
ACE Studio does not replace the producer or mix engineer’s judgment. It gives them stronger material to shape. You still decide what needs density, what should stay dynamic, what deserves a parallel return, and how much of that compressed signal belongs in the final balance.
Critical Diagnosis: Pitfalls and Mixing Mistakes
Misalignment of Strategic Objectives (Density vs. Punch)
A common mistake in music production is applying parallel processing without a clear understanding of the sonic goal. This technique can serve two distinct functions, depending entirely on how the attack time parameter is configured:
- The Density Objective: Designed to pull up low-level details and increase sustain. This requires an ultra-fast attack time to eliminate peaks on the parallel path, turning that channel into a dense block of sound.
- The Punch Objective: Designed to accentuate the attack and impact of a sound. This requires a slower attack time to let the initial transient through, followed by a fast release to pump up the signal tail.
If an engineer uses a slow attack time while trying to build density, the parallel path will pass loud transients through. When blended with the original track, these combined peaks can clip the output bus, causing digital distortion without ever adding the desired body or warmth.
Insufficient Signal Gain Reduction on the Parallel Path
Many engineers approach parallel processing too timidly, applying only 2 dB to 4 dB of gain reduction on the parallel channel. This gentle processing fails to create a distinct sonic contrast between the two paths.
For parallel compression to work effectively, the parallel channel must be processed aggressively. If the signal isn't heavily compressed (aiming for 10 dB to 20 dB of gain reduction), blending it back in simply increases the overall volume of the track, rather than changing its dynamic structure. The parallel path needs to be radically transformed to properly introduce density and character when mixed at a lower volume.
Managing Phase Issues and Signal Cancelation
One of the most dangerous technical pitfalls of parallel processing is the introduction of phase anomalies and comb filtering.
When an analog signal splits across two channels in a digital audio workstation, any digital plugin loaded onto the parallel path introduces a tiny amount of processing latency (measured in samples). If the DAW's internal plugin delay compensation (PDC) fails to perfectly realign the two tracks, they will arrive at the master summing bus slightly out of step.
Even a tiny delay of 5 to 10 samples can cause severe phase cancellation. This alters the frequency response of the audio, causing a noticeable loss of low-end punch, a thin midrange, and a hollow acoustic character.
To prevent these phase issues, engineers should perform regular phase inversion checks:
- Step 1: Invert the polarity (180 degree phase switch) on the parallel return channel while playing both tracks at identical volume levels.
- Step 2: Listen for maximum cancellation. If the signal completely disappears or drops significantly in volume, the two paths are perfectly aligned.
- Step 3: Flip the polarity back to normal to ensure constructive, punchy summation.
- Step 4: If the low end feels thin or hollow when blended, check your DAW's delay compensation settings, or use a sample-delay plugin to manually align the tracks down to the individual sample.

Psychoacoustic Evaluation Flaws Caused by Unmatched Levels
The human auditory system is easily fooled by sheer volume. A fundamental rule of psychoacoustics is that the brain naturally perceives louder audio as sounding better, richer, and clearer, regardless of any actual tonal improvement.
When an engineer blends a parallel track into a dry mix, the overall volume inevitably increases. This volume boost can trick the engineer into thinking the compression settings are perfect, when in reality, they may just be cluttering the mix.
To make an objective judgment, you must perform accurate level matching:
- Step 1: Route both the dry track and the parallel return track to a common stereo subgroup bus.
- Step 2: Use a loudness meter (measuring LUFS or RMS) to check the combined volume level.
- Step 3: Lower the overall output of the subgroup until its volume matches the bypassed, dry-only signal exactly.
- Step 4: Toggle the parallel track on and off at this matched volume. This allows you to clearly hear whether the parallel compression is genuinely adding useful density, warmth, and detail, or if it is simply making things louder.
Unintentional Reinforcement of Undesirable Frequencies
When you apply extreme compression to a signal, you amplify every single detail within that audio path, including unwanted frequencies and background noise.
For instance, heavily compressing a drum room microphone path doesn't just bring out the energy of the room; it can also overemphasize harsh, brittle cymbal bleed (around 4 kHz to 8 kHz) or muddy low-end buildup (around 200 Hz to 400 Hz). On a vocal track, heavy parallel compression can unsafely boost low-frequency room rumble, mouth clicks, and harsh sibilance (sounds).
To fix this, introduce dedicated equalization (EQ) directly onto the parallel processing path:
- Pre-Compression EQ: Insert an EQ plugin right before the compressor on the parallel channel. Use a high-pass filter to roll off unnecessary low end (e.g., cutting below 100 Hz on a vocal) or pull down harsh frequencies with a wide bell curve. This prevents the compressor from reacting to frequencies you don't want to reinforce.
- Post-Compression EQ: Insert an EQ after the compressor to shape the final tone of the parallel blend. For example, you can roll off the high end above 10 kHz to keep cymbals from sounding brittle, or boost the low-mid frequencies to add targeted warmth and body to the mix.
Alteration of the Musical Groove and Envelope Shape
Every musical performance has an underlying rhythm and groove determined by its natural dynamic envelope. If a compressor's release time is set incorrectly on a parallel bus, it can alter or ruin that original feel.
If the release time is set too slow, the compressor remains active across multiple notes, keeping the parallel channel continuously turned down. This defeats the purpose of the parallel path, as it fails to lift the quiet spaces between notes.
Conversely, if the release time is set too fast, the audio can snap back violently, causing unnatural pumping artifacts that clash with the song's tempo. Sound engineers must carefully tune the release control so the compressor's gain recovery syncs naturally with the music's tempo, ensuring the parallel enhancement flows with the rhythm rather than fighting against it.
Genre-Specific Application Vectors
Electronic Dance Music and Hip-Hop Topologies
In electronic dance music (EDM) and hip-hop production, low-end punch and consistent track energy are critical.
Maximizing the Impact of 808 Basslines and Synth Leads
Electronic kick drums and 808 basslines require massive sub-bass weight without becoming a muddy mess that overloads the mix. To optimize these elements, route the bass track to a parallel auxiliary bus loaded with a fast VCA or digital compressor, followed by a harmonic saturation plugin.
Set the compressor to lock the sustain portion of the bass into a flat, solid block of sound, while the saturation plugin adds upper-frequency harmonics. When you blend this saturated parallel track back in, it provides the low-mid warmth and definition needed to help the sub-bass cut through clearly on smaller consumer playback devices, like smartphones or laptop speakers.
For EDM synth leads and wide pads, use a parallel compression bus with a medium attack and a fast release. This configuration emphasizes the pumping motion of the music's tempo, making synth chords sound massive and wide during drops without drowning out the lead vocal or principal elements.
Acoustic, Jazz, and Orchestral Implementations
For acoustic styles like jazz, folk, and classical music, preserving natural performance dynamics and realism is paramount. In these genres, standard inline compression can quickly make a mix sound unnatural and claustrophobic.
Transparent Dynamics Control for Natural Instrumentation
Parallel compression is an excellent tool for managing acoustic arrangements transparently. For a jazz ensemble, route the overhead drum microphones, double bass, and acoustic piano to a shared parallel auxiliary bus. Use a clean, transparent Vari-Mu or optical compressor, setting it for a minimal 2 dB to 3 dB of gentle gain reduction with a slow attack time.
This subtle parallel blend lifts the quiet details of the arrangement—such as the delicate scraping of a jazz brush on a snare, the rich resonance of the double bass body, and the natural decay of the recording room. This approach controls the dynamic range and glues the acoustic elements together beautifully, all while leaving the main performance dynamics completely untouched.
Frequently Asked Questions
What makes parallel compression different from standard downward compression?
Standard downward compression attenuates signal peaks that exceed a specified threshold, working from the top down to reduce the loud parts of a performance. Parallel compression blends an unprocessed dry track with a heavily compressed duplicate. This works from the bottom up, raising the volume of the quietest details while leaving the natural, punchy transients of the original track completely unaffected.
Should my parallel compression sends be configured as pre-fader or post-fader?
For most standard mixing situations, sends should be configured as post-fader. This ensures that when you adjust the main track fader during a mix, the signal level feeding the parallel bus changes proportionally, keeping your parallel blend perfectly balanced.
Pre-fader sends are typically reserved for specialized creative effects, where you want the parallel compressed sound to remain constant even if you turn the main dry channel completely down.
Why is it important to use aggressive settings on a parallel compression track?
If you apply gentle compression to a parallel track, it will sound almost identical to the original dry track. Blending it in will simply make the instrument louder, rather than changing its dynamic structure.
The parallel track needs to be processed aggressively—using high ratios and heavy gain reduction (10 dB to 20 dB)—to create a dense, highly sustained sound character that truly adds warmth, depth, and presence when mixed subtly beneath the original track.
Can I use parallel compression during the final mastering stage?
Yes, parallel compression is a highly effective tool in mastering audio. It allows you to glue the final mix together and boost its perceived average loudness without destroying the song's natural transient punch.
For mastering, use very gentle settings: a low compression ratio (1.5:1 or 2:1), a slow attack time to protect transients, and modest gain reduction.