Sidechain Compression: The Ultimate Guide to Audio Dynamic Manipulation
Dynamic range control is a cornerstone of professional sound engineering. Among the various audio mixing techniques available to modern producers, sidechain compression stands out as both an essential utility for clarity and a powerful engine for creative sound design. This comprehensive guide details the technical mechanics, historical evolution, practical routing protocols, and advanced applications of this indispensable audio processing operation.
Key Takeaways
- Sidechain compression lets one sound control the volume movement of another, helping important elements like kicks, bass, and vocals stay clear in a busy mix.
- The most common use is kick-and-bass separation, where the bass briefly ducks when the kick hits to prevent low-end masking and muddiness.
- Threshold, ratio, attack, and release shape how obvious or transparent the sidechain effect feels, from subtle mix cleanup to heavy rhythmic pumping.
- Dynamic EQ, multiband compression, and volume-shaping tools can give more precise control than traditional wideband compression when only certain frequencies need space.
- ACE Studio can support sidechain workflows by helping producers create cleaner stems, stronger vocal or instrument layers, and custom ghost triggers before mixing.
Fundamentals of Sidechain Compression
To master sidechain compression, one must first understand how a standard compressor operates. In a traditional dynamic range compression setup, a compressor analyzes the incoming signal of the track it is placed on. When that signal exceeds a user-defined threshold, the compressor applies gain reduction to that exact same signal based on a set ratio, attack time, and release time. The audio driving the detection circuit and the audio being processed are identical.
Defining Sidechain Compression in Audio Processing
Sidechain compression alters this fundamental topology. In a sidechain configuration, the compressor splits its internal architecture into two distinct paths: the signal processing path and the sidechain control path. The signal processing path handles the target audio that will undergo attenuation, while the sidechain control path accepts an entirely separate, external audio signal to dictate when and how that attenuation occurs.
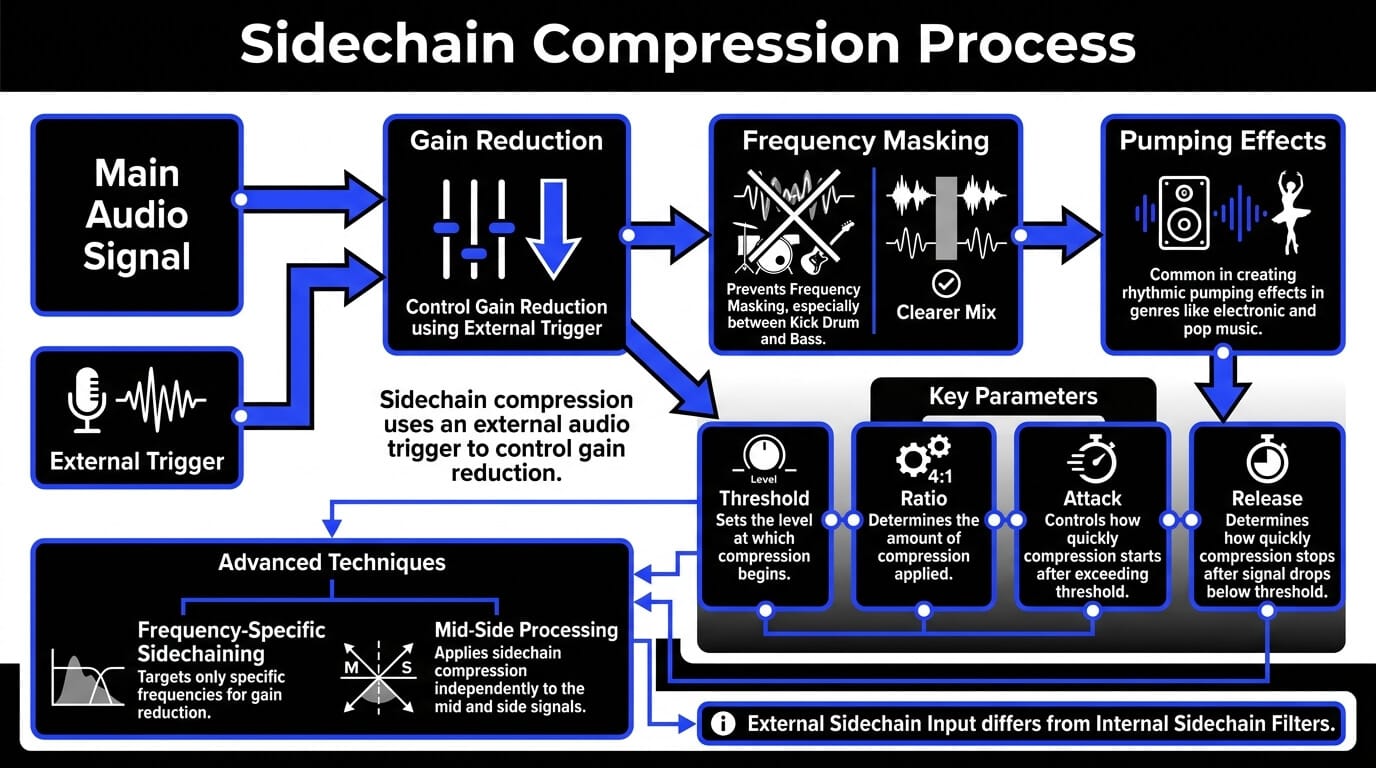
This means that the volume envelope of Track A controls the dynamic response of Track B. When Track A peaks, Track B ducks. This systematic audio signal processing operation allows sound engineers to establish an automated, reactive hierarchy within a mix, ensuring that priority elements remain prominent without requiring tedious volume automation pass after pass.
Understanding the Sidechain Mechanism and Signal Routing
The architecture relies heavily on proper signal routing. The external audio source, frequently a percussive element with high transient energy like a kick drum, sends a duplicate of its signal via an auxiliary send or a direct bus output. This duplicate signal travels to the compressor sidechain input of the processor loaded onto the target track, such as a synth or a bass line.
The compressor detector ignores the host track entirely and listens exclusively to this incoming auxiliary signal. The moments of gain reduction match the arrival of the external trigger's acoustic energy. If the kick drum triggers the circuit, the compressor reduces the volume of the bass track exclusively during the duration of the kick drum hit. As the kick drum signal decays, the compressor releases its grip, allowing the bass to return to its original level.
Sidechain Input vs. Standard Internal Sidechain Filters
It is critical to distinguish between an external compressor sidechain input and an internal sidechain filter, as confusing the two is a frequent point of misunderstanding in sound engineering.
- External Sidechain Input: Receives a completely separate audio track from elsewhere in the mix to trigger gain reduction.
- Internal Sidechain Filter: Uses the original track's own audio but inserts a high-pass, low-pass, or band-pass filter into the detection circuit. For example, applying an internal sidechain high-pass filter at 150 Hz tells the compressor to ignore all energy below 150 Hz when calculating gain reduction, preventing a heavy sub-bass from trigger-happy over-compression. However, the track is still compressing itself based on its own mid and high-frequency energy.
Understanding this difference allows mixing engineers to choose the correct routing path for localized dynamic fixes versus inter-track separation.
Setting Up Sidechain Compression in a Mix
Configuring sidechain compression within modern digital audio workstations requires a systematic approach to signal routing and parameter calibration. While individual software interfaces vary, the underlying signal routing architecture remains identical.
Signal Routing Architecture and Configuration
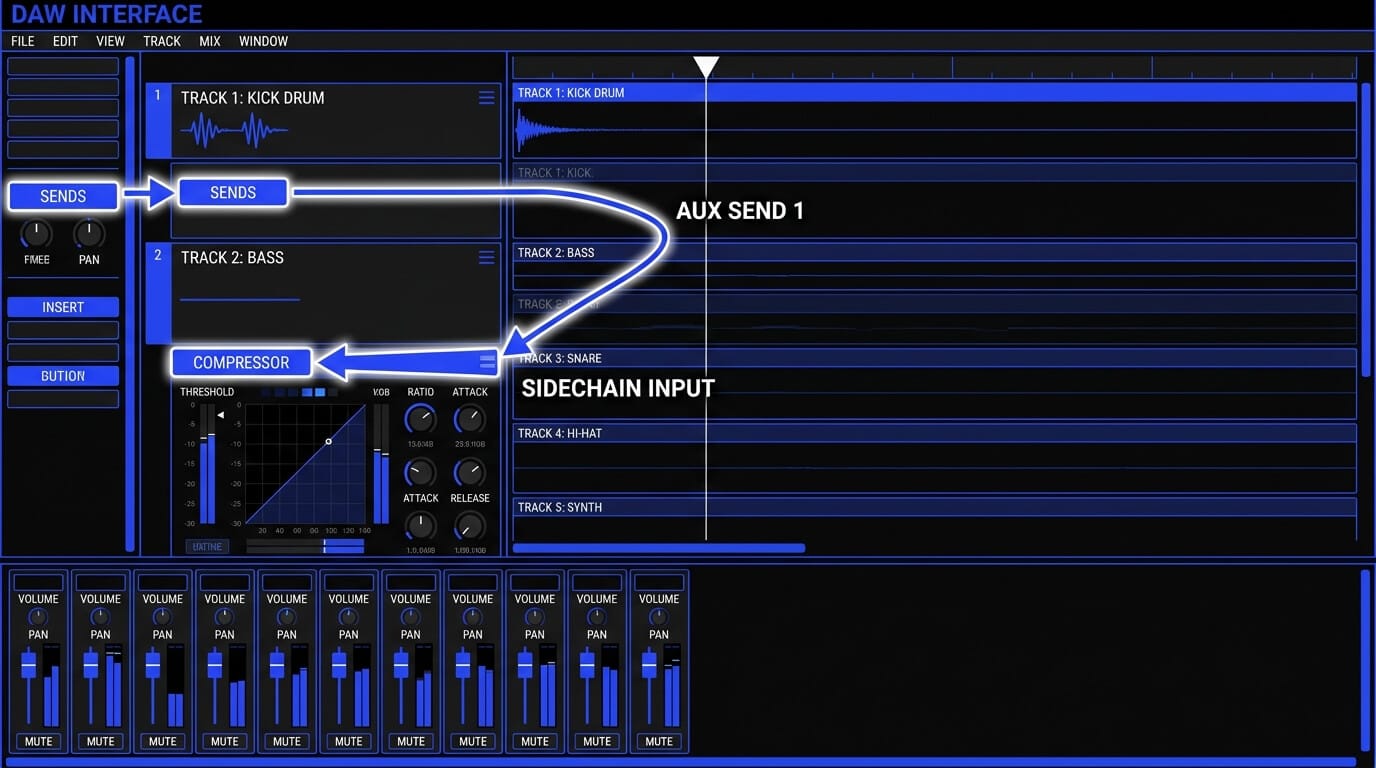
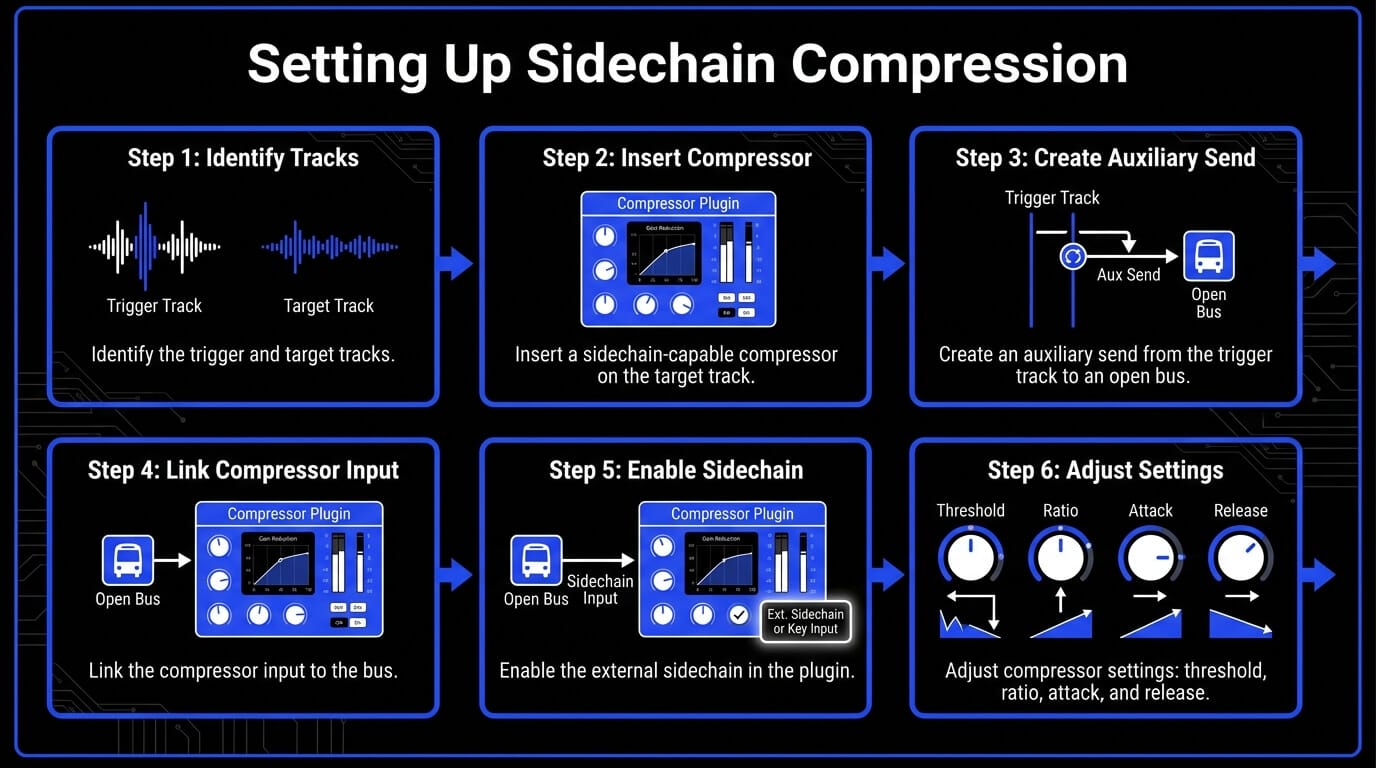
To establish an external sidechain connection in your software, follow this step-by-step routing protocol:
- Identify the Trigger and Target: Select the track that will act as the modulator (e.g., the kick drum) and the track that will serve as the carrier or target (e.g., the bass guitar).
- Insert the Compressor: Place a sidechain-capable compressor plugin directly onto the insert slot of the target track.
- Establish the Source Bus: Navigate to the trigger track. Create an auxiliary send and assign it to an open bus (e.g., Bus 1). Set the send level to unity gain (0.0 dB). For classic ducking applications, configure this send as pre-fader. This ensures that even if you alter the channel fader volume of your trigger track later in the mix process, the volume entering the compressor's control circuit remains constant.
- Link the Compressor Input: Open the compressor interface on the target track. Locate the external sidechain configuration dropdown menu (often labeled Sidechain, Key Input, or Aux Input) and select Bus 1 as the source.
- Activate and Verify: Enable the external sidechain button within the plugin interface. Play your session. You should see the compressor gain reduction meter moving in perfect synchronization with the hits of your trigger track, even if the target track is silent.
Dialing in Compressor Settings for Optical and VCA Topologies
The behavior, speed, and sonic color of your sidechain compression depend heavily on the underlying hardware emulation or digital topology of the compressor plugin you select.
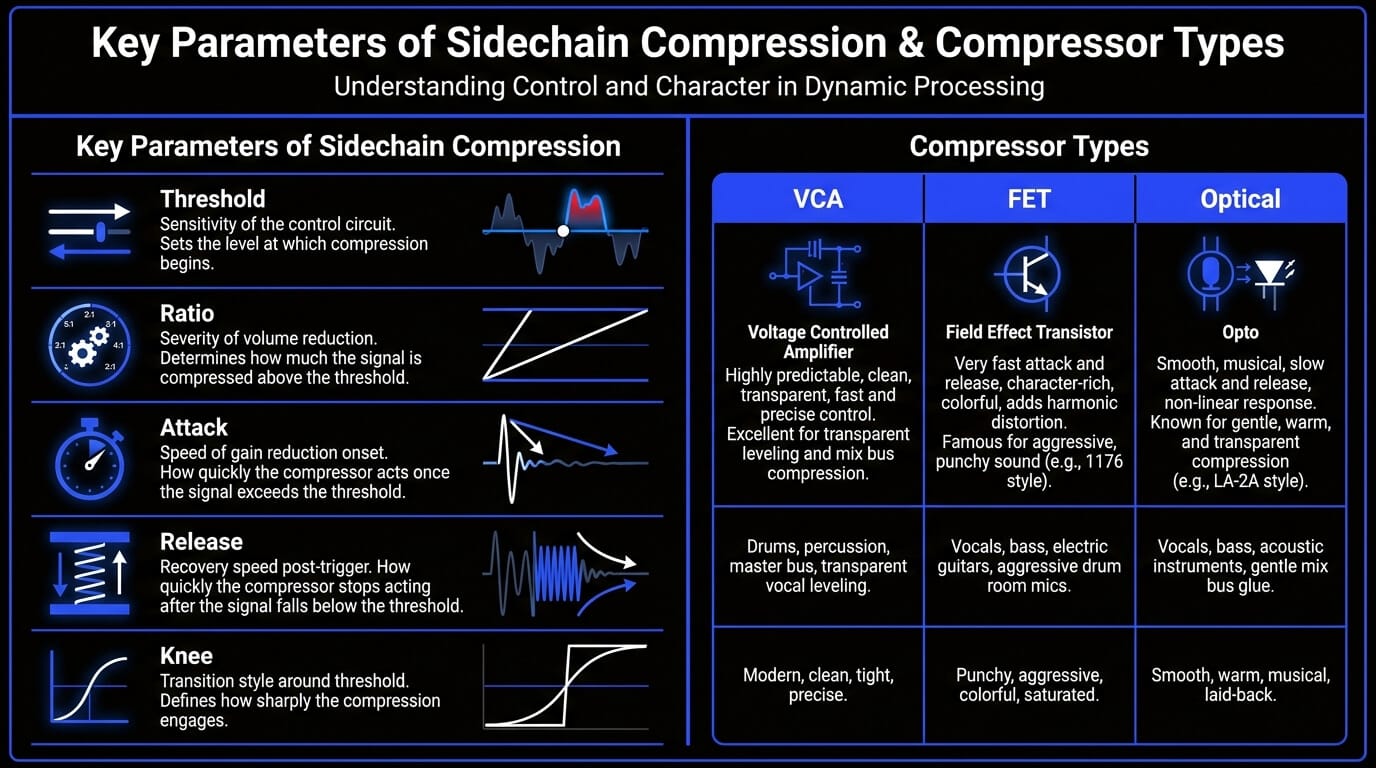
VCA (Voltage Controlled Amplifier) Compressors
VCA models, such as the classic SSL G-Master Bus Compressor or DBX 160 emulations, offer exceptionally fast response times and precise controls. They are the ideal choice for sharp percussive triggers, aggressive electronic pumping, and any scenario where you need instantaneous gain reduction the exact millisecond a transient occurs.
FET (Field Effect Transistor) Compressors
FET models, like the iconic 1176, provide lightning-fast attack times along with an aggressive harmonic distortion when driven hard. Using a FET compressor for sidechain operations adds grit and midrange bite to the target track, making it highly effective for rock, punk, or industrial genres where transparent processing is not desired.
Optical Compressors
Optical compressors, such as the LA-2A, utilize a light-dependent resistor circuit that possesses an inherent, program-dependent lag in both its attack and release curves. Because they cannot react instantaneously, optical compressors are generally poorly suited for fast kick-to-bass rhythmic sidechaining. However, their smooth, musical release curves make them excellent for transparently ducking background music pads underneath a lead vocal or voiceover.
Component Analysis: Threshold, Ratio, Attack, Release, and Knee
Once your routing is secure and your topology is chosen, you must precisely calibrate the five primary compressor settings to achieve the desired dynamic profile.
- Threshold: This parameter dictates the sensitivity of the control circuit. Lowering the threshold forces the compressor to react to lower levels of the trigger signal, resulting in deeper and longer-lasting gain reduction. Adjust the threshold until the gain reduction meter registers the exact depth of ducking required for your mix asset.
- Ratio: The ratio determines the severity of the volume reduction once the trigger crosses the threshold. A low ratio (e.g., 2:1 or 3:1) yields gentle, transparent ducking suitable for acoustic music or subtle vocal separation. A high ratio (e.g., 8:1, 10:1, or infinity:1 limiting) creates a hard, brick-wall attenuation pattern necessary for high-energy electronic pumping effects.
- Attack: This control defines how quickly the compressor clamps down on the target track once the trigger signal breaks the threshold. For immediate isolation and electronic pumping, set the attack as fast as possible (0.1 milliseconds to 1 millisecond). If you want the target track's natural transient punch to pop through briefly before the volume ducks, lengthen the attack time slightly (10 to 30 milliseconds).
- Release: The release control is arguably the most critical parameter for setting the rhythmic groove of the track. It governs how quickly the compressed signal recovers to its normal operating volume after the trigger drops back below the threshold. If your release is too fast, the audio will distort or chatter. If it is too slow, the target track will remain quiet for too long, ruining the energy of the arrangement.
- Knee: The knee dictates the transition style around the threshold point. A hard knee provides an abrupt, instantaneous switch to the specified ratio the moment the threshold is crossed, which is excellent for percussive control. A soft knee introduces a gradual, progressive application of the compression ratio as the signal approaches the threshold, facilitating a smoother, more transparent blend.
Industry Standard Plugins and Specialized Tools
Most modern DAWs include stock compressors that can handle basic sidechain compression well, so you do not always need a third-party plugin. If your goal is simple kick-and-bass ducking, vocal-triggered instrumental ducking, or reverb control, a clean stock compressor is often enough.
For more detailed control, FabFilter Pro-C 2 is one of the strongest choices because it combines transparent compression with advanced sidechain filtering and clear visual feedback. FabFilter Pro-Q 3 and Pro-MB are also useful when you only want to duck a specific frequency range instead of lowering the entire track.
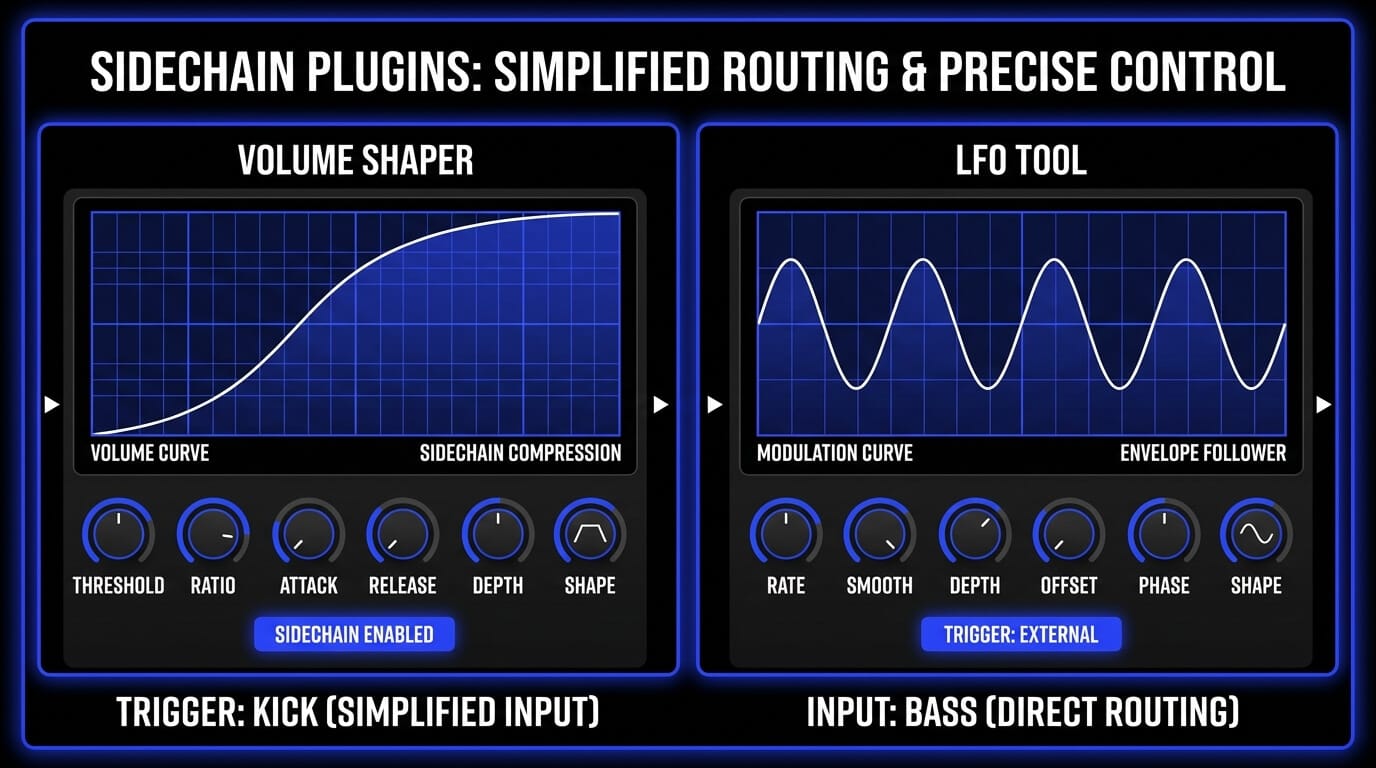
For rhythmic pumping effects, volume-shaping tools are often faster than traditional compressors. Cableguys VolumeShaper and Xfer LFO Tool let you draw precise ducking curves synced to the tempo, which makes them especially useful in EDM, pop, hip-hop, and trap production. Waves OneKnob Pumper is a simpler option when you want a quick pumping effect without detailed routing or setup.
The best tool depends on the job: use a stock or transparent compressor for natural mix separation, use dynamic EQ or multiband tools for frequency-specific ducking, and use volume shapers when you want tight, tempo-locked movement.
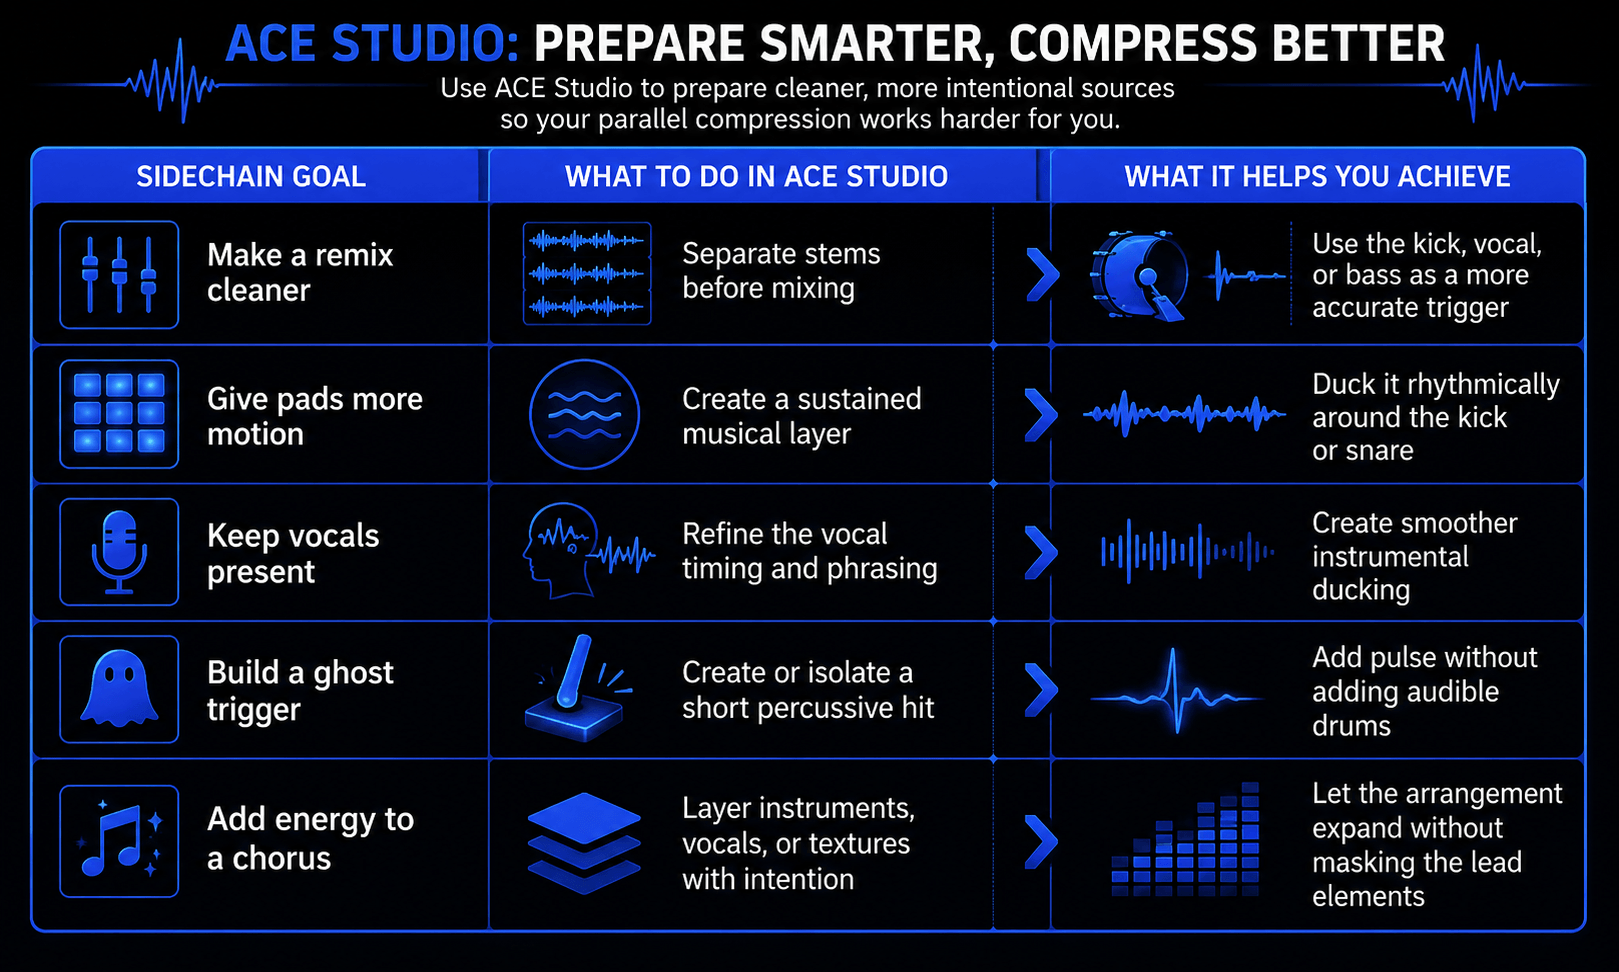
How ACE Studio Helps You Create Cleaner Sidechain Movement
Good sidechain compression does not start with the compressor. It starts with the sounds you feed into it. A sharp kick gives the bass a cleaner pocket. A steady vocal phrase creates smoother instrumental ducking. A focused pad, string layer, or backing part responds better to rhythmic movement than a crowded loop that already has too much going on.
That is where ACE Studio becomes useful before the mix gets technical. You can use it to prepare clearer triggers, cleaner targets, and more intentional musical layers before you start dialing in threshold, ratio, attack, and release.
For remixing or rebuilding an idea from a stereo bounce, Stem Splitter gives you a practical starting point. Instead of sidechaining from a full mixed track, you can separate the song into usable parts and choose the element that should actually control the movement. If the kick is the priority, use the drum stem. If the vocal needs space, use the vocal stem. If the bass is masking the low end, separate it and shape the relationship more precisely.
This makes sidechain compression feel less like guesswork. The compressor reacts to the musical element that matters, not to every sound in the mix at once.
ACE Studio is also helpful when you want to create a layer specifically for sidechain movement. A sustained string part, soft pad, brass swell, backing vocal, or rhythmic texture can be built as a separate musical layer, then ducked around the kick, snare, or lead vocal in the DAW. The point is not to add more sound for the sake of it. The point is to create a part with a clear role: something that supports the groove, fills space, and moves when the track needs room.
For vocal-heavy productions, ACE Studio gives you even more control. You can shape phrasing, pitch, timing, breaths, and expression before the vocal becomes the sidechain trigger. That matters in dense pop, EDM, hip-hop, and cinematic arrangements, where the vocal often needs to sit forward without forcing the whole instrumental down too aggressively. A cleaner vocal performance creates a cleaner sidechain response.
You can also use ACE Studio creatively for silent triggers. Create or isolate a short percussive sound, send it into the DAW, mute its output, and use it only to control compression. This gives pads, basses, textures, or background vocals a rhythmic pulse without making the trigger itself audible. It is the same ghost-kick concept producers already use, but with more freedom to design the trigger around the song instead of relying on a stock kick sample.
Used this way, ACE Studio supports the same principle behind good sidechain compression: you decide what leads, what moves, and what makes space.
The compressor still does the ducking. The producer still makes the call. ACE Studio simply gives you better material to work with before those mix decisions happen.
Technical and Practical Applications in Sound Engineering
The true power of sidechain compression unfolds when it is integrated across different elements of a multitrack mix session. Below are the primary industrial applications utilized by top sound engineering professionals.
Low-End Management: Kick and Bass Interactivity
The collision of the kick drum and the bass guitar is the single most common problem area in modern sound engineering. Both instruments possess vast amounts of energy in the low frequency spectrum (typically between 40 Hz and 120 Hz). If they strike at the exact same moment, their combined energy can easily overload the master stereo bus, causing muddy acoustics or harsh digital clipping.
By placing a fast-acting VCA compressor onto the bass track and driving its sidechain input with the kick drum, you can achieve perfect low-end separation. Set the attack time to its fastest setting to ensure that the instant the kick transient lands, the bass drops in volume by 3 to 6 decibels.
Set the release time to recover quickly so that as soon as the kick drum punch subsides, the bass fills the sonic void seamlessly. This preserves the transient power of the kick while retaining the melodic weight of the bass line.
Mid-Range Harmonization: Kick and Keyboards/Synths
In electronic dance music and synth-pop, massive wall-of-sound synthesizer pads, supersaws, and electric keyboards can easily consume the entirety of the mid-range and high-frequency spectrum. When these elements are static, they can make a mix feel flat and two-dimensional.
By routing a pre-fader auxiliary send from the kick drum into a compressor placed on the synthesizer bus, you inject a physical groove into the instruments. The synths plunge dramatically on every quarter note beat and swell gracefully back to full volume during the off-beats. This introduces essential syncopation, altering the groove and giving the listener a physical sensation of motion that drives dancefloors.
Vocal Clarity and Intelligibility: Mixing Vocals with Sidechain
The lead vocal is almost always the most critical element of a commercial mix. However, a dense arrangement consisting of wall-to-wall electric guitars, thick piano chords, and backing vocals will constantly fight the lead vocal for dominance in the crucial speech intelligibility frequency response zones (1 kHz to 4 kHz).
Instead of raising the vocal volume to piercing heights, load a transparent compressor onto the entire instrumental group or midrange instrument bus. Route the lead vocal track into the compressor sidechain input. Configure the settings for absolute subtlety: a low ratio of 1.5:1 or 2:1, a moderate attack time (15 to 30 milliseconds), and a smooth release time (100 to 200 milliseconds).
Now, whenever the vocalist sings, the instrumental backing track quietly drops by a mere 1.5 to 2.5 decibels. The moment the vocal line pauses, the instruments effortlessly expand back to full volume. The listener perceives a powerful, uncompromised instrumental mix, yet the vocal remains perfectly intelligible at all times.
Percussive Separation: Snare and Cymbals
A drum kit is a complex web of acoustic spill and frequency overlaps. Heavy cymbal crashes and energetic hi-hat patterns can quickly mask the crisp transient bite of a snare drum.
To counteract this frequency response issue, instantiate a compressor on the overhead microphone track or the dedicated stereo cymbal stem. Route the snare drum microphone channel into the compressor sidechain input. Adjust the threshold to achieve 2 to 4 decibels of fast gain reduction. Every time the snare strikes, the high-frequency cymbal wash momentarily dips out of the way, allowing the snare transient to cut through the mix with clean, pristine articulation before the cymbals rush back to fill the stereo field.
Frequency-Specific Ducking via Dynamic Equalization
Traditional wideband sidechain compression reduces the volume of the entire target track uniformly. For instance, if a vocal triggers a compressor on an acoustic guitar track, the guitar's low-frequency body, mid-range strum, and high-frequency string air are all pulled down simultaneously. This can sometimes cause an audible, unnatural pumping that alerts the listener to the technical trickery.
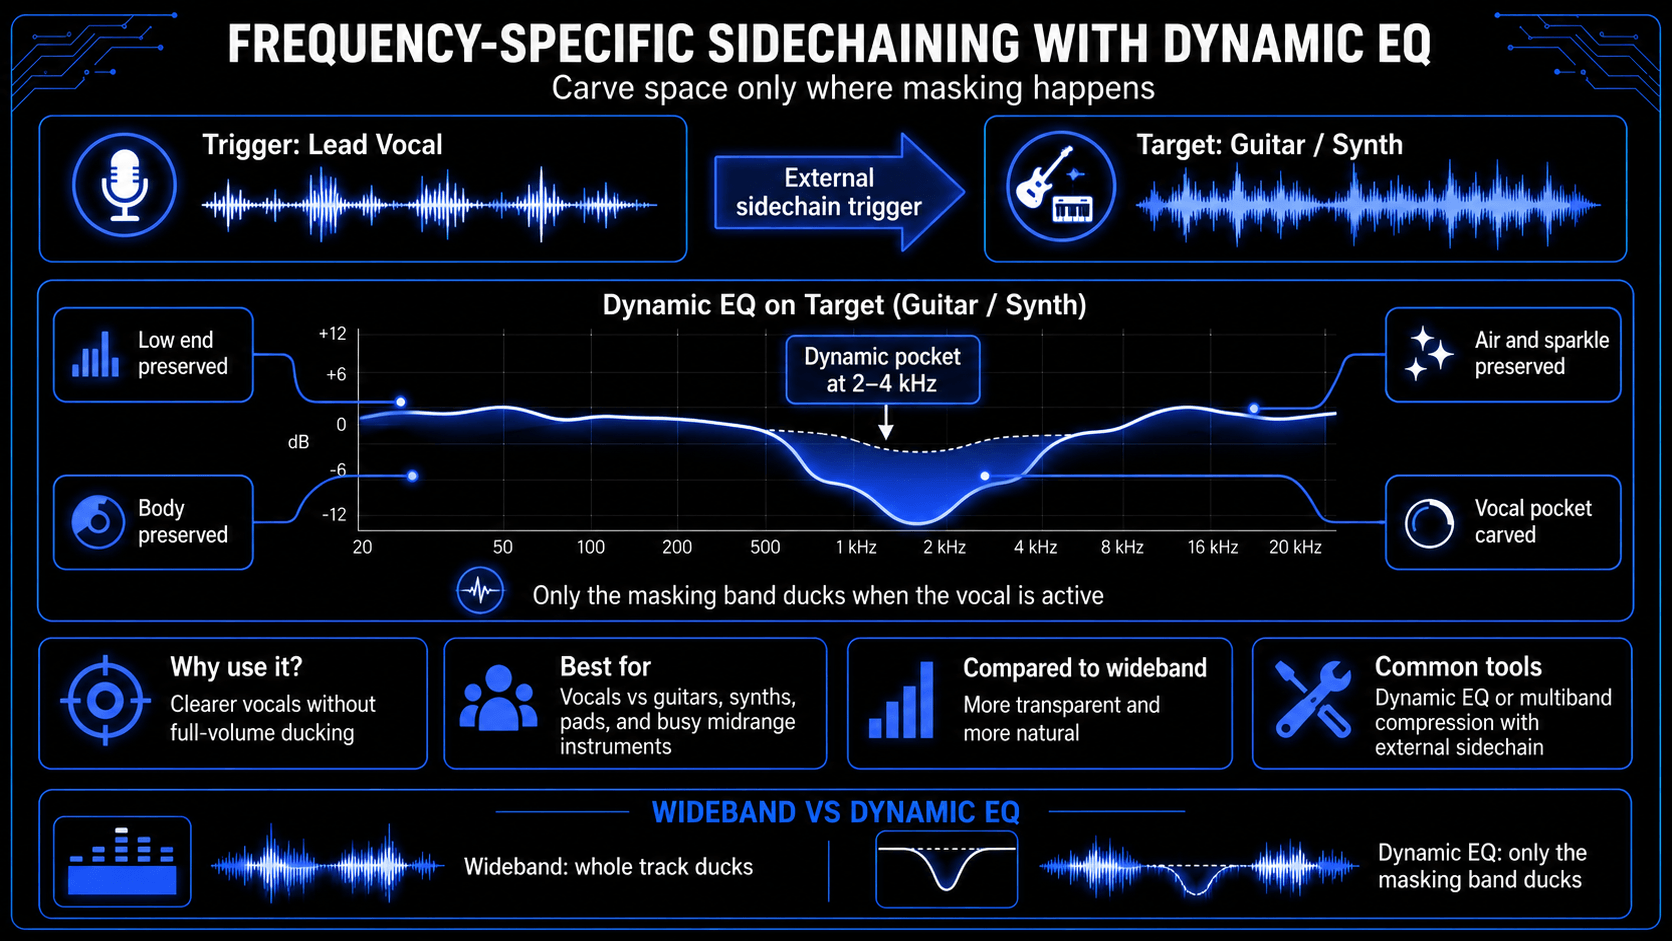
Modern sound engineering resolves this by employing frequency-specific sidechaining via dynamic equalizers or multiband compressors (such as FabFilter Pro-Q 3 or Pro-MB).
Instead of attenuating the entire guitar channel, you instruct the dynamic equalizer to listen only to the lead vocal sidechain trigger, and compress only the specific frequency band where the vocal resides (e.g., a bell filter centered at 2.5 kHz with a medium Q factor). The low-end warmth and high-end sparkle of the guitar remain completely untouched, while a clean, responsive pocket is carved out in the midrange exclusively when the vocalist sings. This provides the ultimate level of transparent audio mixing control.
Arranging and Sidechaining Different Parts of a Song
Dynamic relationships are not static; they must evolve as a musical arrangement progresses from sparse verses to dense, high-energy choruses.
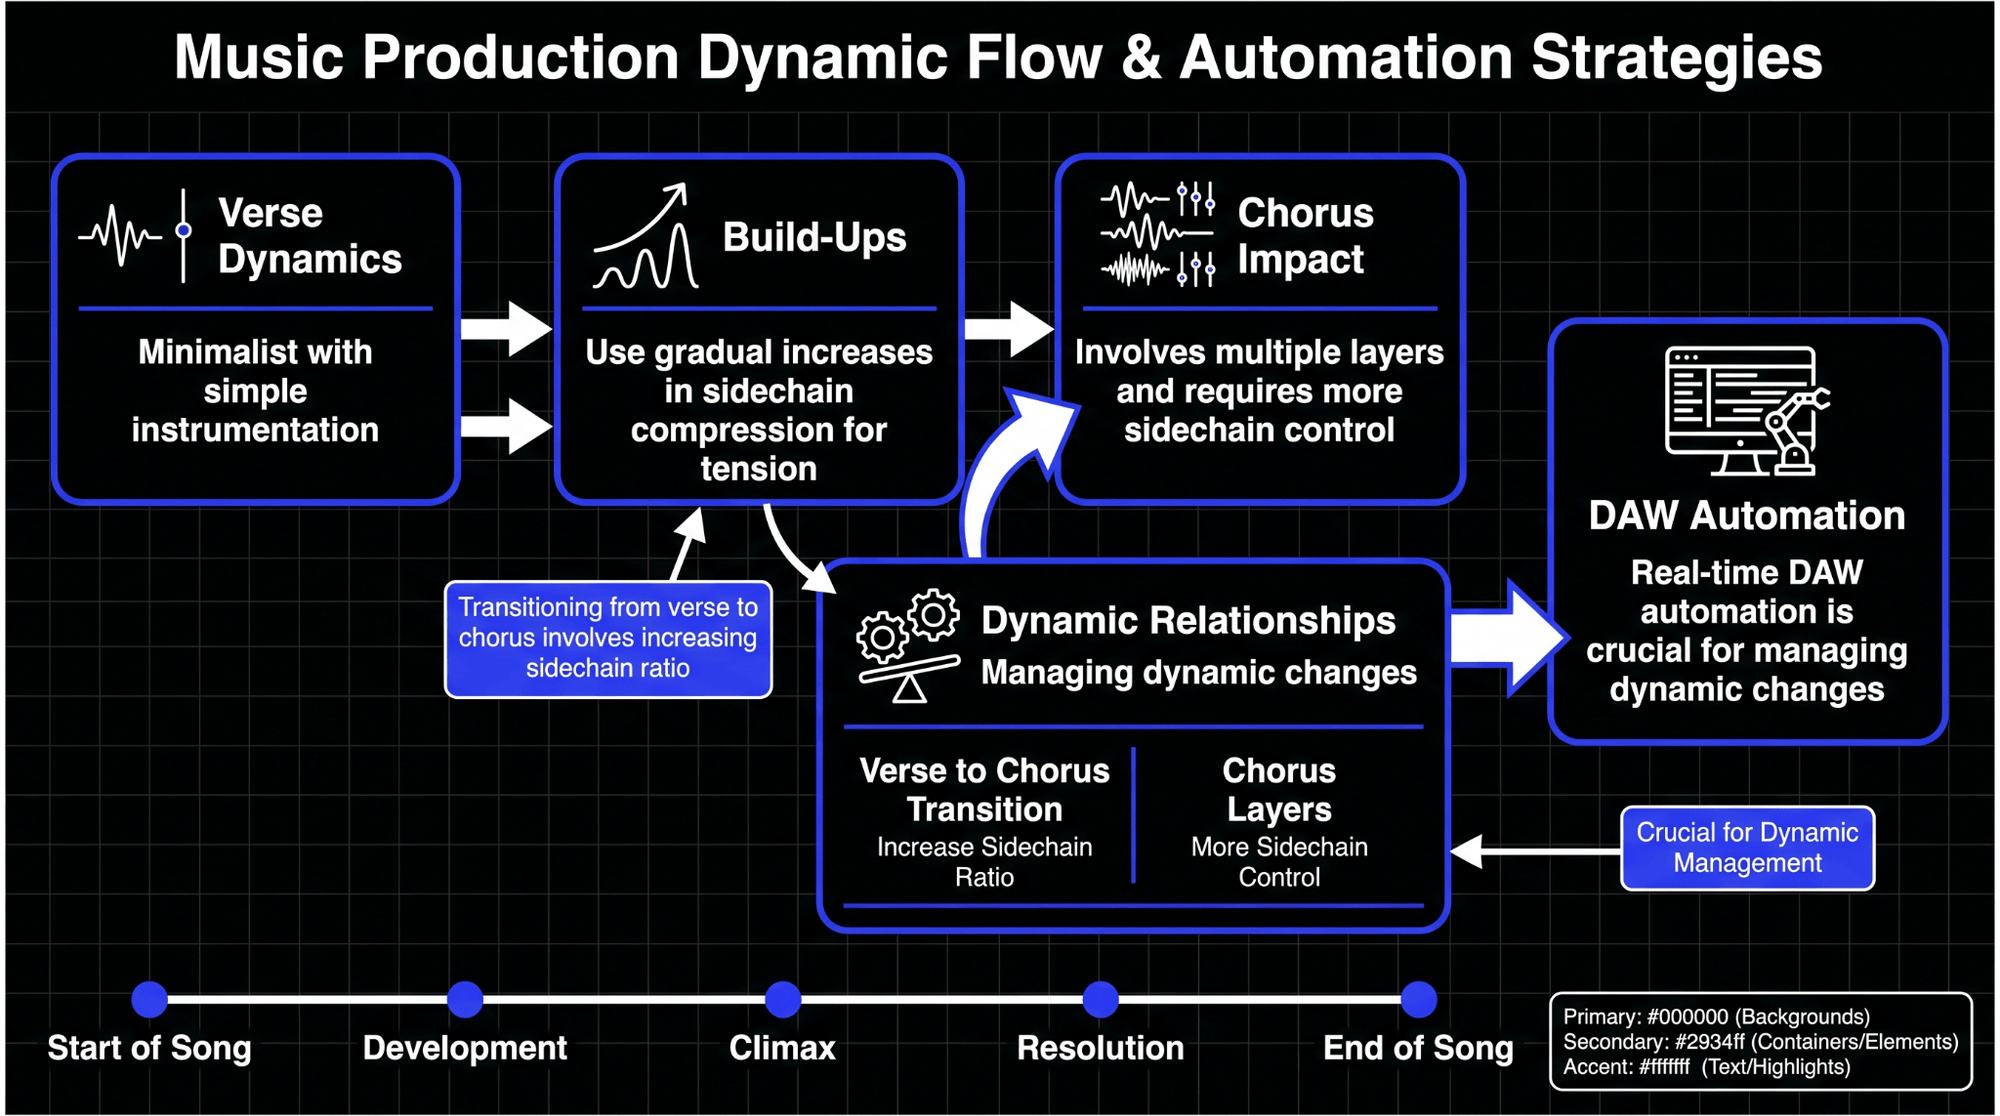
Verse Dynamics vs. Chorus Impact
During the verse of a pop or electronic song, the instrumentation is typically minimalist—perhaps containing only a vocal, a simple bass line, and a basic percussion pattern. In this space, sidechain settings should be dialed back. Because there is ample physical space in the frequency spectrum, heavy sidechaining can sound distracting and unmusical.
However, when the song transitions into a massive chorus or drop, dozens of additional tracks (layer synths, rhythm guitars, percussion loops, double-tracked vocals) fire simultaneously. To manage this sudden influx of acoustic energy, you can utilize DAW automation to adjust your sidechain parameters in real time. Increasing the ratio or lowering the threshold during the chorus forces the sidechain into a tighter, more protective mode, keeping the foundational kick and vocal clear amidst the sonic chaos.
Build-Ups and Transitions
Sidechaining can also serve as an arrangement transition effect. During a pre-chorus electronic build-up, you can automate the auxiliary send volume feeding your sidechain compressor to increase gradually over eight bars.
As the build-up reaches its climax, the backing instrumentation pumps harder and harder, creating a claustrophobic, breathing tension that perfectly primes the audience for the release of energy when the chorus drop arrives and the sidechain settles into its steady groove.
Creative Exploitation and Sound Design
While utility application keeps a mix clean, creative exploitation of the sidechain input opens up endless possibilities for innovative sound design.
Time-Based Effects: Sidechaining Reverb and Delay Tails
Huge, lush reverbs and long tape delays are excellent for creating cinematic depth, but they quickly turn a mix into a washed-out, muddy mess if they bleed into active playing or singing segments. This issue is easily solved by sidechaining the effect returns.
Create a dedicated auxiliary track for your reverb send. Place a 100% wet reverb plugin on that track, followed immediately by a compressor. Route the clean, dry lead vocal or snare drum into the compressor sidechain input.
When the vocalist sings, the compressor clamps down on the reverb return track, keeping the effects tail quiet and pristine behind the dry vocal line. The moment the vocalist finishes a line and holds a final note, the compressor releases, causing the massive reverb space to swell up dramatically to fill the silence. This technique creates an expansive sense of acoustic space without sacrificing upfront clarity.
Silent Key Triggers: The Ghost Kick Technique
The ghost trigger method is an essential arrangement trick used extensively by top pop and electronic sound designers. There are times when you want an instrument to pump with a heavy rhythmic pulse, but you do not want an audible kick drum playing underneath it during that specific section of the song (e.g., an ambient breakdown or an intro).
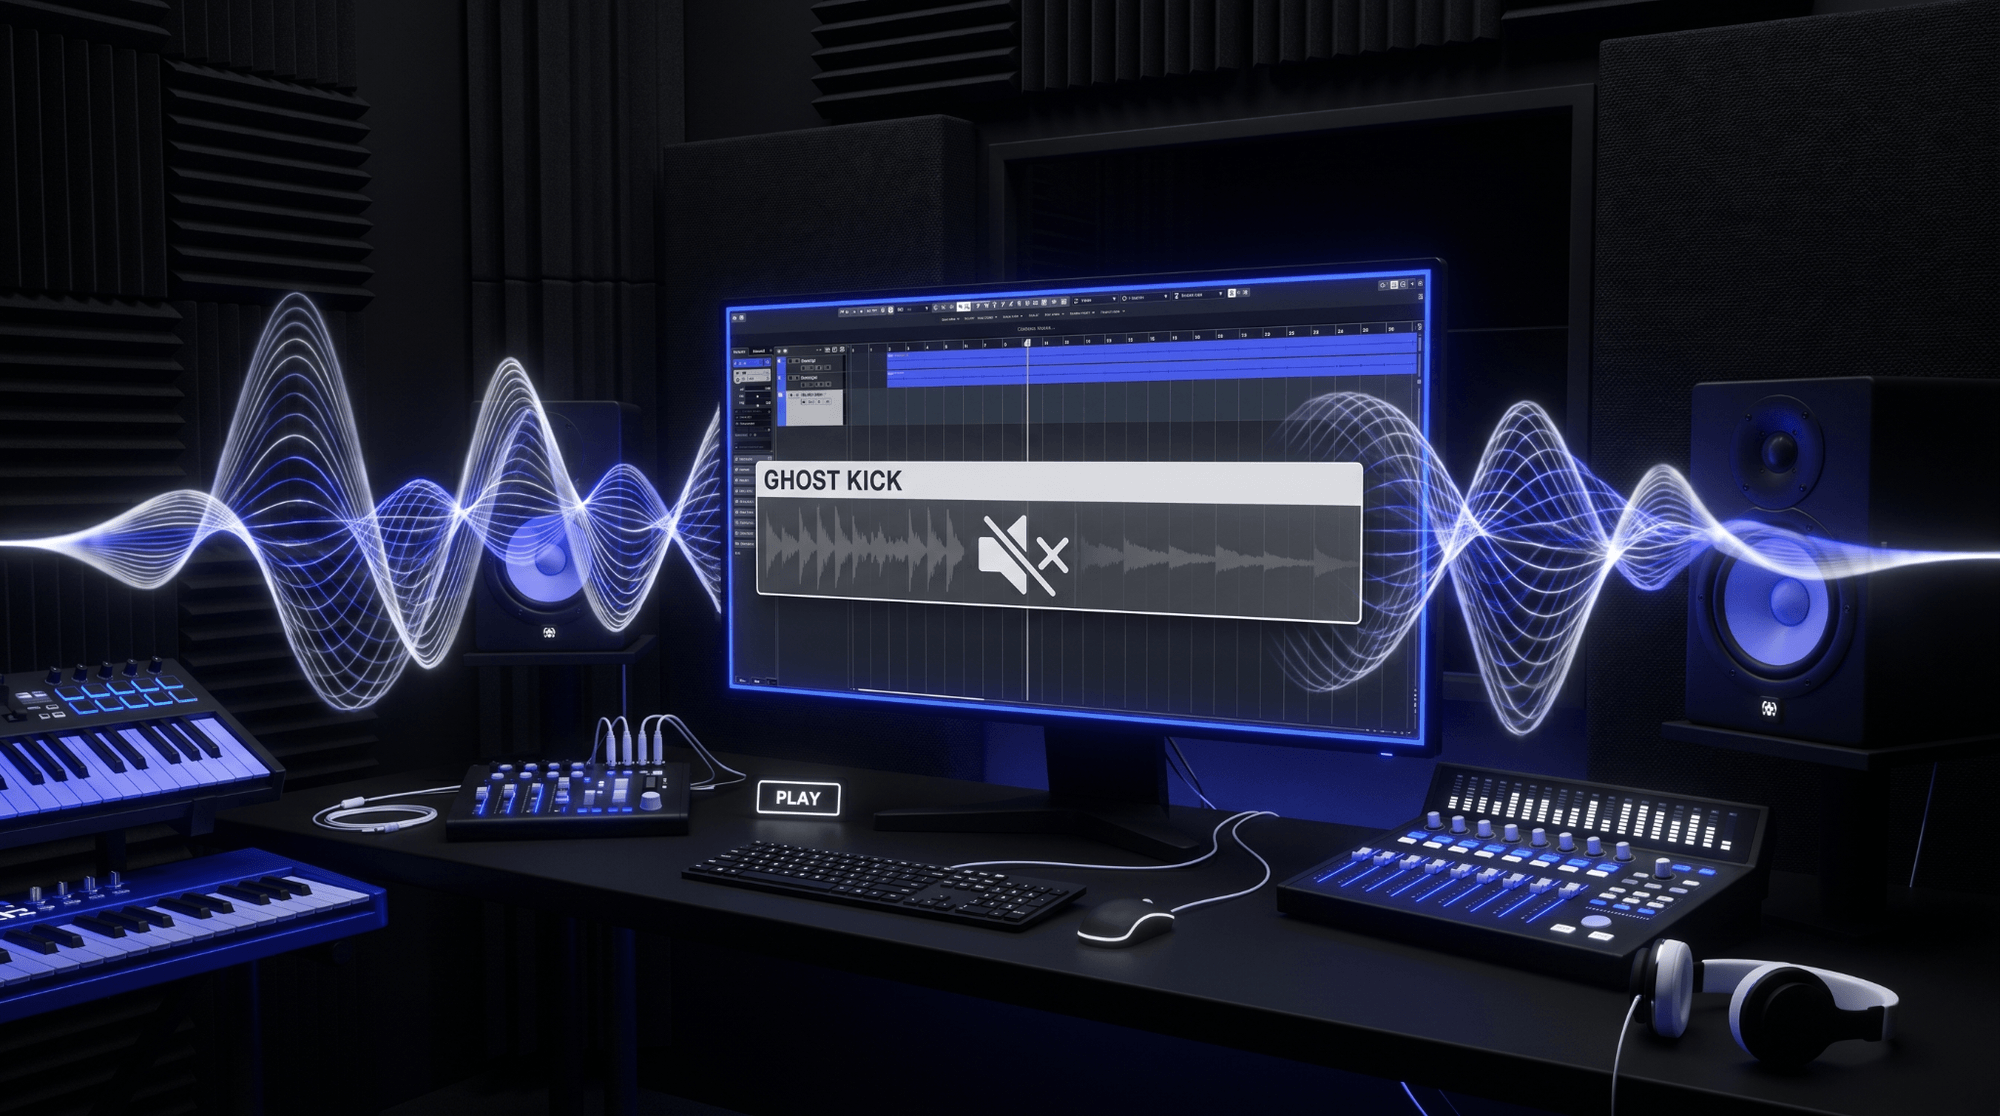
To execute this, create a duplicate kick drum track in your DAW and name it Ghost Kick. Set the main output routing of this track to No Output, or mute the channel fader directly, but leave its auxiliary send active. Route this auxiliary send into your target compressor's sidechain input.
Because the send is configured pre-fader, the compressor continues to receive the sharp percussive transient energy and ducks the target synth or pad perfectly in time, even though the audience cannot hear the actual kick drum sound. This produces an organic, floating rhythm that breathes entirely on its own.
Serial and Double Sidechain Implementations
For ultimate dynamic control, advanced engineers implement serial sidechaining—using multiple compressors in a row on a single channel, each responding to a different trigger source.
For example, a bass guitar channel might feature Compressor 1 driven by the kick drum, dialed in with a fast attack and fast release to clear out immediate transient room for the low-end thump. Immediately following that plugin, Compressor 2 is inserted, driven by the lead vocal sidechain, dialed in with a soft knee and slow release to pull the mid-range harmonics of the bass slightly away whenever the vocalist is actively performing. This layered processing creates an incredibly articulate mix where every element respects multiple priority tiers simultaneously.
Creative Texturing, Transient Shaping, and Extreme Pumping Effects
Sidechaining can also generate entirely new textures out of white noise or field recordings. By placing a gate or a compressor on a continuous, static vinyl static sample or a rain recording and sidechaining it to a rhythmic hi-hat or percussion pattern, you transform a boring background texture into a rhythmic, gating percussive layer that injects organic flavor into an electronic arrangement.
Furthermore, using sidechain inputs on specialized transient shaping tools allows you to alter the punch and sustain profiles of acoustic instruments dynamically based on external song cues, unlocking a playground for creative exploration.
Common Mistakes, Troubleshooting, and Quality Control
Even experienced engineers run into technical hurdles when configuring complex sidechain signal processing paths. Recognizing and resolving these issues is paramount for maintaining professional quality control.
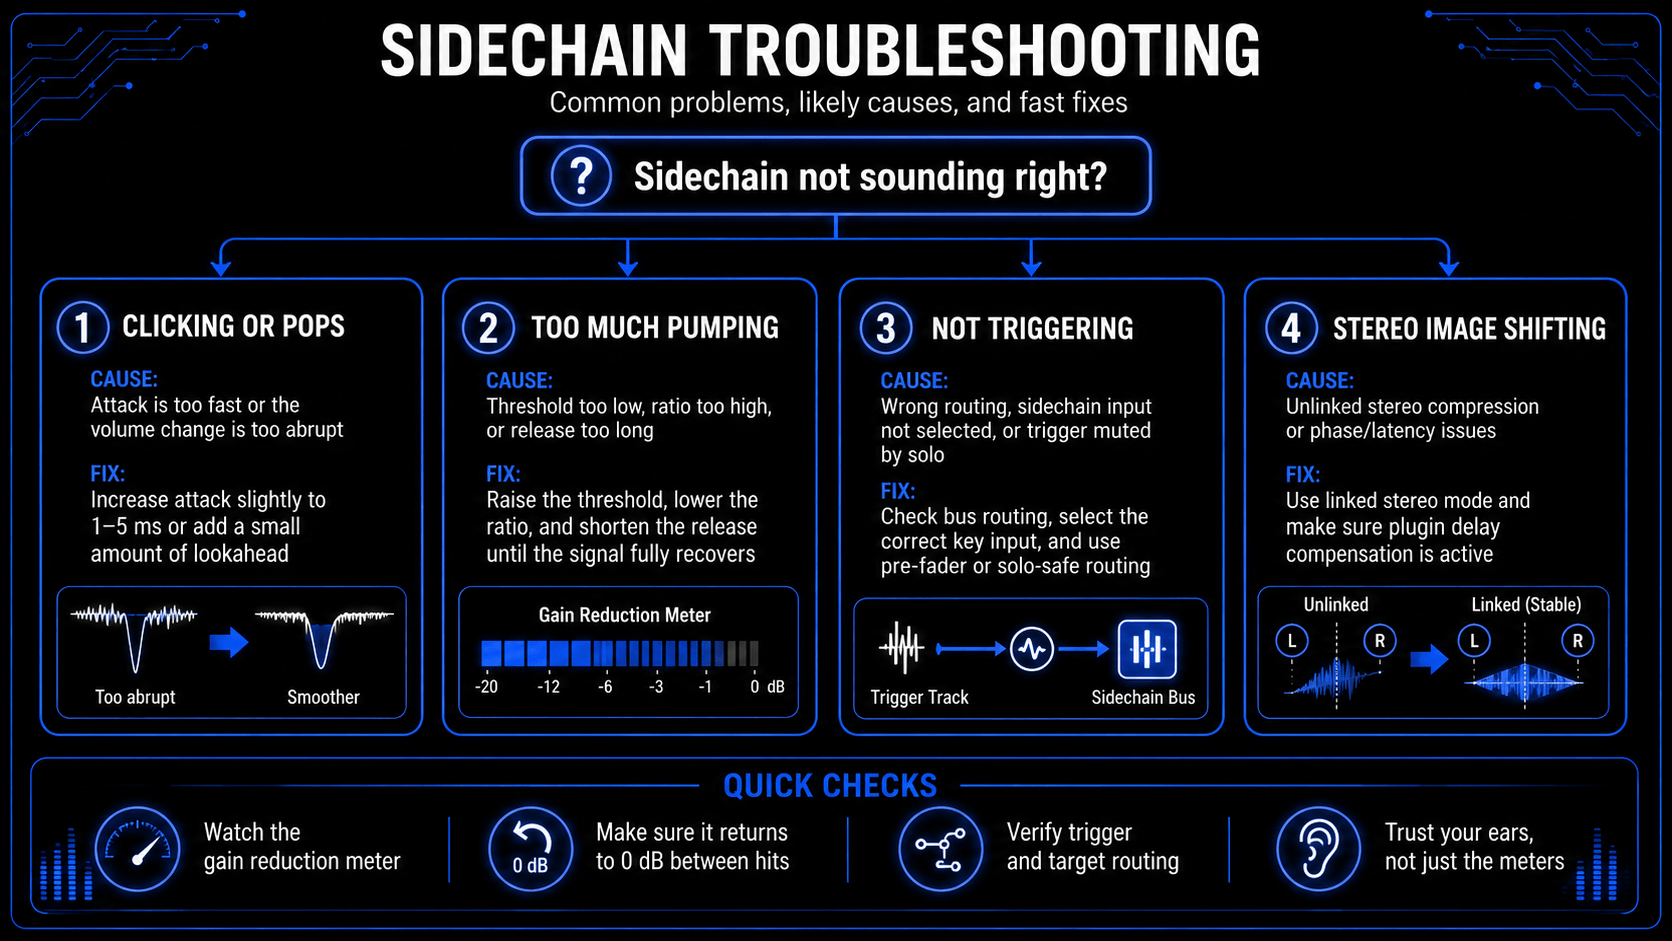
Avoiding Clicking and Artifacts
One of the most frequent problems encountered when utilizing fast digital compressors for sidechaining is an audible clicking or popping sound every time the trigger strikes. This artifact occurs because the compressor's attack time is set too fast (e.g., 0.0 milliseconds), causing the digital waveform of the target track to be sheared off mid-cycle. This instantaneous change in amplitude creates a digital square wave artifact, which the human ear perceives as a click.
The Fix: Increase the attack time slightly, moving it from 0.0 milliseconds to 1.0–5.0 milliseconds. This small window allows the target waveform to transition smoothly into gain reduction without generating digital distortion. Alternatively, introduce a minute amount of lookahead (1 to 3 milliseconds) within the compressor settings, allowing the digital processor to look into the future of the audio stream and smoothly ramp down the volume just before the trigger transient arrives.
Over-Compression and Dynamic Range Flattening
It is incredibly easy to over-indulge in sidechain effects, resulting in a mix that sounds fatiguing, unnatural, or utterly devoid of life. If your threshold is constantly pulled down too low across all instruments, your mix will lose its natural internal contrast. The entire song begins to pump uniformly, destroying the front-to-back depth and flattening out the natural performance dynamics of the musicians.
The Fix: Use your gain reduction meters to verify that the compressor is recovering fully to 0 dB between trigger hits. If the meter stays pinned at -6 dB and never returns to zero, raise your threshold or shorten your release time. Sidechain compression should function like an elastic band—stretching out of the way when required, but snapping completely back to its natural form the moment the pressure subsides.
Phase Issues and Stereo Image Degradation
When sidechaining stereo groups or wide spatial pads, aggressive dual-mono or unlinked stereo compression can severely warp your stereo image. If an external trigger contains more energy on the left channel than the right, a non-linked compressor will duck the left side of your wide synth pad harder than the right side, causing the stereo field to tilt wildly back and forth. Additionally, improper latency compensation in older DAWs or poorly coded plugins can introduce phase alignment errors when routing audio across complex auxiliary bus networks.
The Fix: Always ensure that your compressor is operating in a linked stereo mode when processing stereo assets, ensuring that equal gain reduction applies to both sides simultaneously. Furthermore, utilize modern, up-to-date DAW architectures that feature flawless, automatic plugin delay compensation (PDC) to guarantee that all parallel and sidechain signal paths remain perfectly aligned down to the single audio sample.
Advanced Techniques and Comparative Frameworks
To truly unlock elite mixing results, engineers push sidechaining into specialized structural routing realms that manipulate the stereo field and compare processing paradigms directly.
Mid-Side Sidechain Processing
Standard stereo compressors treat the left and right channels as a pair. Advanced sound engineering, however, regularly utilizes mid-side processing to achieve extreme spatial clarity. Mid-side processing separates an audio signal into two distinct components: the Mid channel (containing all information dead-center in the mono field, such as lead vocals, kick, and snare) and the Side channel (containing all wide, out-of-phase information that provides spatial width).
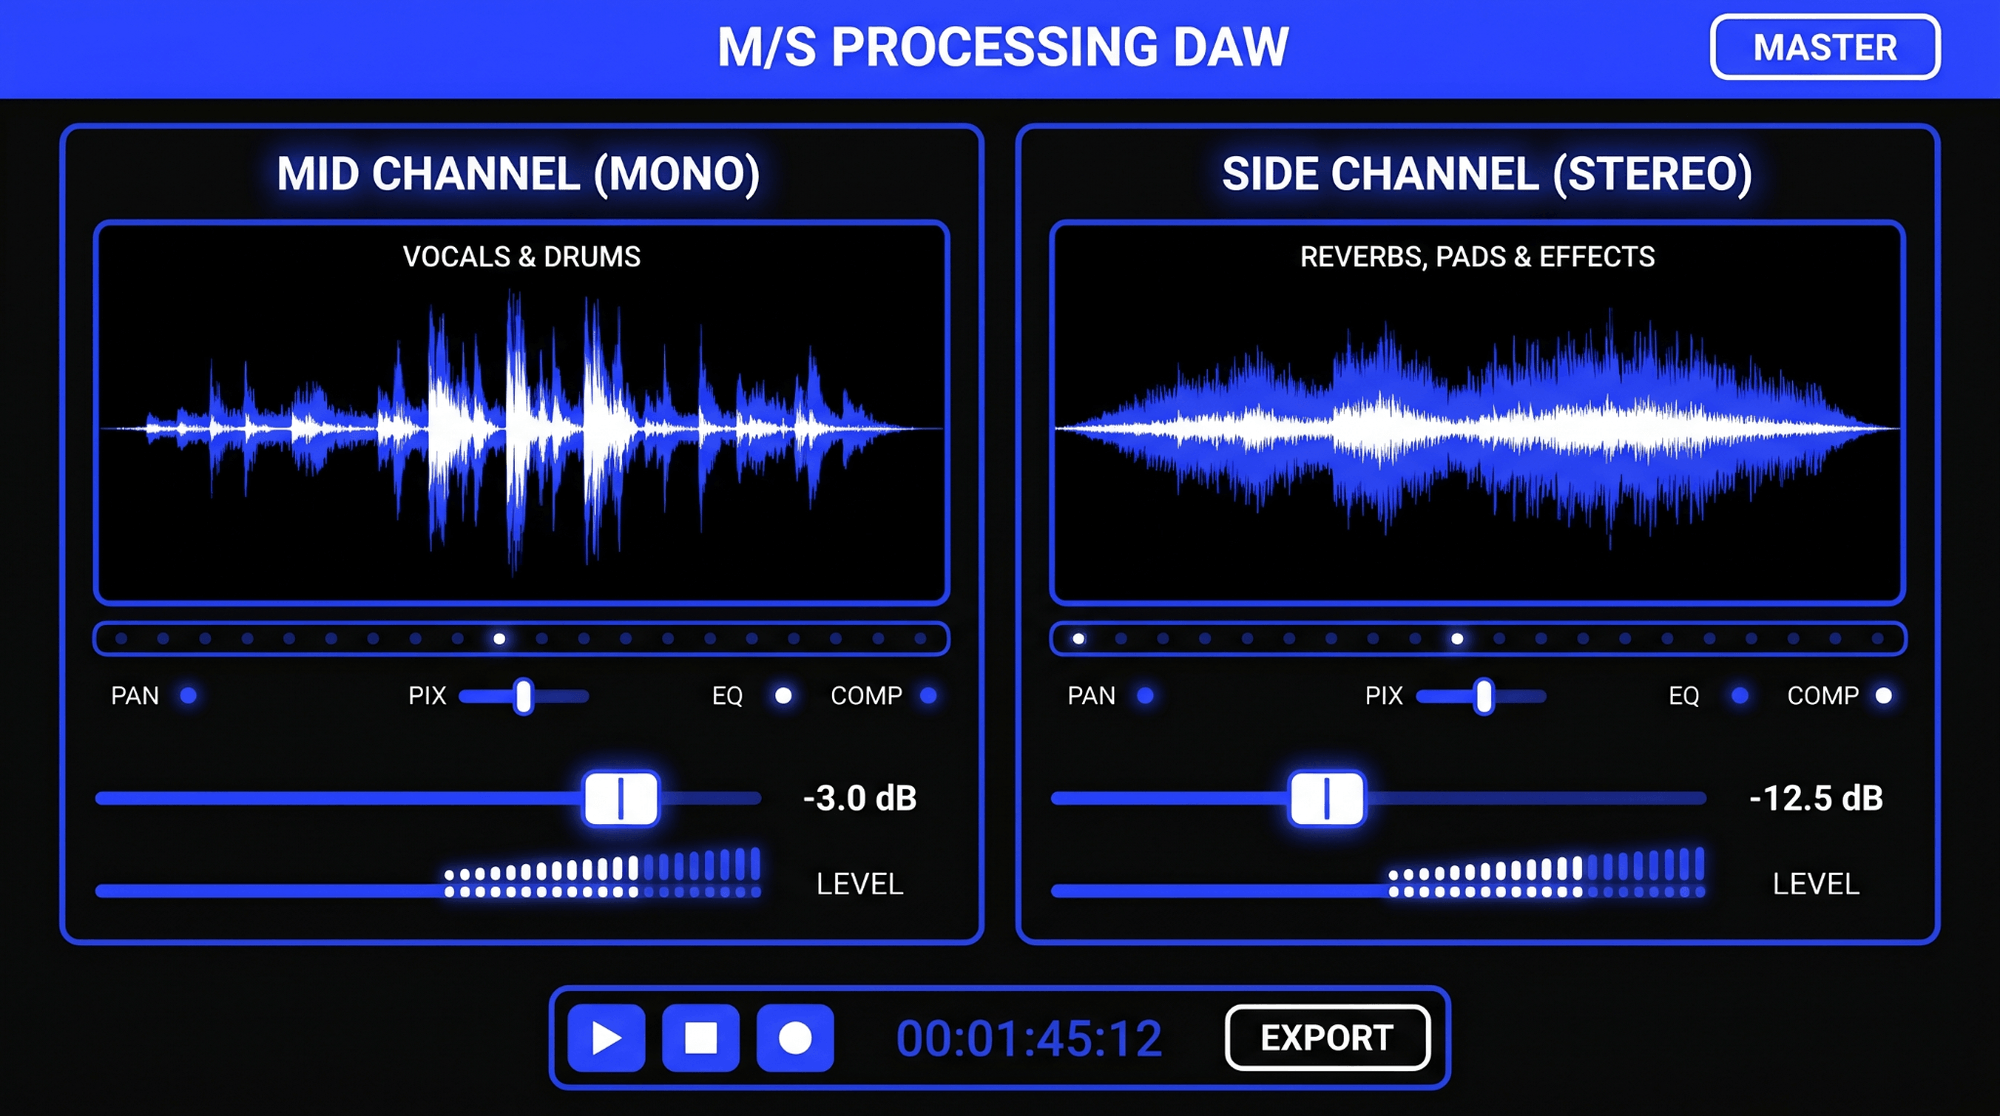
By deploying a sidechain compressor capable of mid-side decoupling onto a wide stereo synth or guitar group, you can route the kick and snare exclusively into the Mid control circuit.
Now, when the kick drum strikes, the compressor ducks only the center mono information of the guitar group, leaving the extreme wide stereo edges completely uncompressed. This keeps the low-end punch focused and centered in mono, while the instruments maintain their expansive, immersive stereo width around the sides of the listener's head.
Lookahead and Feedback vs. Feed-Forward Topologies
The internal architecture of your chosen compressor dictates how precisely it catches incoming signals.
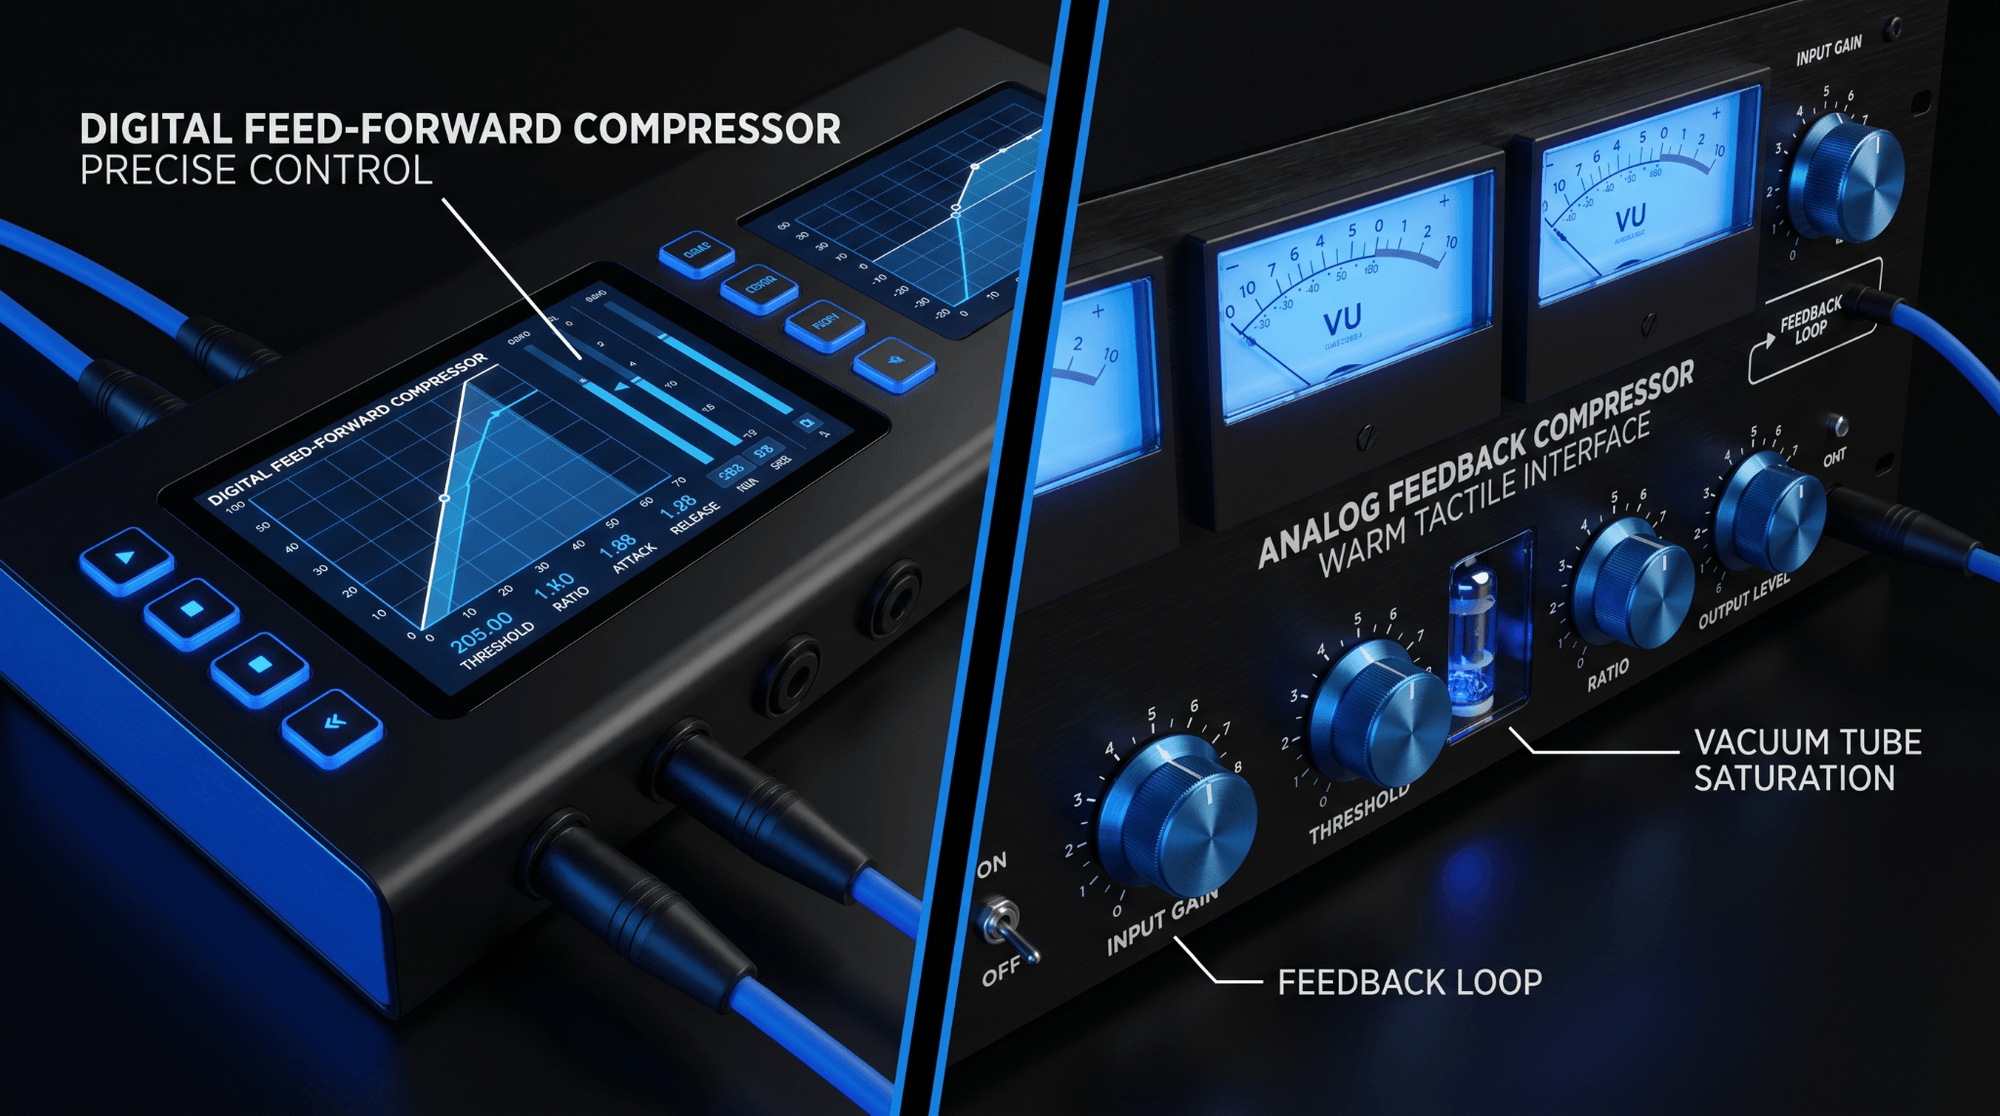
Feed-Forward Compressors
Most modern digital compressors utilize a feed-forward topology, meaning the sidechain detection circuit splits off before the gain reduction stage. This allows for hyper-precise tracking and instant response, making it the supreme choice for pristine external sidechain control.
Feedback Compressors
Vintage hardware units often utilize a feedback design, where the detection circuit splits off after the gain reduction stage. Feedback compressors cannot easily handle external sidechain routing because they are inherently reactive to their own output, resulting in a smoother, more glued character that is better suited for master bus duties rather than sharp trigger-based ducking.
By activating lookahead controls on a feed-forward digital compressor, the plugin buffers the target audio by a fraction of a millisecond. It analyzes the incoming sidechain trigger before it actually hits the playback engine, allowing the gain reduction envelopment to curve perfectly into place with zero transient overshoot.
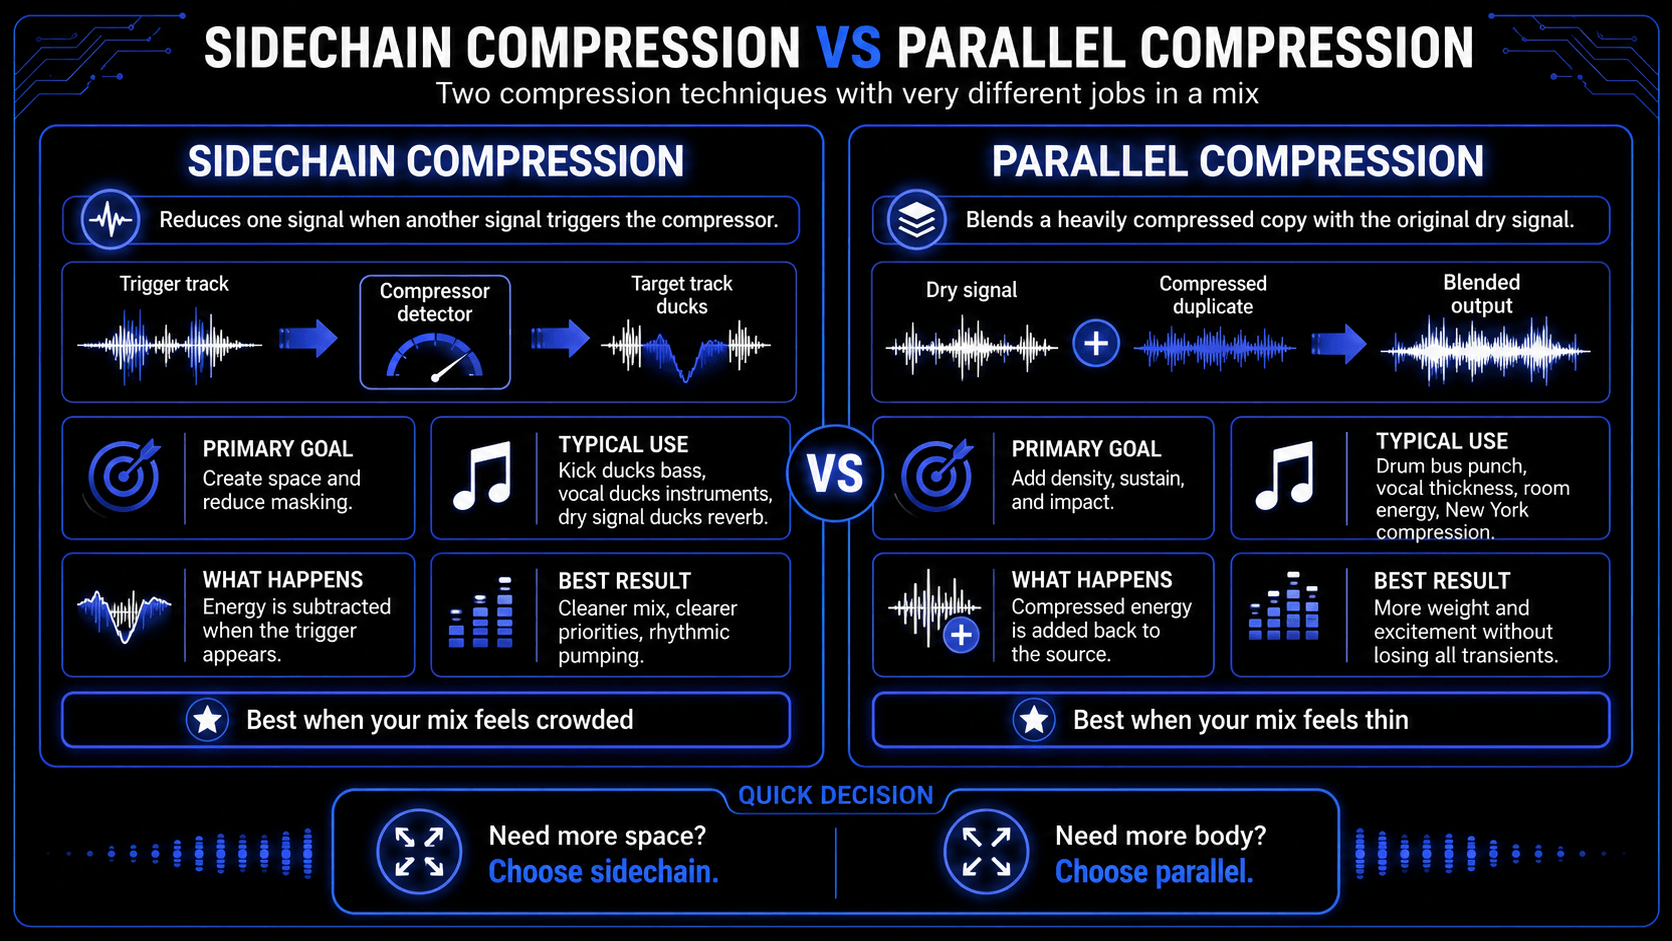
Sidechaining vs. Parallel Compression: A Comparative Feature Sheet
Producers often confuse sidechain compression with parallel compression (frequently referred to as New York compression). While both are powerful dynamic range manipulation mixing techniques, they serve completely inverted structural purposes.
As illustrated above, choose sidechain compression when your mix is too crowded and you need to subtract energy to create space. Choose parallel compression when your mix is too thin and you need to add heavily compressed, dense energy back into the soundstage without destroying the natural transients of your original transient peaks.
Frequently Asked Questions
Can I sidechain an entire instrument mix to the vocal?
Yes, this is an excellent and highly utilized commercial mixing technique. By grouping all non-vocal elements (guitars, synths, pianos, orchestra strings) to a single stereo instrument stem bus, you can place a transparent compressor on that bus and drive it with an external sidechain fed by the lead vocal. Ducking the entire instrumental field by a subtle 1 to 2 decibels whenever the vocal is active provides immense clarity across the entire arrangement.
Why is my sidechain compressor not working when I solo a track?
This is a common DAW routing trap. If you solo your target track (e.g., the bass) but the trigger track (e.g., the kick) is muted by the solo state, the compressor will receive absolutely zero audio signal into its sidechain input circuit. Consequently, no compression will occur. To resolve this, configure your trigger track's auxiliary send to pre-fader, or set the trigger channel state to solo-safe within your DAW layout so its auxiliary signal routing remains active regardless of solo configurations.
Is it better to use sidechain compression or a volume shaper plugin?
Neither is inherently superior; it entirely depends on your required workflow and stylistic goals. Volume shaping utilities offer immaculate, mathematical precision and artifact-free operation, making them the gold standard for high-energy electronic dance music where the kick pattern is absolute and unyielding. However, if you are mixing acoustic music, live drums, jazz, or rock where the musicians vary their tempo and dynamics naturally, a traditional sidechain compressor is mandatory because it responds organically to the actual fluctuating audio signal rather than a static timeline loop.
How many decibels of gain reduction should I aim for when sidechaining kick and bass?
For transparent acoustic genre mixing (rock, indie, folk), aim for a subtle 2 to 4 decibels of gain reduction. The goal is simply to let the kick transient pop through clearly without making the bass volume shift audibly to the average listener. For electronic dance genres, hip-hop, and trap drops, engineers regularly push gain reduction to 6, 12, or even 20 decibels to achieve that heavy, aggressive rhythmic pumping aesthetic.
Can I use a stock DAW compressor for sidechaining, or do I need third-party tools?
Stock compressors in modern DAWs are incredibly robust and fully capable of executing flawless sidechain compression operations. Third-party plugins generally offer advanced visual feedback graphs, unique analog harmonic coloration, or specialized workflow shortcuts, but the mathematical principle of gain reduction driven by an external trigger path remains identical across all software interfaces.