What is an Equalizer? A beginner’s guide to audio EQ

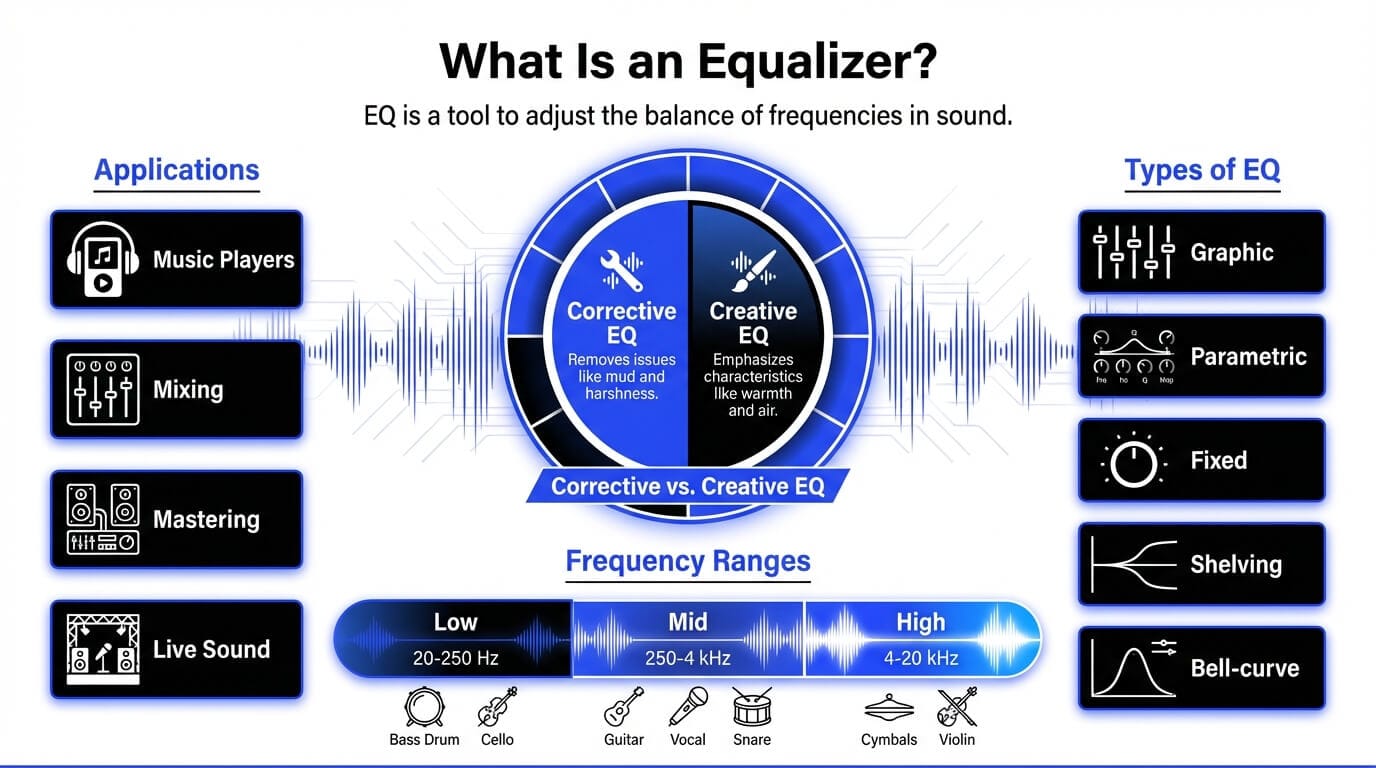
If you’ve ever opened an audio app, a DAW, or a music equalizer on your phone and seen a bunch of sliders labeled “Bass”, “Mid”, and “Treble”, you’ve already met EQ. The simplest equalizer meaning is this: it’s a tool that lets you adjust the balance of frequencies in sound.
So when people ask “what is an equalizer in audio?”, the practical answer is: EQ helps you shape tone. It can make a vocal feel clearer, a kick drum feel tighter, a guitar feel less harsh, or headphones feel more balanced for your ears.
The important part is mindset: EQ is not “make it better” magic. It’s decision-making. You’re deciding what matters in the sound, what’s getting in the way, and what needs space. Once you understand that, audio equalization stops being intimidating and starts feeling like a set of small, repeatable moves.
What is an Equalizer (EQ) in audio?
An equalizer (EQ) is a processor that boosts or cuts specific frequency ranges of an audio signal. Think of audio like light through a prism: it’s one thing, but it contains many parts. EQ is how you choose which parts come forward and which parts step back.
That’s why EQ shows up everywhere:
- In music players (to tailor listening to your headphones, speakers, or taste)
- In mixing (to create separation between instruments)
- In mastering (to refine the overall tonal balance)
- In live sound (to control feedback and intelligibility)
In audio equalization, you’re usually doing one of two jobs:
- Corrective EQ – removing problems (mud, harshness, rumble, resonances)
- Creative EQ – emphasizing character (warmth, bite, air, weight)
A key beginner lesson: EQ is relative. A “good” EQ move depends on the source, the arrangement, and the goal. A vocal that sounds perfect solo can feel thin once drums and synths enter. A bass that sounds huge alone can mask the kick in a full mix. EQ is how you solve those conflicts.
What does an equalizer actually do?
When you boost or cut frequencies, you change what your ear focuses on. Here are a few concrete examples:
- Cut low rumble (sub-bass) to clean up a vocal or guitar recording
- Cut low-mids to reduce “boxiness” or “mud”
- Boost presence to help words in a vocal translate on small speakers
- Add air for a sense of openness, breath, and clarity
A useful rule: cut first, boost second. Subtractive EQ often gets you 80% of the way without making the sound feel “processed.”
How does an equalizer work?
To understand how EQ works, it helps to think in two layers:
- The physics layer: frequencies are measured in Hertz (Hz)
- The perception layer: your ear experiences frequencies as “weight”, “warmth”, “nasal”, “clarity”, “sparkle”, and “harshness”
An equalizer targets the frequency layer, but you’re always listening for the perception result.
Most EQs work by creating one or more “bands” that you can adjust. Each band focuses on a frequency area, and you decide whether to boost (increase) or cut (decrease) that area. In modern digital EQs, you can do this with a lot of precision, which is powerful, but also easy to overdo.
A practical way to use EQ is to listen for:
- Masking (two sounds competing in the same range)
- Resonances (ringing or “whistling” frequencies)
- Build-up (too much energy collected in one range)
- Thinness (missing energy that makes a sound feel small)
Understanding the audio frequency spectrum
Humans hear roughly 20 Hz to 20 kHz, but we don’t hear it evenly. We’re especially sensitive in the midrange (where speech and many instrument harmonics live). That’s why small EQ changes around 1–4 kHz can feel huge, and why harshness often shows up there.
A good mental map:
- Low end = power, weight, rumble
- Mids = identity, tone, intelligibility
- High end = detail, brightness, air
How boosting and cutting frequencies changes sound
Boosting adds emphasis, but it also adds risk:
- Boosting can amplify noise, harshness, and resonances
- Too many boosts can make a sound feel unnatural
Cutting reduces clutter and often sounds more natural, because you’re removing what you don’t want rather than “painting over” it. In many mixes, clarity comes from subtraction.
Try this listening exercise: take a vocal and do a gentle cut around the “mud” range (often somewhere in the low-mids). Then compare that to boosting the highs. Both can create “clarity”, but one usually sounds more honest and less brittle.
EQ frequency ranges explained
Instead of memorizing numbers, learn what each range tends to feel like. Frequency ranges aren’t rules – they’re landmarks. Different voices, instruments, and recordings will shift these landmarks slightly.
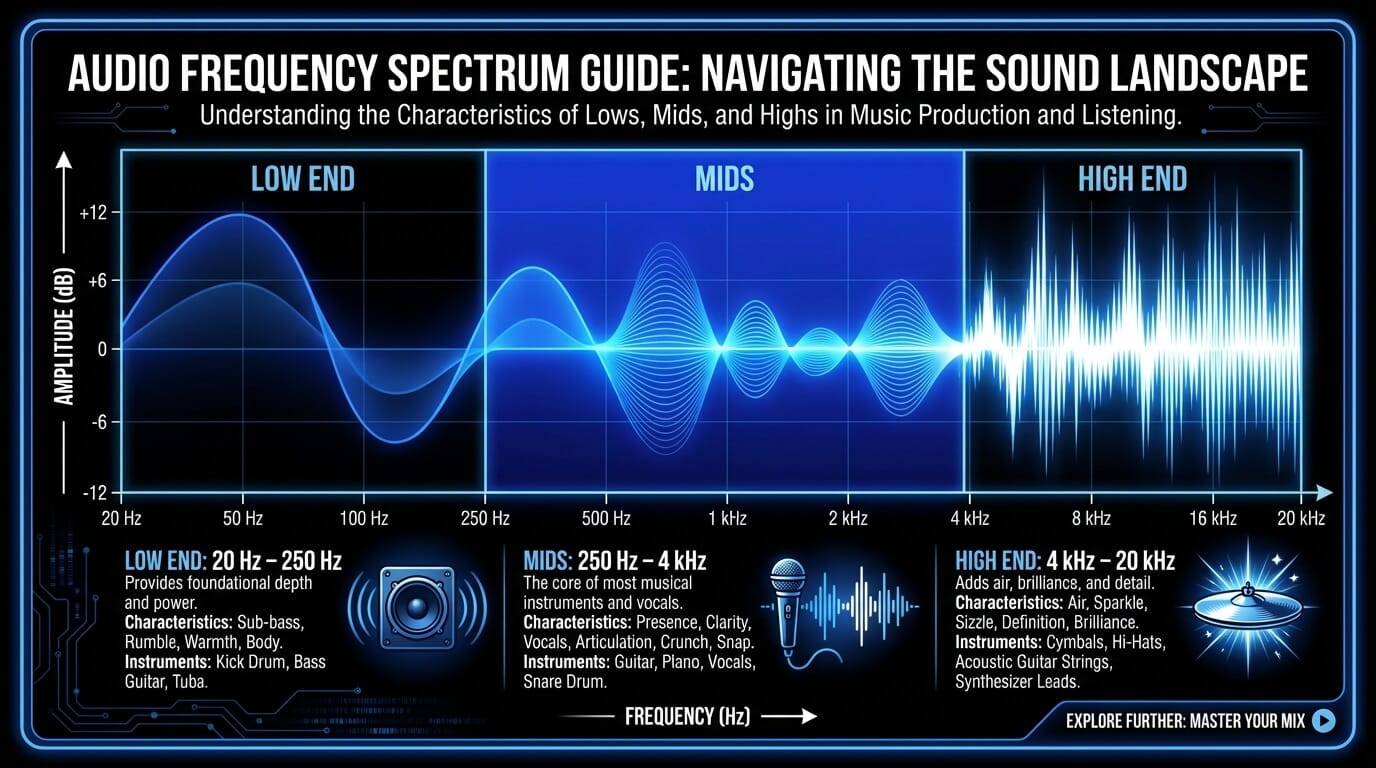
- Low frequencies (20 Hz – 250 Hz)
This range is about foundation. It’s where your kick and bass live, but it’s also where unwanted rumble hides. In mixing, low-end problems don’t just sound bad – they steal headroom and make everything harder to balance.
Common beginner win: high-pass filter non-bass elements (vocals, guitars, pads) so the bass instruments have room to breathe. You’re not “removing bass for no reason”. You’re preventing low-frequency clutter.
- Low-mid frequencies (250 Hz – 500 Hz)
This is where mixes often get “muddy”. Too much energy here can make a track feel like it’s under a blanket. But cutting too aggressively can make it thin and cheap.
A good approach is gentle: small cuts, and always in context. If your vocal is fighting guitars, a slight cut in the guitars around this range can open space without making the vocal sound hyped.
- Mid frequencies (500 Hz – 2 kHz)
This is the identity zone. Many instruments speak here. If something feels unclear, it’s often because this range is crowded or uneven.
Be careful with narrow boosts here. They can quickly sound “honky”. If you need more clarity, try cutting competing elements instead of boosting everything.
- High-mid frequencies (2 kHz – 4 kHz)
Presence lives here. This range can make vocals feel closer and more intelligible. It can also make cymbals and guitars feel aggressive.
A useful habit: when you boost presence, do it subtly and double-check at normal listening volume. The ear gets tired fast in this zone.
- High frequencies (4 kHz – 20 kHz)
This is where you get air and sheen. It’s also where hiss, harsh digital edges, and brittle over-EQ live.
If you’re chasing “clarity”, don’t automatically boost highs. Often clarity comes from removing low-mid clutter. High boosts should feel like a gentle opening of the top end, not a sharp spotlight.
Types of qualizers
There are lots of EQ designs, but most beginner workflows revolve around a few core types. If you’re wondering how many equalizers are there, the honest answer is: countless variations – but they usually fall into these buckets.
Graphic equalizers
Graphic EQs split the spectrum into fixed bands (often 10, 15, or 31), each controlled by a slider. They’re common in live sound and consumer music equalizers because they’re fast and visual.
Downside: you can’t choose the exact center frequency or bandwidth – you’re working with what’s given.
Parametric equalizers
Parametric EQs are the standard in mixing. You choose:
- Frequency (where)
- Gain (how much)
- Q (how wide or narrow)
This flexibility makes them ideal for both corrective and creative EQ.
Fixed equalizers
Some EQs are designed with fixed frequency points and curves (often inspired by analog hardware). They can be great for quick tone-shaping because the “sweet spots” are baked in.
Shelving vs bell-curve EQs
These are shapes:
- Shelf boosts or cuts everything above (high shelf) or below (low shelf) a point
- Bell boosts or cuts around a center frequency
A shelf is great for overall brightness or warmth. A bell is great for targeting specific problems or enhancing a focused character.
Quick comparison:
|
EQ type |
Best for |
Why it’s useful |
|
Graphic |
fast tone tweaks |
simple, visual |
|
Parametric |
mixing precision |
frequency + gain + Q control |
|
Fixed |
musical broad strokes |
fewer choices, faster decisions |
|
Shelf |
overall tilt |
easy brightness/warmth moves |
|
Bell |
targeted shaping |
correct or enhance specific areas |
Common EQ controls and parameters
EQ becomes less confusing when you learn the “four knobs” mindset. Most EQ moves can be described by: where, how much, how wide, and what shape.
Frequency selection
This is the “where”. If you choose the wrong area, even a small boost or cut won’t help. Train yourself to describe what you hear:
- “too boomy” (low end)
- “muddy” (low-mids)
- “nasal” (mids)
- “harsh” (high-mids)
- “dull” (highs)
That language helps you find the right area faster than staring at numbers.
Gain (boost and cut)
This is “how much”. Beginners often EQ too hard because they’re listening for an obvious change. In real mixes, EQ changes are often small. If you need a massive boost, it’s worth asking if the source sound needs improvement first.
A solid guideline:
- Use small moves (a few dB) and compare before/after often.
- If you boost, consider whether a cut somewhere else would get the same result more naturally.
Q factor (bandwidth)
Q is “how wide”. A wide Q affects a larger area and tends to sound more natural. A narrow Q targets a small area and is best for resonances or surgical cleanup.
Beginner habit to avoid: using a super narrow boost to “find” the frequency and forgetting to widen it afterward. That often creates a weird, unnatural spike.
Filters and slopes
Filters shape broad areas:
- High-pass (low-cut) removes low frequencies below a point
- Low-pass (high-cut) removes high frequencies above a point
- Notch removes a very narrow, specific problem frequency
Slope controls how steep the filter is. Steeper slopes sound more aggressive. Gentler slopes often sound more musical.
If you’re mixing vocals or instruments, high-pass filtering is one of the most useful moves you can learn – but it should be guided by listening, not habit. Don’t remove body just because you can.
How to use an equalizer effectively
EQ is easiest when you treat it like a checklist, not a guessing game. Here’s a repeatable approach that works in mixing, in live sound, and even when you’re setting a music equalizer for headphones.
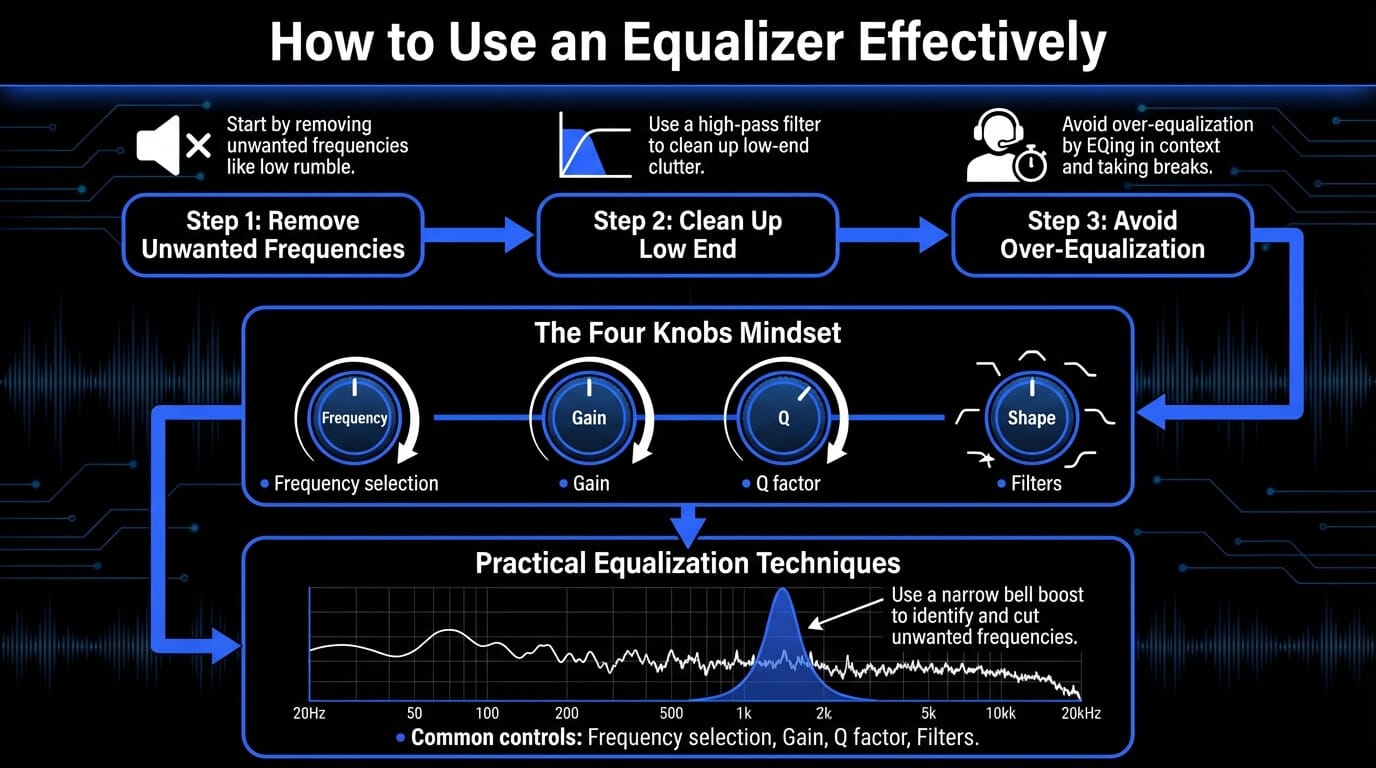
Removing unwanted frequencies
Start by removing what you don’t want:
- Low rumble that isn’t part of the instrument
- Resonances that ring out when a note hits
- Harsh spots that fatigue your ear
A practical technique:
- Use a narrow bell boost to find a nasty frequency (sweep until it jumps out)
- Turn the boost into a cut
- Widen slightly if the cut sounds too “surgical”
- Level-match and compare
The goal is not to make the sound “smaller”. It’s to remove distractions so the musical intention comes through.
Cleaning up low end and high end
Low-end cleanup is often what makes a mix feel professional. If every track has unnecessary low frequencies, the mix gets cloudy fast. Use high-pass filters strategically, especially on:
- vocals
- guitars
- synth pads
- reverb returns
High-end cleanup matters too. A gentle low-pass on overly bright elements can reduce fizz and make your top end feel smoother.
Avoiding over-equalization
Over-EQ is when you keep adjusting because you’ve lost perspective. A few habits prevent it:
- EQ in context, not solo
- Take breaks (ear fatigue is real)
- Use bypass often
- If you’re doing five EQ bands, ask if the source needs fixing
EQ should serve the performance. If your EQ makes everything “perfect” but less emotional, you probably went too far.
Practical equalizer use cases
EQ isn’t just for producers. It shows up in everyday listening and in every serious production workflow. The trick is using EQ with a clear goal.
Using an equalizer for music listening
A music equalizer helps compensate for:
- headphone tuning (some are bass-heavy, some are bright)
- room acoustics (speakers in small rooms often exaggerate lows)
- personal preference (you might prefer a warmer presentation)
A good listening EQ rarely involves extreme moves. Small changes feel more natural and translate better across songs.
Best equalizer settings for music on headphones
There’s no single “best equalizer settings for music”, because every headphone model is different. But here are safe starting curves you can try and adjust by ear:
|
Goal |
What to try |
Why it works |
|
Less boom |
small cut in bass area |
reduces mud and masking |
|
More clarity |
gentle cut in low-mids |
lifts veil without harsh highs |
|
More sparkle |
small high-shelf boost |
adds air if headphones are dull |
|
Less harshness |
small cut in 2–4 kHz zone |
reduces ear fatigue |
Tip: If you boost lows, consider lowering overall volume slightly. Big bass boosts can push your playback chain into distortion.
Using EQ in mixing and mastering
Mix EQ is about separation. You’re carving space so each element has a role.
- Cut mud from guitars so vocals sit forward
- Shape bass so kick punch is audible
- Control harshness so the mix stays listenable
Mastering EQ is more subtle. It’s about nudging the whole track’s balance, not fixing individual problems. If you’re doing heavy EQ in mastering, it often means the mix needs revision.
Equalizer tips for live sound and performance
Live EQ is often corrective:
- reduce feedback frequencies
- improve vocal intelligibility
- control boom from room acoustics
In live environments, clarity usually comes from cutting problem areas rather than boosting highs. A bright boost can increase feedback risk.
Best equalizer settings for clear voice
For voice clarity (spoken or sung), focus on intelligibility and remove clutter:
- High-pass to remove rumble
- Small low-mid cut if it’s boxy
- Gentle presence boost only if needed
And always check sibilance. If “S” sounds jump out, boosting high end won’t help – you’ll need different handling (often de-essing or a softer EQ approach).
ACE Studio: a practical way to train your EQ ears
EQ gets easier when you practice on sources you can control. That’s one underrated advantage of working inside ACE Studio: you can generate and shape parts until they behave consistently, then use those parts to learn what EQ actually does in a real mix.
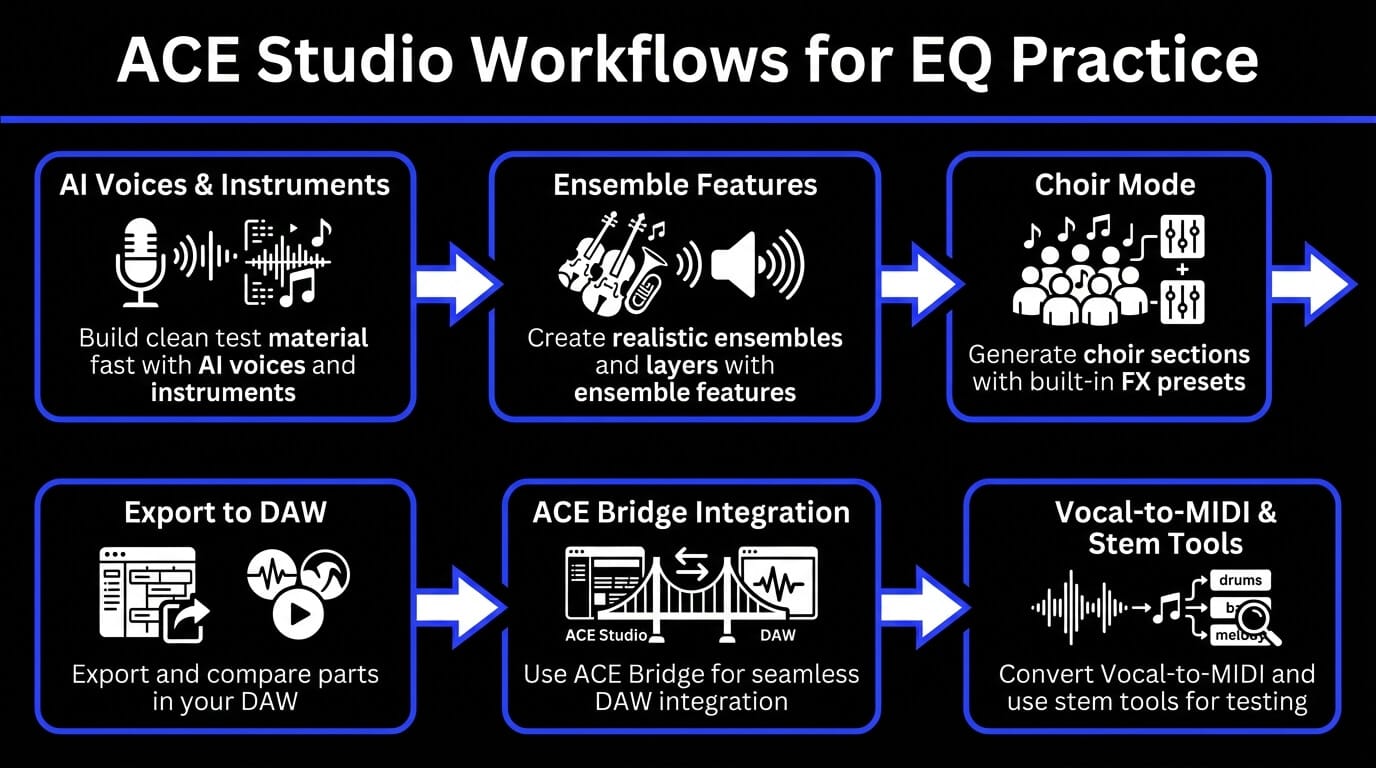
Here are a few ACE Studio workflows that pair naturally with EQ practice:
- Build clean test material fast: ACE Studio isn’t only vocals. In ACE Studio 2.0, you can work with AI voices and AI instruments, plus tools for generating loops and layers for sketches. That makes it easier to create consistent material to mix and compare.
- Create realistic ensembles and layers: You can load AI instruments onto tracks, and even enable ensemble features to group multiple instruments into a cohesive section. That’s perfect for learning how EQ changes “density” in strings, horns, or layered parts.
- Choir sections with built-in polish: Choir Mode lets you generate multi-layer choral arrangements from melody and lyrics, and it includes built-in FX presets (including EQ and reverb) to help the sound sit together before you export to your DAW.
- Export and compare in your DAW: You can export MIDI and choose whether to include lyrics and phonemes, which is useful if you want to compare a “dry” part vs a processed one while keeping the performance identical.
- DAW integration: If you’re working between ACE Studio and a DAW, ACE Bridge is designed for that integration, so your EQ decisions can happen where you’re most comfortable mixing.
- Vocal-to-MIDI and stem tools: ACE Studio 2.0 notes upgrades like an enhanced Vocal-to-MIDI conversion and an upgraded stem splitter. Even if you’re not using these every day, they’re useful for turning audio into something editable and then testing how EQ affects clarity across versions.
- Sharing and rehearsal: You can share projects as links that render stems and lyrics for preview. That’s handy if you’re collaborating and want feedback like “the vocal is muddy” or “the strings are sharp”, then you apply targeted EQ fixes.
Common EQ mistakes to avoid
Over-boosting frequencies
Over-boosting usually happens when you’re trying to force clarity or excitement. The problem is that boosts don’t just lift the “good” parts – they lift everything in that range, including harshness, noise, and resonances.
Instead of boosting:
- Try subtractive EQ first
- Fix masking by cutting competing instruments
- Improve the source (mic choice, performance, arrangement) when possible
A mix that sounds bright because it’s balanced will usually translate better than a mix that sounds bright because everything got high-shelved.
Ignoring gain staging
EQ changes level. If you boost a band, the track gets louder. Louder often sounds “better”, so you can fool yourself into thinking your EQ is improving the sound when it’s just increasing volume.
Basic fix: after EQ, level-match the output so you’re comparing tone, not loudness.
Also keep headroom in mind. Big boosts can cause clipping in plugins or buses. If you find yourself boosting lots of bands, it might be a sign you need:
- a better sound choice
- layering decisions
- different arrangement space
Using EQ instead of fixing the source
EQ can’t rescue everything. If a vocal is harsh because the singer is straining, or a guitar is muddy because it was recorded too far from the mic, EQ can help, but it won’t create a different performance.
A healthier workflow:
- Fix the source when possible (performance, instrument tone, mic placement)
- Use editing and dynamics to control inconsistency
- Use EQ to shape and place the sound in the mix
When EQ becomes your only tool, mixes tend to get over-processed. When EQ is part of a chain of intentional decisions, it stays musical.
Frequently asked questions about equalizers
Is an equalizer the same as EQ?
Yes. “Equalizer” and “EQ” refer to the same concept. “EQ” is just the shorter production term.
What is the best equalizer setting?
There isn’t one. The best setting depends on:
- the headphones or speakers you’re using
- the song itself (genre, arrangement, tonal balance)
- what you want to feel (warm, bright, punchy, relaxed)
A better goal than “best” is “intentional”. Make one small change, listen, then decide if you moved closer to what you want.
Should I boost or cut frequencies?
Most of the time, cutting gets you cleaner results. Boosting can be useful, especially for character, but it’s easy to overdo.
A practical rule:
- Cut to remove problems and create space
- Boost to highlight personality, but keep it subtle
Do equalizers improve sound quality?
EQ can improve perceived quality if it fixes an imbalance or reduces a problem. But EQ can also make sound worse if it’s used aggressively or without context.
If your EQ move makes the sound feel less natural, less emotional, or more fatiguing, it’s probably not improving quality – it’s just changing it.
How many equalizers are there?
In practice: a lot. But most EQ tools you’ll encounter are variations of:
- graphic EQ
- parametric EQ
- fixed or “musical” EQ designs
- shelves, bells, and filters as building blocks
Once you understand those, you can pick up almost any EQ and know what to do.