Gain staging: mastering the basics for optimal sound

Key Takeaways
- Gain staging is the process of managing audio levels throughout the entire signal chain, from recording to plugins, buses, and the final master output.
- Proper gain staging helps prevent clipping, distortion, noise buildup, harsh plugin behavior, and crowded mixes that lack clarity or depth.
- Healthy recording levels usually leave plenty of headroom, with many engineers aiming for peaks around -18 dBFS to -10 dBFS during tracking.
- Clip gain, VU meters, utility plugins, peak meters, and limiters all help producers control levels before and after processing.
- ACE Studio can support cleaner gain staging by helping producers create, edit, split, and prepare vocals, instruments, and stems before they enter the mix.
Why gain staging matters from the first signal
In modern audio production, gain staging is the foundational practice of controlling signal levels at every point in your signal path to ensure audio remains clean, balanced, and usable. While often dismissed in the digital age, proper level management is a practical skill that influences everything from initial recording to final loudness.
Every stage affects the next—from the microphone preamp to the final stereo bus. Mastering this balance is essential because:
- It Optimizes Plugins: Analog-modeled plugins perform best at specific input levels; excessive gain can cause harsh saturation or aggressive compression.
- It Preserves Clarity: Proper staging prevents gradual distortion from "hot" signals and keeps the noise floor low.
- It Ensures Stability: In complex sessions, ignoring levels leads to "invisible" issues like brittle highs, a weak low end, or an overcrowded mix.
Whether you are a beginner or a pro, gain staging is not just a technical rule; it is the habit that allows your creative tools to work properly.
What is gain staging?
Gain staging is the process of managing volume at every point in your audio chain to ensure every device and plugin receives an ideal signal. Rather than just making things louder or quieter, the goal is to maintain healthy levels from source to output while avoiding clipping, excessive noise, and unnecessary coloration.
Think of audio like water flowing through pipes:
- Too much pressure (Gain): Leads to leaks or bursts (digital clipping and harsh distortion).
- Too little pressure: The flow becomes weak, and background "muck" (noise floor) takes over.
In practice, this begins at the microphone preamp. If you record too "hot," you risk clipping before the sound even reaches your computer. If it’s too quiet, you’ll be forced to boost it later, which also amplifies background hiss and room noise. Inside your DAW, every EQ boost or compressor adjustment changes the signal level; professional gain staging means compensating after each plugin to ensure the next processor in the chain stays in its "sweet spot."
Key audio terms defined
To master gain staging, you must distinguish between these core concepts:
- Gain vs. Volume: Gain is the amplification applied before processing (changing the signal’s strength and character), whereas volume is the perceived loudness of the playback.
- Headroom: The "safety gap" between your peak signal and Clipping (the point where the system can no longer handle the level, causing harsh distortion).
- Unity Gain: When the output level of a device or plugin exactly matches its input level. Professionals aim for this after every processing step to ensure they aren't being "tricked" into thinking a sound is better just because it got louder.
- Noise Floor: The inherent background noise of your system. Proper gain staging keeps your signal significantly louder than this noise without hitting the ceiling.
Why is gain staging important?
Gain staging is critical because every processing decision depends on the signal level entering the next stage. When levels are inconsistent, small issues multiply quickly into a mix that sounds thin or cluttered.
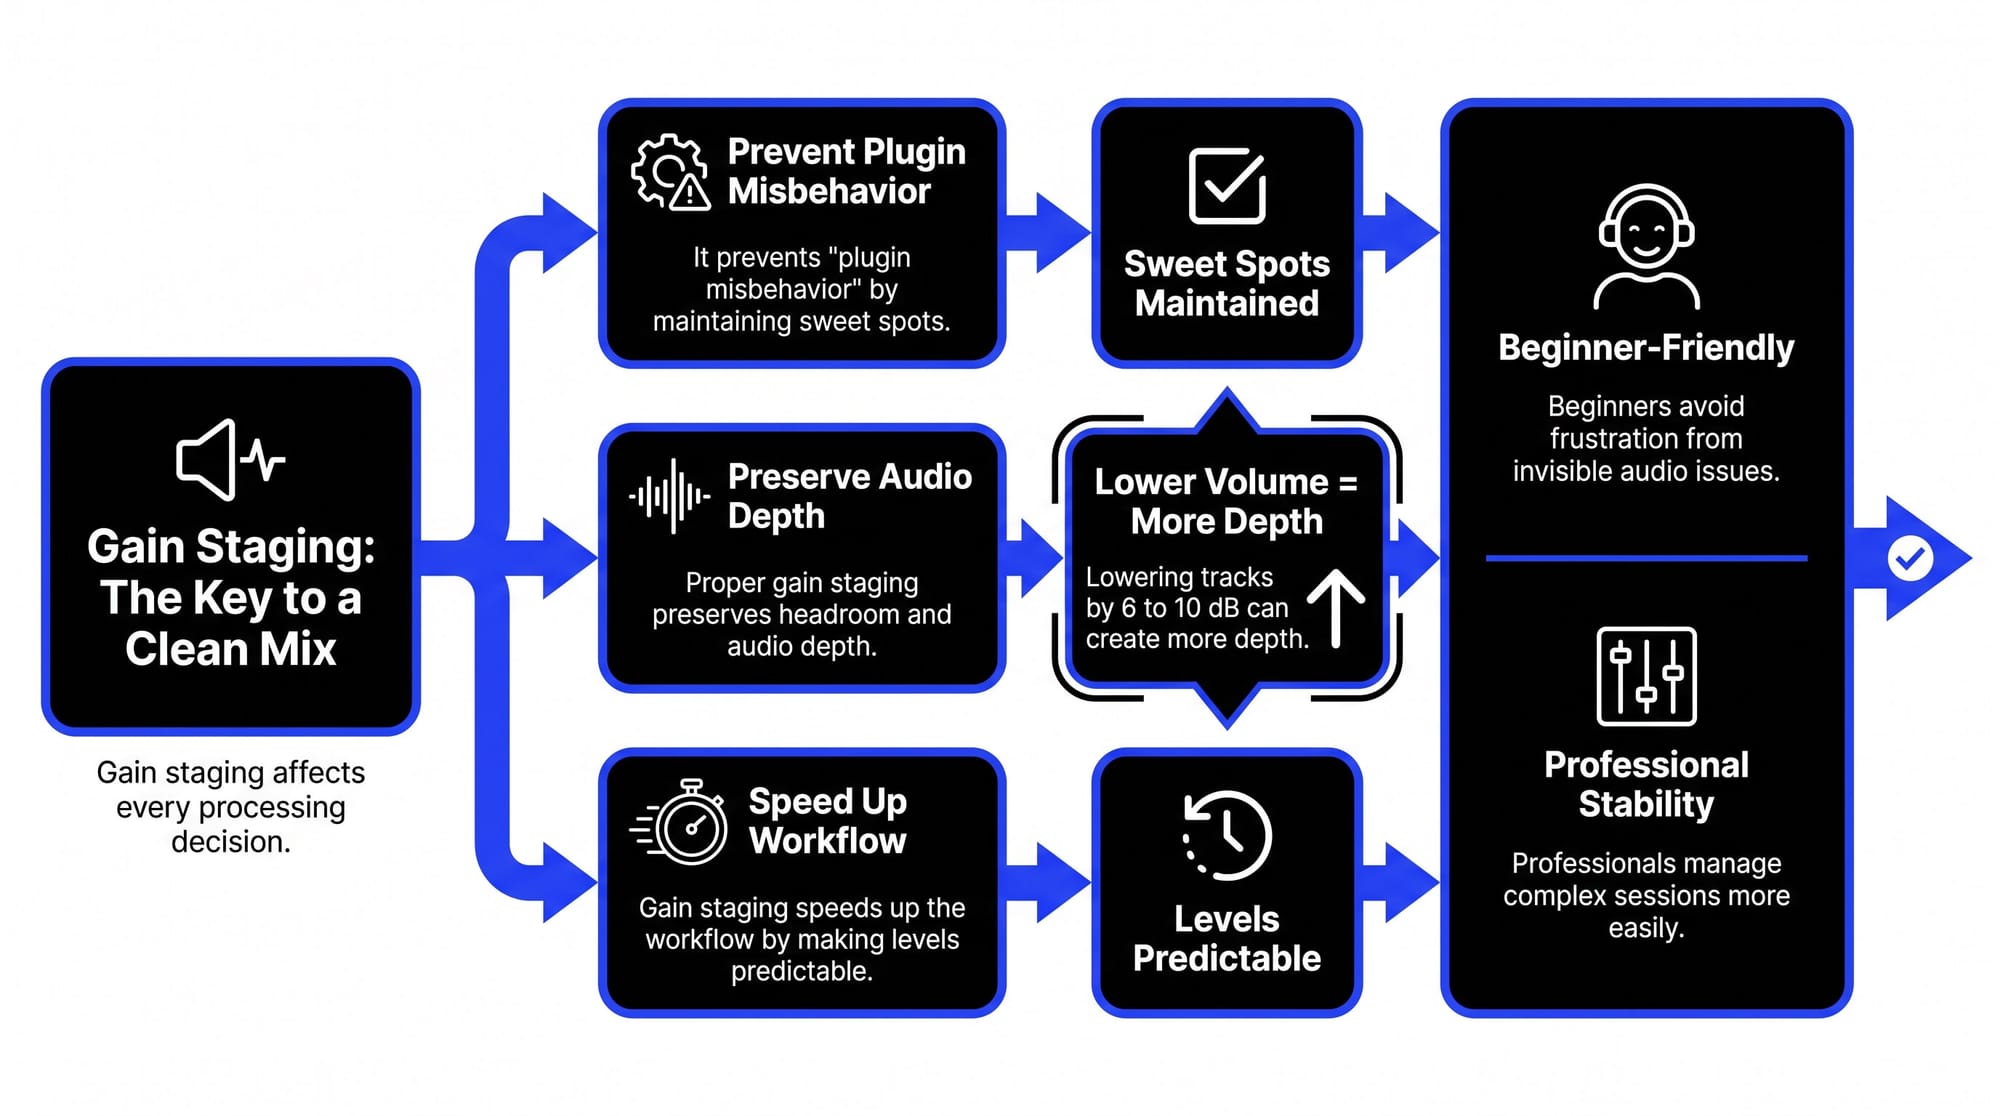
1. It Prevents "Plugin Misbehavior"
Many digital tools—especially those designed to mimic classic hardware—are built with a specific "sweet spot" in mind. If the incoming audio is too loud:
- Saturation becomes brittle and harsh rather than warm and musical.
- Compressors overreact, flattening the life and dynamics out of a performance.
- EQs can exaggerate harsh frequencies rather than enhancing the natural tone.
2. It Preserves Headroom and "Depth"
A common mistake is letting every track reach the maximum volume limit of the software. While the audio might not sound broken yet, the main output bus becomes overloaded and congested.
- The "Opening Up" Effect: Engineers often find that simply lowering every track by 6 to 10 dB instantly creates more depth, punch, and separation.
- Room to Breathe: Proper gain staging ensures your mastering engineer has the space they need to enhance the track without fighting a "crowded" session.
3. It Speeds Up Your Workflow
When your levels are predictable and consistent, you stop struggling with your volume sliders and can focus on the creative side—tone, emotion, and arrangement.
- For Beginners: It prevents the frustration of "invisible" audio issues like brittle highs or pumping compression.
- For Professionals: It makes complex sessions with dozens of tracks stable and easy to navigate.
Essential tools for gain staging
Managing levels is easier when you use the right tools for each stage of the process. Below are the most common tools professionals use to keep their audio clean.
Hardware tools (before the computer)
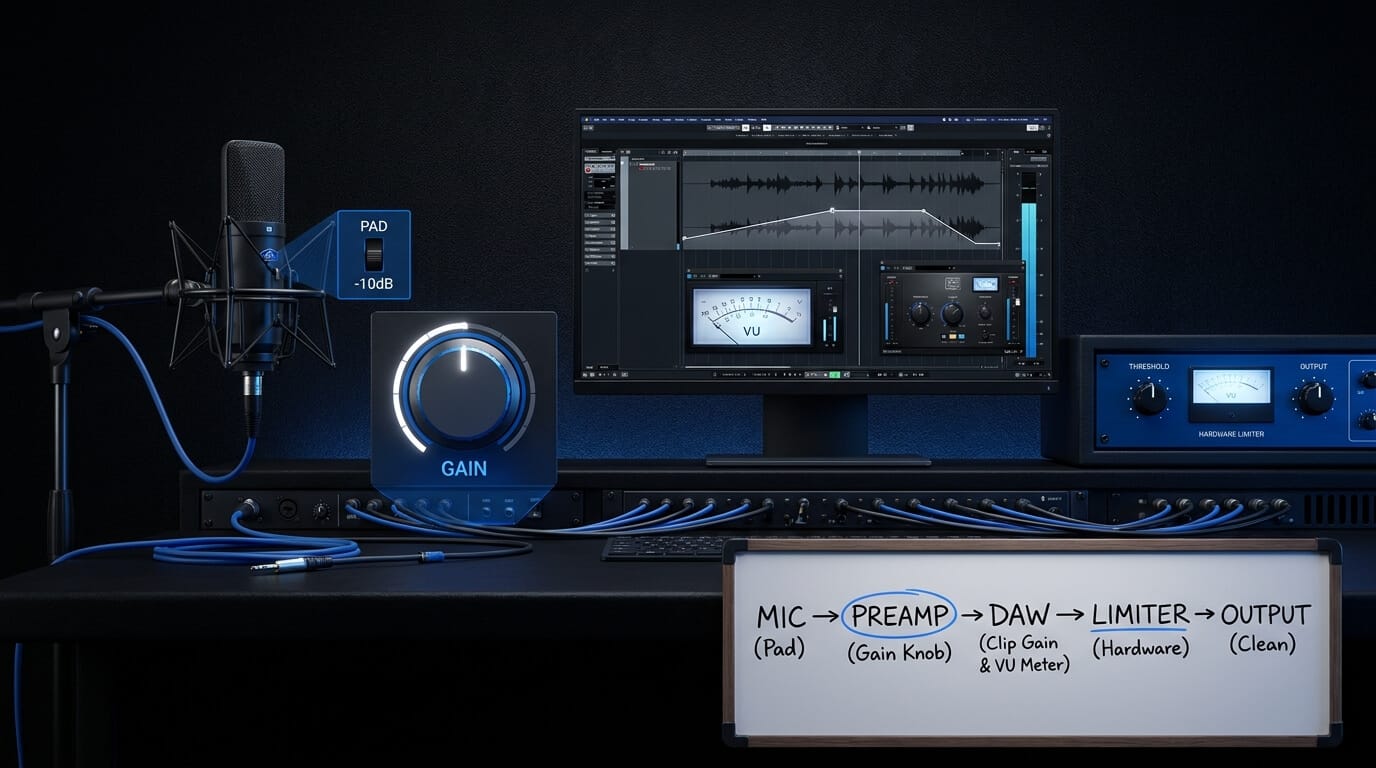
- The preamp gain knob: This is your first line of defense. It controls the strength of the signal coming from your microphone or instrument.
- The pad switch: Found on many microphones and audio interfaces, this button reduces the incoming signal by a fixed amount (usually -10dB or -20dB). Use this for very loud sources like drums to prevent the hardware from overloading.
Software tools (Inside the DAW)
Inside your DAW, gain staging is mostly about keeping each signal under control before processing begins. The right tools help you adjust levels at the source, monitor how much energy a track carries, and prevent volume buildup as plugins are added. These are the main software tools producers use to keep a session clean, balanced, and ready for mixing.
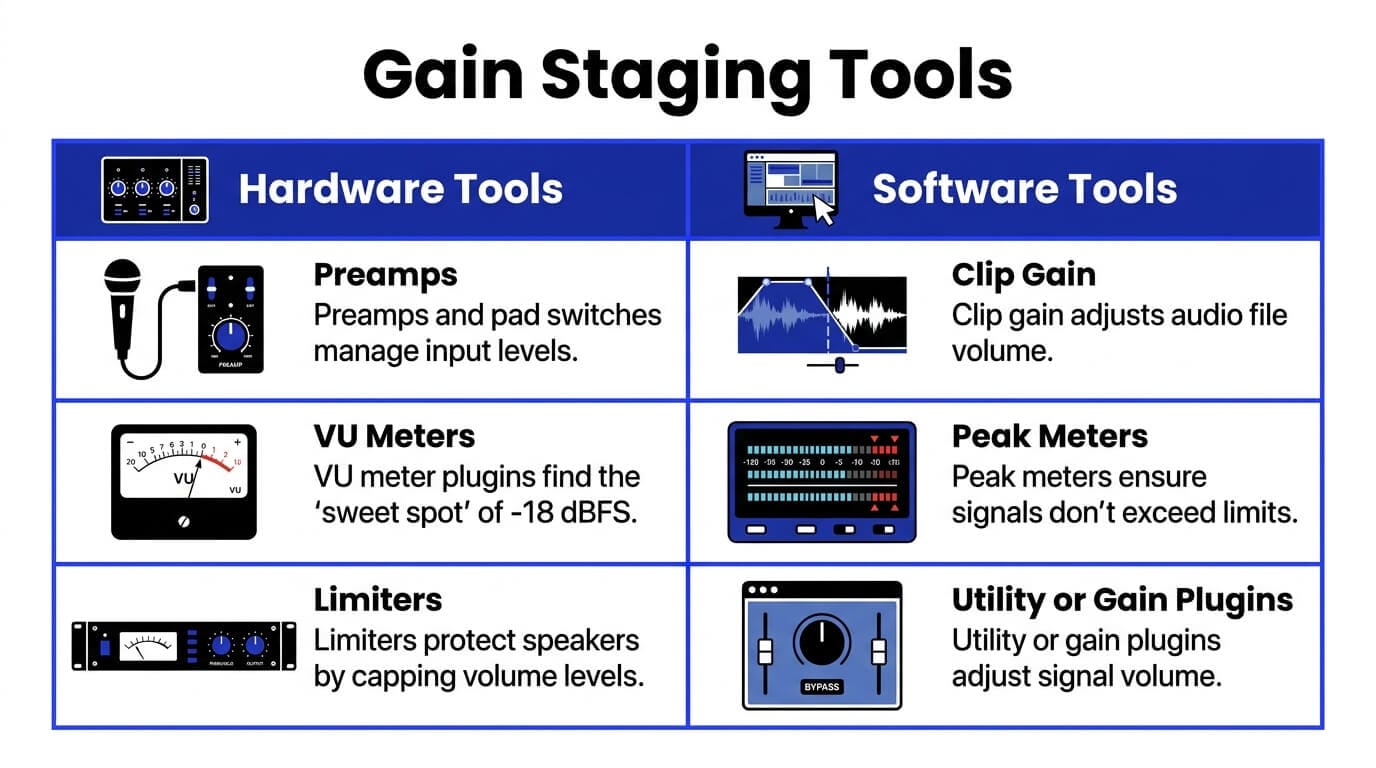
- Clip gain: This allows you to adjust the volume of an audio file directly on the timeline before it ever reaches your plugins or volume faders. It is the most transparent way to level out a session.
- VU meter plugins: Many pros use a VU meter to find the "sweet spot" of -18 dBFS. Unlike standard peak meters, a VU meter shows the average "energy" of a sound, which is more helpful for setting levels for analog-modeled plugins.
- Utility or gain plugins: Every DAW has a simple plugin (like "Utility" in Ableton or "Gain" in Logic) that just changes volume. Placing one at the beginning or end of a plugin chain allows you to turn the signal up or down without touching your main mix faders.
- Peak meters: These are the standard meters on your tracks that show you exactly how close you are to the maximum limit (zero). Use these to ensure your peaks are hitting your targets, like -6dB for the master bus.
- The limiter: While primarily a creative and mastering tool, a limiter acts as a "ceiling." It ensures that no matter how much you push the volume, the signal will not cross a certain point, protecting your speakers and ears from unexpected loud bursts.
How to gain stage: step-by-step guide
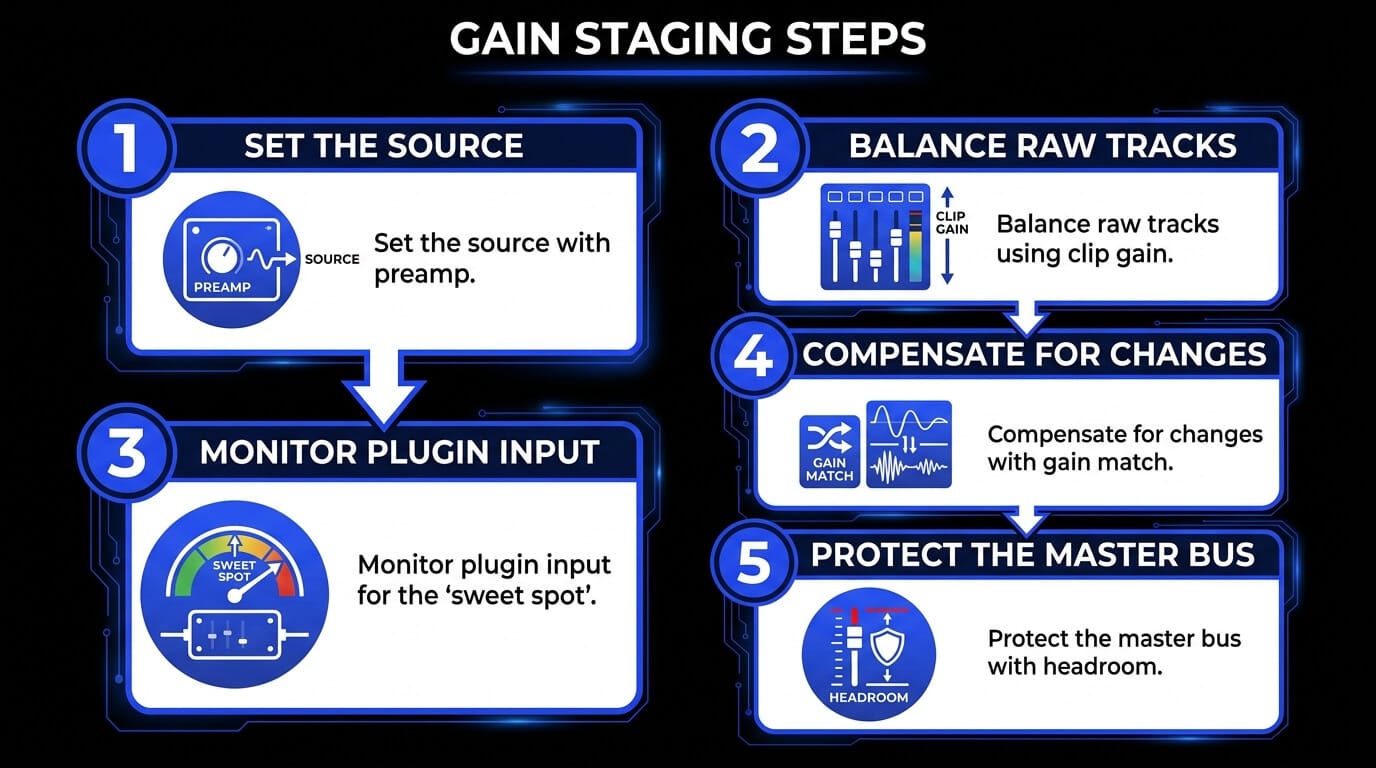
Step 1: Set the source (the preamp)
Gain staging starts before the sound even hits your computer. When recording, adjust your microphone preamp so the loudest parts of the performance land between -18 dBFS and -10 dBFS on your digital meters.
- This captures a strong, healthy signal while leaving a "safety buffer" for unexpected loud moments.
Step 2: Balance the raw tracks (clip gain)
Before you touch a single plugin or volume slider, look at your recorded or imported audio files.
- If a track or sample is significantly louder than others, use Clip Gain (adjusting the volume of the audio file itself) to bring it down.
- Start your mix with all tracks sitting at a similar, moderate level. This creates a stable foundation for everything that follows.
Step 3: Monitor plugin input (the "sweet spot")
Every time you add a tool like a compressor or equalizer, check how loud the signal is as it enters the plugin.
If the signal is too strong, the plugin might overreact—compressing too hard or adding harsh distortion. Reduce the incoming level before you start tweaking the settings to ensure the plugin performs as intended.
Step 4: compensate for changes (the gain match)
Every processing choice you make changes the volume. For example, boosting the bass on an EQ makes the overall track louder.
- After making an adjustment, use the plugin’s Output Gain or Makeup Gain to bring the volume back to where it started.
- Pro Tip: Periodically bypass the plugin to compare. If the "processed" sound is much louder than the "bypassed" sound, you are likely being tricked by volume rather than better tone.
Step 5: protect the master bus (final output)
As you combine dozens of tracks, the volume adds up quickly at the final stereo output.
- Ensure your master output has several decibels of "room" (headroom) before it hits the maximum limit.
- This gives the final mastering stage the space it needs to polish your song without having to fix a cluttered or overloaded mix.
Gain staging in analog vs. digital
In analog systems, gain staging was essential because hardware introduced noise and distortion more easily. Engineers had to keep signals strong enough to rise above the noise floor without overdriving equipment.
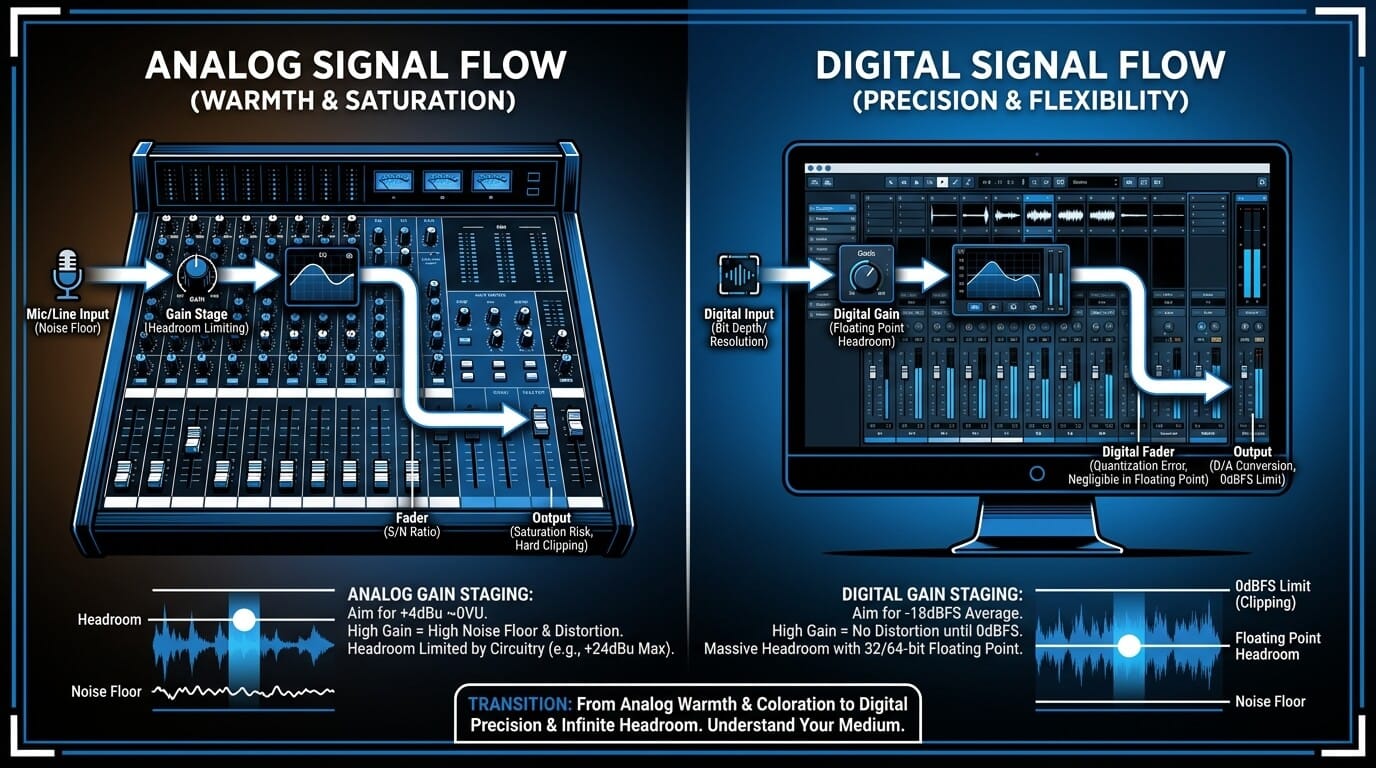
In digital systems, the noise floor is lower and internal processing is more forgiving, but gain staging still matters because plugins emulate analog behavior. Many virtual compressors and tape emulations are calibrated to react best near certain levels.
A mixer who moved from hardware to software once noticed his digital mixes felt harsh compared to his analog work. The issue was not the plugins. He was feeding them signals that were far too loud. Once he lowered the channel levels, the tone became smoother and more natural.
That is why gain staging remains relevant in both environments. The tools may differ, but signal flow still matters.
Simple gain staging for home recording
Home studio users often face unique challenges because smaller rooms and budget equipment make level issues very obvious. Background noise from computer fans or budget preamps can become overwhelming if a recording is too quiet and has to be boosted significantly later.
To get professional results at home, follow this simple routine:
- Set your microphone input so that the loudest parts of a vocal or instrument peak around -12 dBFS. Never let the signal get close to the maximum limit (zero). Leave plenty of "breathing room."
- After recording, don't reach for the volume fader immediately. Use Clip Gain to adjust the volume of the actual audio file. This keeps your mixer organized and ensures every plugin you add later behaves predictably.
- Many home producers find that their mixes become clearer even before they start using EQ. This happens because proper gain staging prevents "clutter" and unnecessary volume buildup before the heavy processing even begins.
Advanced gain staging tips
Professional engineers treat level management as a creative choice. Once you have the basics down, you can use these methods to improve the quality of your music.
- Many software tools change their sound based on how loud the signal is when it enters. You can deliberately send a louder signal into a compressor to get a more aggressive sound. Just remember to turn down the output volume on that specific tool so the rest of your chain stays balanced.
- Do not just focus on individual tracks. Monitor your instrument groups, such as all the drums or all the vocals. Ensure these groups have plenty of space before they hit the final output. This prevents the song from feeling cluttered or squashed.
- The volume sliders in your software are most accurate when they are near the zero mark. If you find yourself pulling a slider almost to the bottom to make a track fit, your signal is too loud. Adjust the volume earlier in the chain so your sliders stay in the middle for better control.
- If every track in your session starts at the same average level, it is much easier to hear small changes. You will be able to tell if an adjustment actually makes the instrument sound better or if you are simply reacting to a change in loudness.
- When your levels are correct from the beginning, your audio stays clean. This means you will not have to use extreme settings on your tools to fix mistakes. Instead, you can spend your time making creative choices that enhance the music.
Common mistakes to avoid
Even experienced producers can fall into traps that hurt the quality of their audio. Avoiding these common errors will lead to a more professional and polished sound.
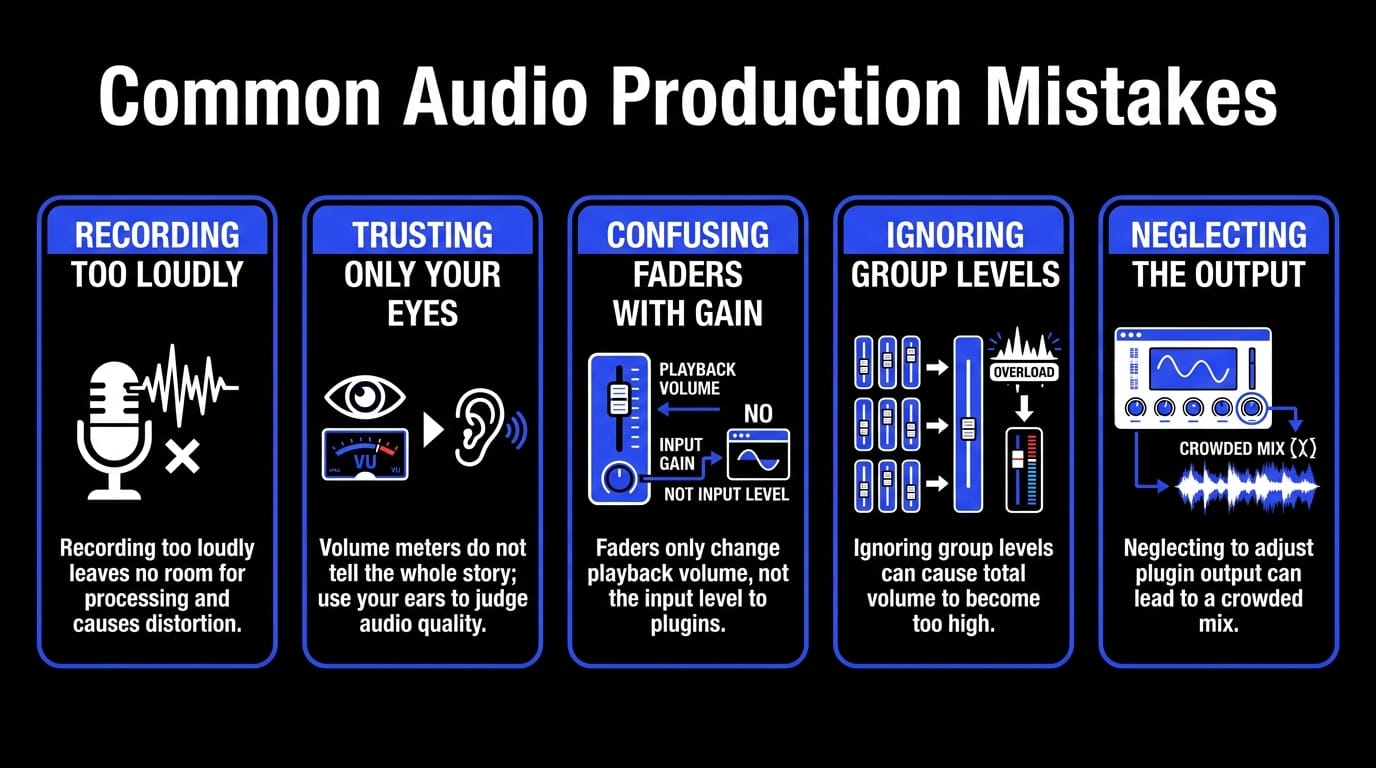
- Recording too loudly: It is tempting to record at high levels because louder sounds often seem better at first. However, this leaves no room for processing and often causes harsh distortion or forces your plugins to overreact.
- Trusting only your eyes: While volume meters are helpful, they do not tell the whole story. A signal might look safe on a screen but still sound thin or unpleasant. Always use your ears to judge if the audio feels right.
- Confusing faders with gain: Moving a volume slider changes how loud you hear the track, but it does not change the level of the audio entering your plugins. If a signal is too strong and causing issues with a compressor or EQ, you must use clip gain or an input control to fix it at the source.
- Ignoring group levels: You might have individual tracks that look fine, but when you combine them into a drum bus or vocal group, the total volume can quickly become too high. Always monitor your groups to ensure they are not overloading.
- Neglecting the output: Adding effects often increases the volume. If you do not turn down the output of your plugins to match the input, you will eventually run out of space in your mix, making everything feel crowded.
Benefits of correct gain staging
- Proper gain staging creates cleaner recordings, smoother mixes, and better plugin performance.
- It improves audio clarity because distortion is minimized before it starts.
- It preserves dynamics because compressors respond more naturally.
- It improves level balancing because tracks interact more predictably.
- It speeds up workflow because fewer corrective moves are needed later.
- It supports better mastering because the mix retains headroom.
A producer mixing orchestral music once mentioned that after correcting gain structure, he could suddenly hear subtle room details that had been buried. Nothing new was added. The signal path was simply cleaner.
That is why many professionals consider gain staging one of the most underrated skills in sound engineering.
Gain staging in your DAW
The key is understanding the difference between clip gain and faders. Clip gain changes the level before your plugins, while the volume fader usually changes the level after them. If a compressor, EQ, or saturation plugin is reacting too strongly, fix the level earlier in the chain rather than pulling down the fader.
Many engineers also start with a gain or utility plugin on each track, especially in large sessions, so levels stay consistent and the mixer remains easier to control.Every digital audio workstation handles audio levels a little differently, but the goal is the same: control the signal before it reaches your effects. In Ableton Live, you can use clip gain or the Utility plugin. In Logic Pro, use region gain or the Gain tool in the channel strip. In Pro Tools, clip gain lets you adjust the audio file directly before any processing happens.Gain staging in your DAW
How ACE Studio helps you start with cleaner, more controlled tracks
Gain staging becomes easier when every sound source enters your session at a controlled, usable level. This matters whether you are recording vocals, importing stems, writing MIDI parts, or building an arrangement with virtual instruments. ACE Studio can support this early stage of the process by giving producers a more precise way to create, edit, and prepare musical parts before they become part of the final mix.
ACE Studio goes beyond AI vocals. It brings vocals, AI instruments, stem tools, MIDI-based editing, and DAW integration into one creative workspace. In a gain staging context, its strength is not simply that it helps you generate parts. It is that you can shape those parts with intention before they reach your mix, giving you cleaner source material and more control over the levels that follow.
For example, if you are creating a vocal line from MIDI and lyrics, you can refine the notes, timing, phrasing, breaths, pitch movement, and emotional delivery before exporting the part. That means the vocal does not arrive in your DAW as a random audio file that needs heavy correction. It arrives as a more intentional performance, making it easier to set a healthy clip gain level, leave headroom, and feed compressors or EQs with a stable signal.
The same idea applies to the AI instruments. Instead of relying only on large sample libraries or static loops, you can create instrument parts from MIDI and adjust the performance inside ACE Studio. With instruments such as strings, brass, saxophone, or other supported sounds, the producer still decides the notes, arrangement, timing, and expression. Once the part feels right, it can be brought into the mix like any other instrument track and gain staged with the same care as a recorded source.
ACE Studio also supports sessions that begin with existing audio rather than a blank timeline. Tools like Stem Splitter and Vocal to MIDI let you break a finished or imported recording into more workable parts, so you can edit, rebuild, or reshape specific elements with greater control.
This matters when a session feels crowded, or when too many sounds are locked inside one stereo file. Instead of trying to fix the whole track with a single fader or broad EQ move, you can separate the key elements, balance them individually, and make cleaner gain staging decisions before the mix becomes overloaded.
For producers working inside a DAW, ACE Bridge makes the workflow more connected. You can use ACE Studio alongside your main session, sync timing, and move between creative editing and mixing decisions without treating ACE as a separate island. That makes it easier to keep gain staging practical: build the performance, bring it into context, check the level, then continue shaping the mix.
The important point is that ACE Studio does not replace gain staging. You still need to watch clip gain, plugin input levels, bus levels, and master headroom. What it can do is give you cleaner, more editable source material before the mixing stage begins. When your vocals, instruments, and stems are already organized and intentional, gain staging becomes less about fixing problems and more about preserving the tone, space, and emotion of the track.
FAQ about gain staging
What level should tracks peak at during recording?
Most engineers recommend peaks between -18 dBFS and -10 dBFS. This preserves headroom while maintaining a strong signal.
Does gain staging matter in digital audio?
Yes. Even in digital systems, plugins still react differently depending on incoming level, especially analog-style processors.
Can gain staging improve a muddy mix?
Often yes. Lowering excessive levels can create more space and improve audio clarity before any EQ is applied.
Is gain staging the same as mixing?
No. Gain staging prepares the signal path, while Audio mixing involves shaping the final relationship between sounds.
Should every plugin have output compensation?
Ideally yes. Matching output levels after processing helps maintain a stable chain and makes decisions more accurate.