Proximity Effect in Audio Engineering: The Ultimate Guide
Key Takeaways
- Proximity effect happens when a sound source gets very close to a directional microphone, causing a noticeable boost in bass and low-mid frequencies.
- Omnidirectional microphones do not create proximity effect because they work as pressure transducers, while cardioid, supercardioid, hypercardioid, and figure-8 microphones react more strongly to close placement.
- The closer the source gets to the capsule, the more likely the recording is to sound warm, intimate, boomy, muddy, or overloaded, depending on the mic pattern and source.
- You can control proximity effect before mixing by adjusting distance, using a pop filter, angling the microphone off-axis, choosing a different polar pattern, or engaging a high-pass filter.
- Tools like dynamic EQ, multiband compression, and ACE Studio can help refine or rebuild problematic parts, but the cleanest result still comes from managing microphone placement at the source.
Foundational Principles of Acoustic Proximity
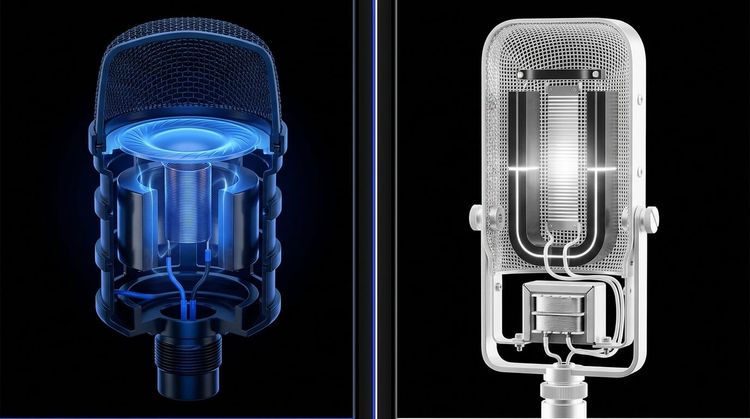
The proximity effect in audio systematically alters a microphone's frequency response. It introduces a pronounced inflation of low-frequency sensitivity as a sound source moves closer to the capsule. To understand why this happens, we must look at how microphone capsules handle air pressure.
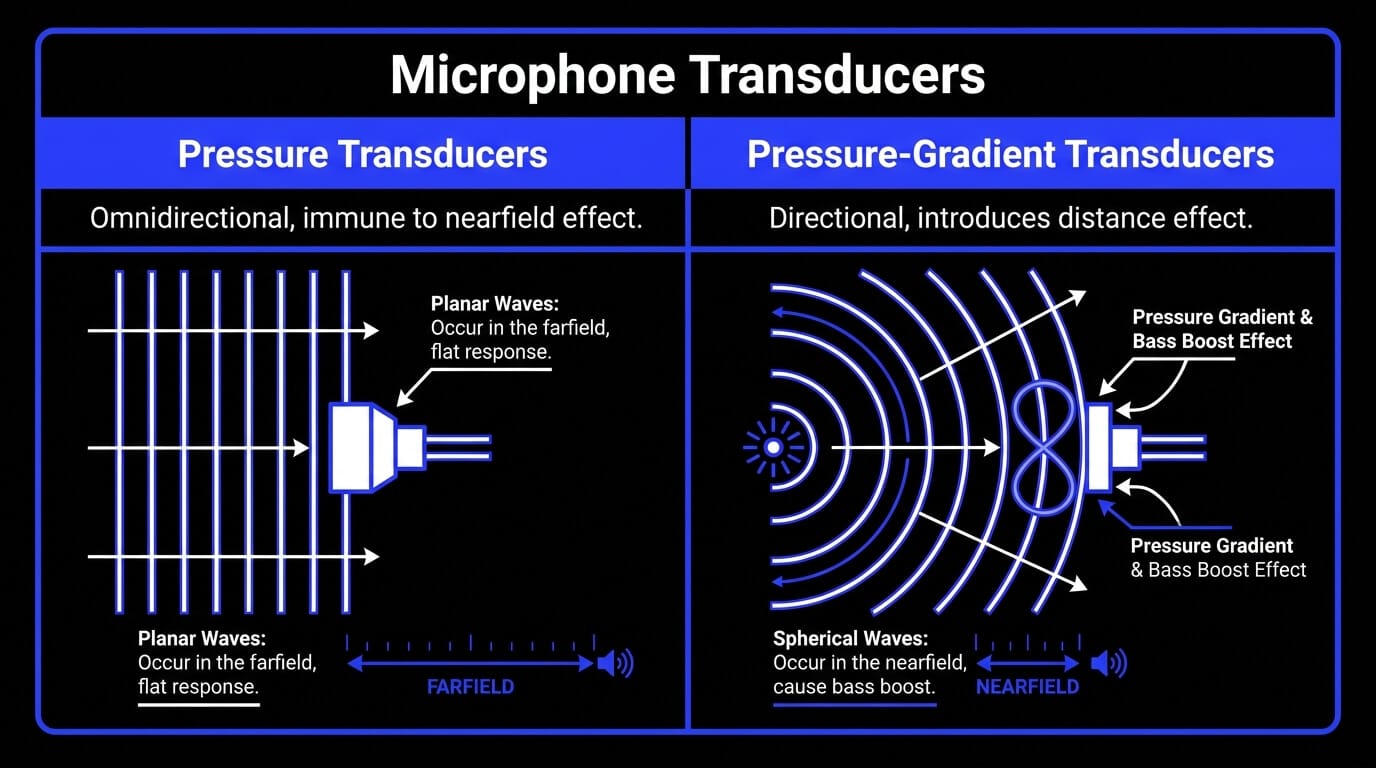
Pressure Transducers vs. Pressure-Gradient Transducers
Microphones generally fall into one of two design categories:
- Pressure Transducers (Omnidirectional): The diaphragm is open to the air on only one side. It measures absolute scalar air pressure at a single point. Result: These microphones are completely immune to the nearfield effect or any distance-based bass variations.
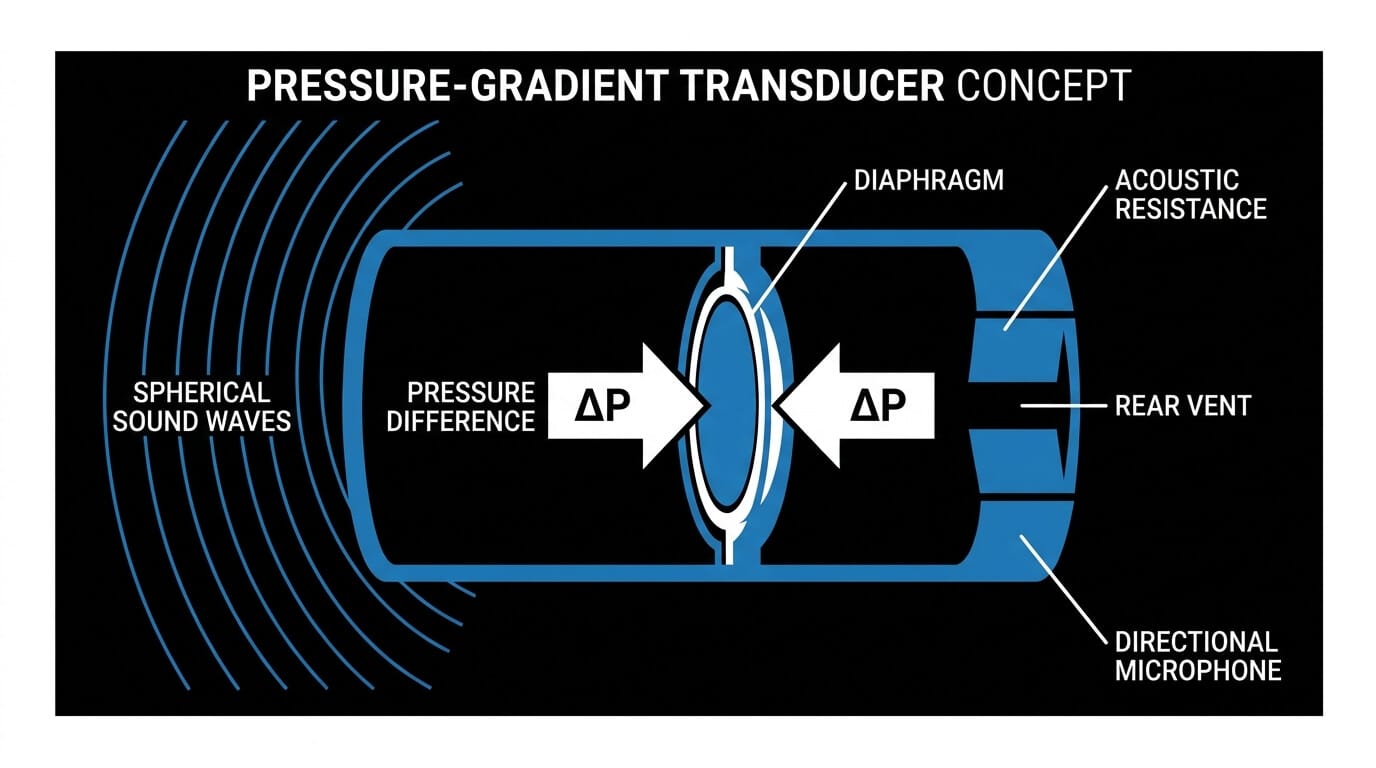
- Pressure-Gradient Transducers (Directional): The diaphragm is exposed to air on both the front and rear faces. Movement is dictated by the pressure difference (gradient) between the two sides. Result: This structural design introduces the distance effect.
The Physics: Planar Waves vs. Spherical Waves
The behavior of these capsules shifts completely depending on the distance of the sound source.
- In the Farfield (Distant Sources): Sound waves arrive at the microphone capsule as flat planar waves. The wave amplitude is virtually identical at both the front and rear entry ports. The only force moving the diaphragm is a tiny phase delay caused by the time it takes the wave to travel around the mic housing. Low frequencies naturally produce a very weak physical force here because of their massive wavelengths. Manufacturers tune the microphone's mechanics to compensate for this and deliver a flat response.
- In the Nearfield (Close Sources): As a source enters close acoustic proximity, the geometry changes into a curved spherical wave. According to the inverse-square law, sound pressure drops rapidly over distance. Because the source is inches away, the distance to the front port is significantly shorter than the distance to the rear port. This creates a massive discrepancy in absolute amplitude between the front and rear faces of the diaphragm.
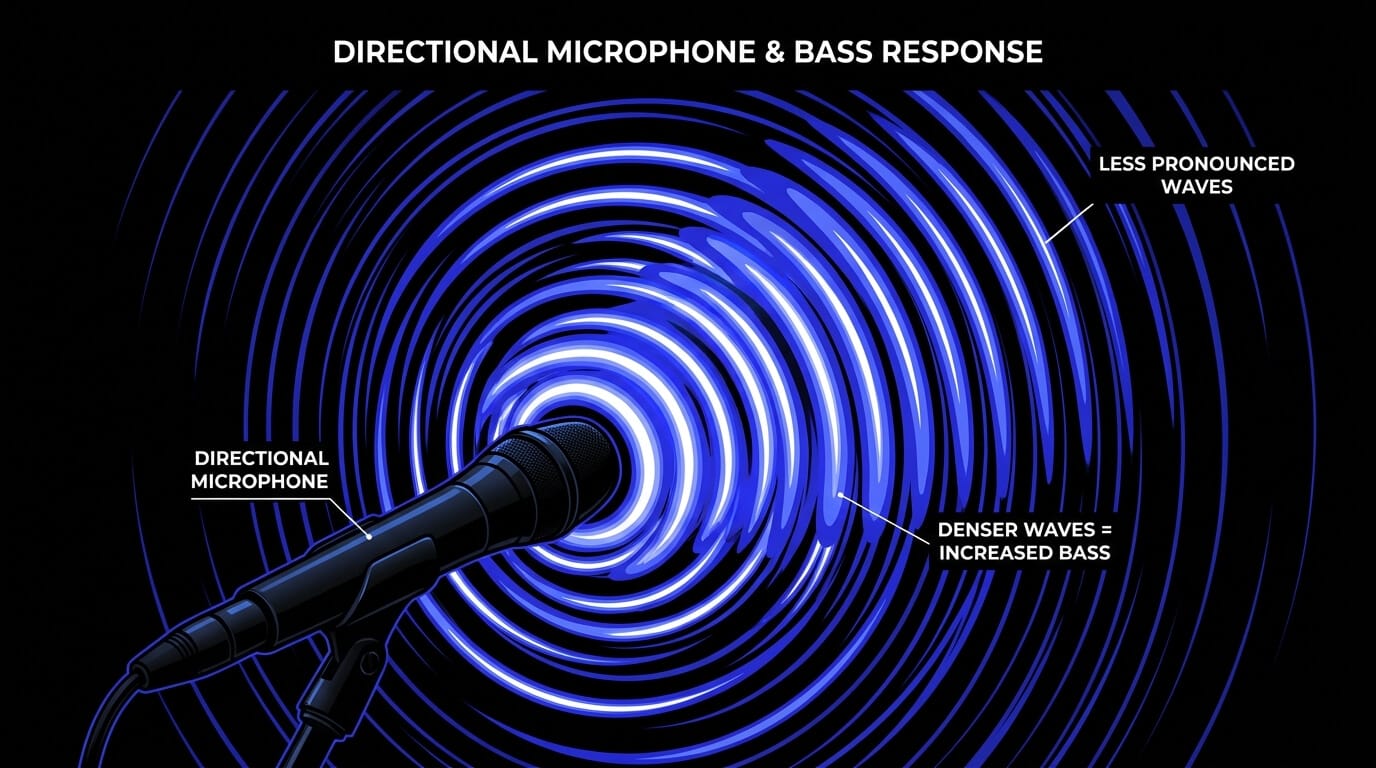
Why the Bass Explodes: This geometric amplitude difference remains constant across all frequencies. When it combines with the internal mechanical tuning (which was engineered to boost weak low-frequency phase signals), the low frequencies experience an exponential boost. This closeness effect heavily shifts the tonal balance of your capture.
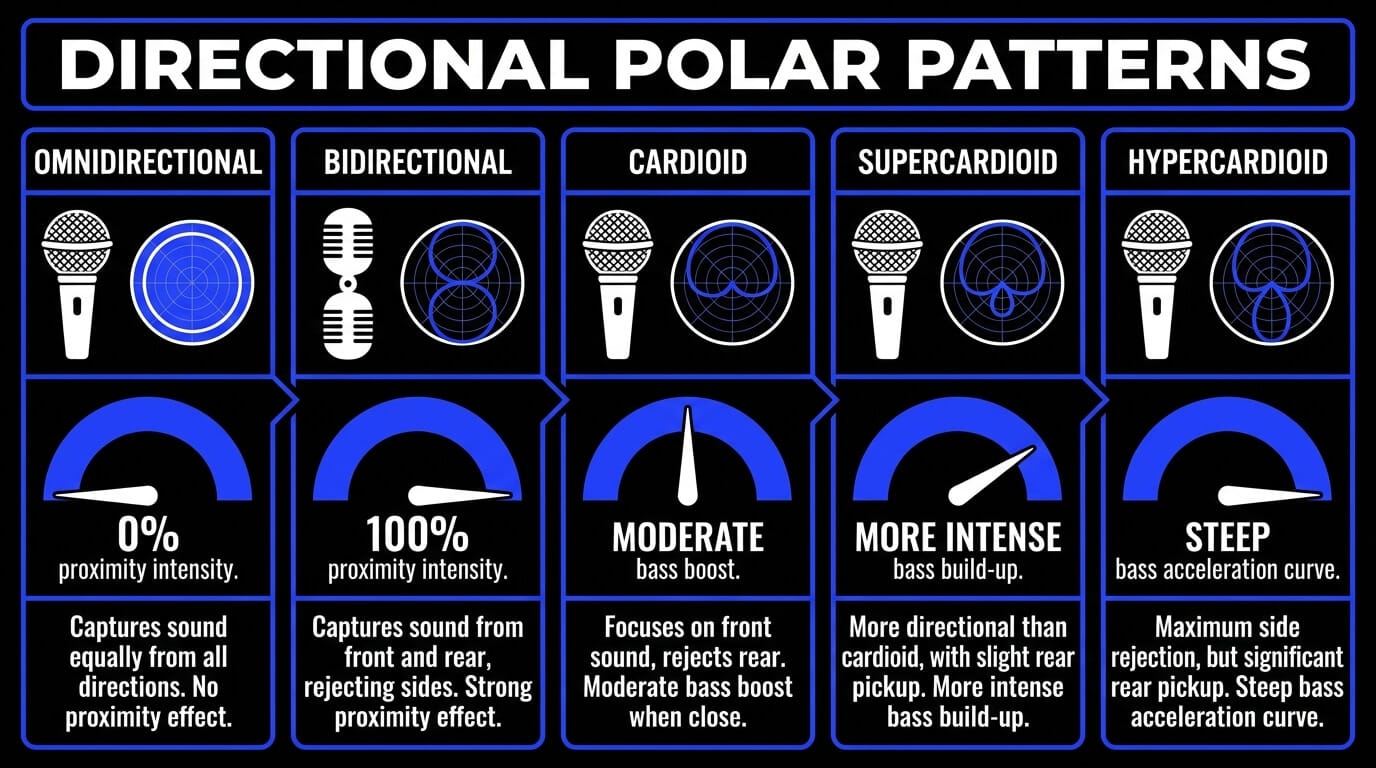
Directional Polar Patterns and Spatial Influence
The intensity of the proximity effect in music production depends entirely on the microphone's directional polar pattern. Altering the pattern changes how the capsule experiences the acoustic gradient.
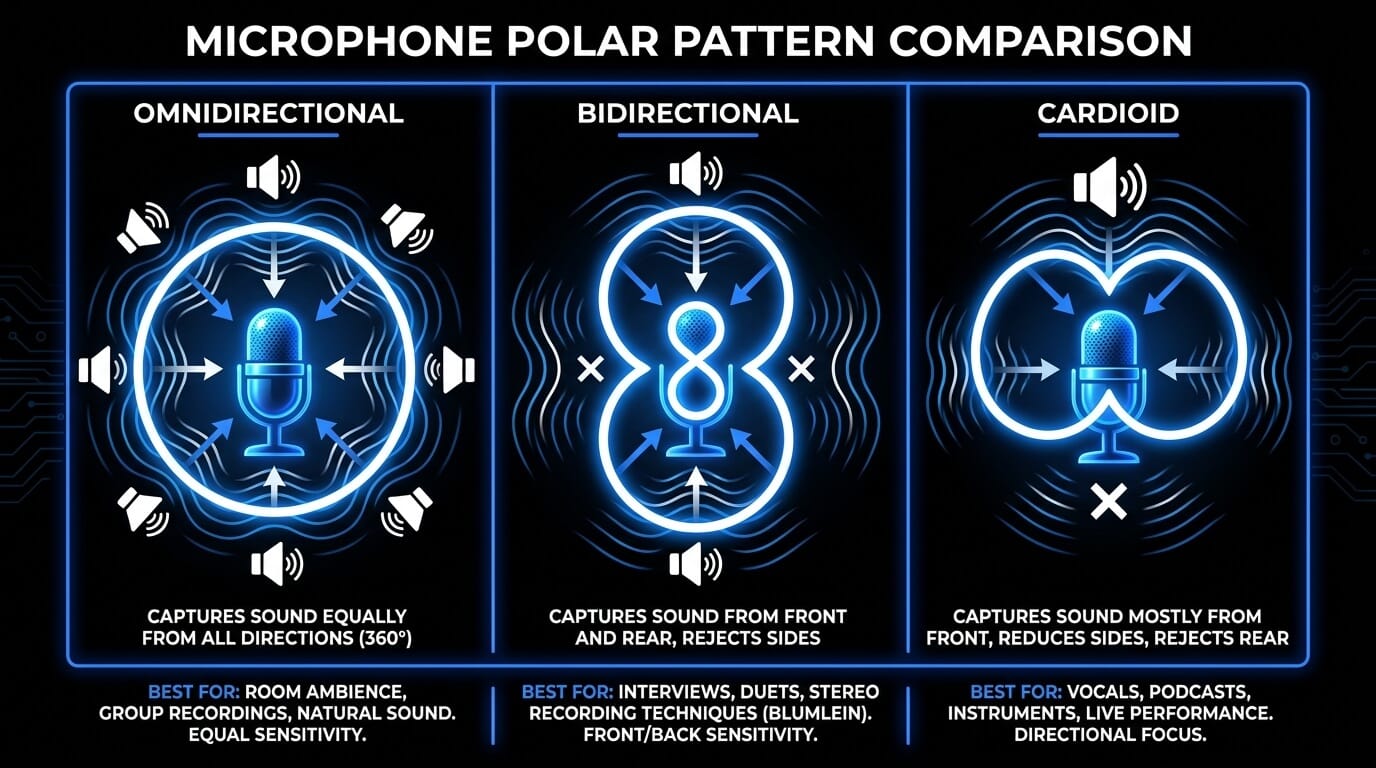
1. Omnidirectional Patterns
- Operation: Pure pressure operation.
- Proximity Intensity: 0%
- Behavior: The rear of the capsule is completely sealed. No pressure gradient exists.
- Use Case: You can place an omni condenser mic millimeters away from an acoustic guitar soundhole or a singer's lips without experiencing any bass boominess.
2. Bidirectional Patterns (Figure-8)
- Operation: Pure pressure-gradient operation.
- Proximity Intensity: 100% (Maximum)
- Behavior: The diaphragm is completely open to the air on both sides without any internal delay networks.
- Use Case: This pattern experiences the most aggressive low-frequency boost. Even minor reductions in distance cause massive spikes in sub-bass and low-midrange energy.
3. Unidirectional Hybrids (Cardioid, Supercardioid, Hypercardioid)
These patterns are engineered by combining pressure and pressure-gradient characteristics using internal acoustic ports.
- Cardioid: A 50/50 mix of pressure and gradient. It exhibits a moderate, predictable bass boost under thirty centimeters.
- Supercardioid: Shifts further toward gradient operation for tighter side rejection. It displays a more intense bass build-up than standard cardioid.
- Hypercardioid: Highly gradient-dominant. The bass acceleration curve is steep, closely approaching bidirectional behavior.
Controlling the Bass with Multipattern Microphones
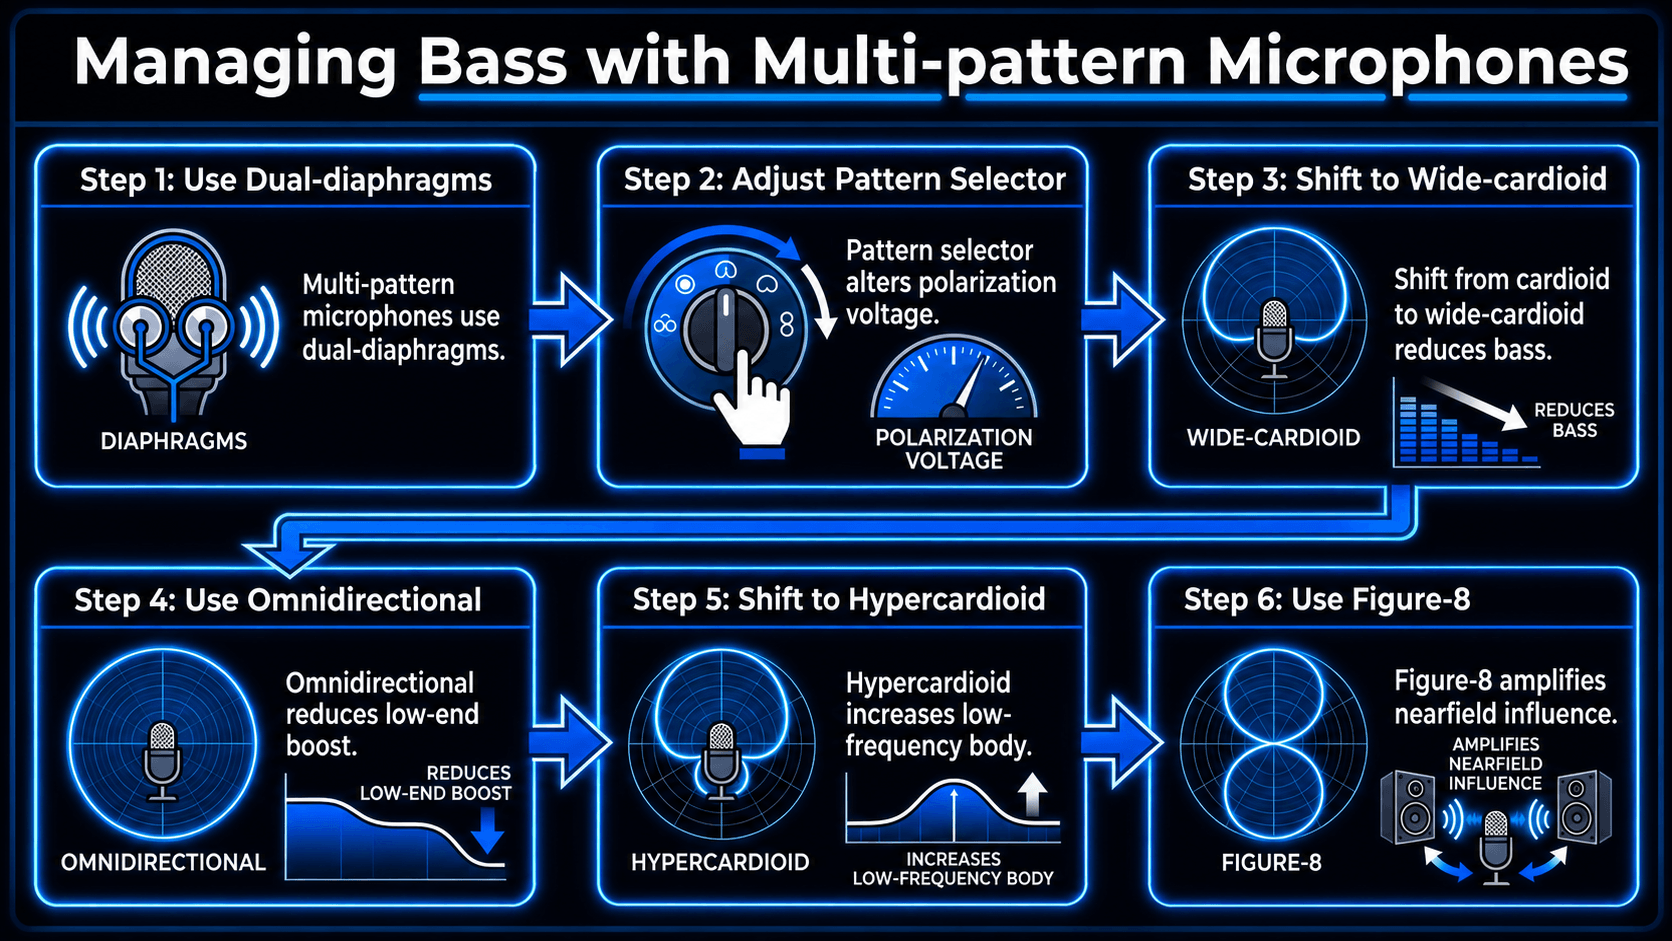
Multi-pattern studio condensers feature dual-diaphragms mounted back-to-back. Changing the pattern selector alters the polarization voltage, which allows you to vary the proximity effect with multipattern mics directly at the source.
- To Tame Excessive Bass: If a vocalist gets too close and sounds boomy, electronically shift the pattern selector away from cardioid toward wide-cardioid or omnidirectional. This reduces the pressure-gradient component and drops the low-end boost without moving the performer.
- To Fatten a Thin Source: If an instrument lacks weight, shift the pattern toward hypercardioid or figure-8. This amplifies the spatial influence of the nearfield, instantly adding low-frequency body to the signal.
Polar Pattern Proximity Reference Sheet
| Microphone Polar Pattern | Transducer Type | Relative Proximity Intensity | Distance Threshold for Bass Boost | Primary Technical Vulnerability |
|---|---|---|---|---|
| Omnidirectional | Pressure | None (0%) | Non-existent | High susceptibility to ambient room reflections |
| Wide Cardioid | Hybrid | Low (~30%) | Under 15 cm | Suboptimal rejection of off-axis bleed |
| Cardioid | 50/50 Hybrid | Moderate (~50%) | Under 30 cm | Susceptibility to plosive pops and wind noise |
| Supercardioid | Gradient-Dominant | High (~70%) | Under 40 cm | Rear pickup lobe can capture unwanted bleed |
| Hypercardioid | Highly Gradient-Dominant | Very High (~85%) | Under 50 cm | Enlarged rear lobe requires precise angling |
| Bidirectional (Figure-8) | Pure Gradient | Maximum (100%) | Under 60 cm | Extreme sensitivity to lateral air movement |
Angle of Incidence: On-Axis vs. Off-Axis Behavior
How sound waves strike the diaphragm changes how the effects of proximity in sound engineering alter your recordings.

On-Axis Frequency Response
- Angle: Zero degrees (directly facing the center of the capsule).
- Behavior: The proximity effect behaves in its most uniform, predictable manner.
- Tonal Impact: Low-frequency acceleration affects a broad shelf of the lower spectrum (from 200 Hz down). It delivers maximum transient detail but leaves the capsule highly vulnerable to low-frequency clipping and plosive air blasts.
Off-Axis Rejection and Low-End Roll-Off
- Angle: 15 to 90 degrees away from the center of the capsule.
- Behavior: Directional microphones achieve off-axis rejection by canceling out waves that arrive at the front and rear ports simultaneously.
- Tonal Impact: In close spatial proximity, the spherical wave format degrades off-axis rejection efficiency. However, because the physical path-length difference between the front and rear ports shrinks along the lateral plane, the pressure-gradient amplitude discrepancy collapses.

The Analog Fix: If a performer insists on standing exceptionally close to a proximity microphone but their tone is accumulating too much low-end congestion, rotate the microphone chassis fifteen to thirty degrees off-axis. This preserves high-frequency intimacy while dampening the nearfield gradient, cutting the bass buildup at the source.
Analyzing the Impact on Specific Sound Sources
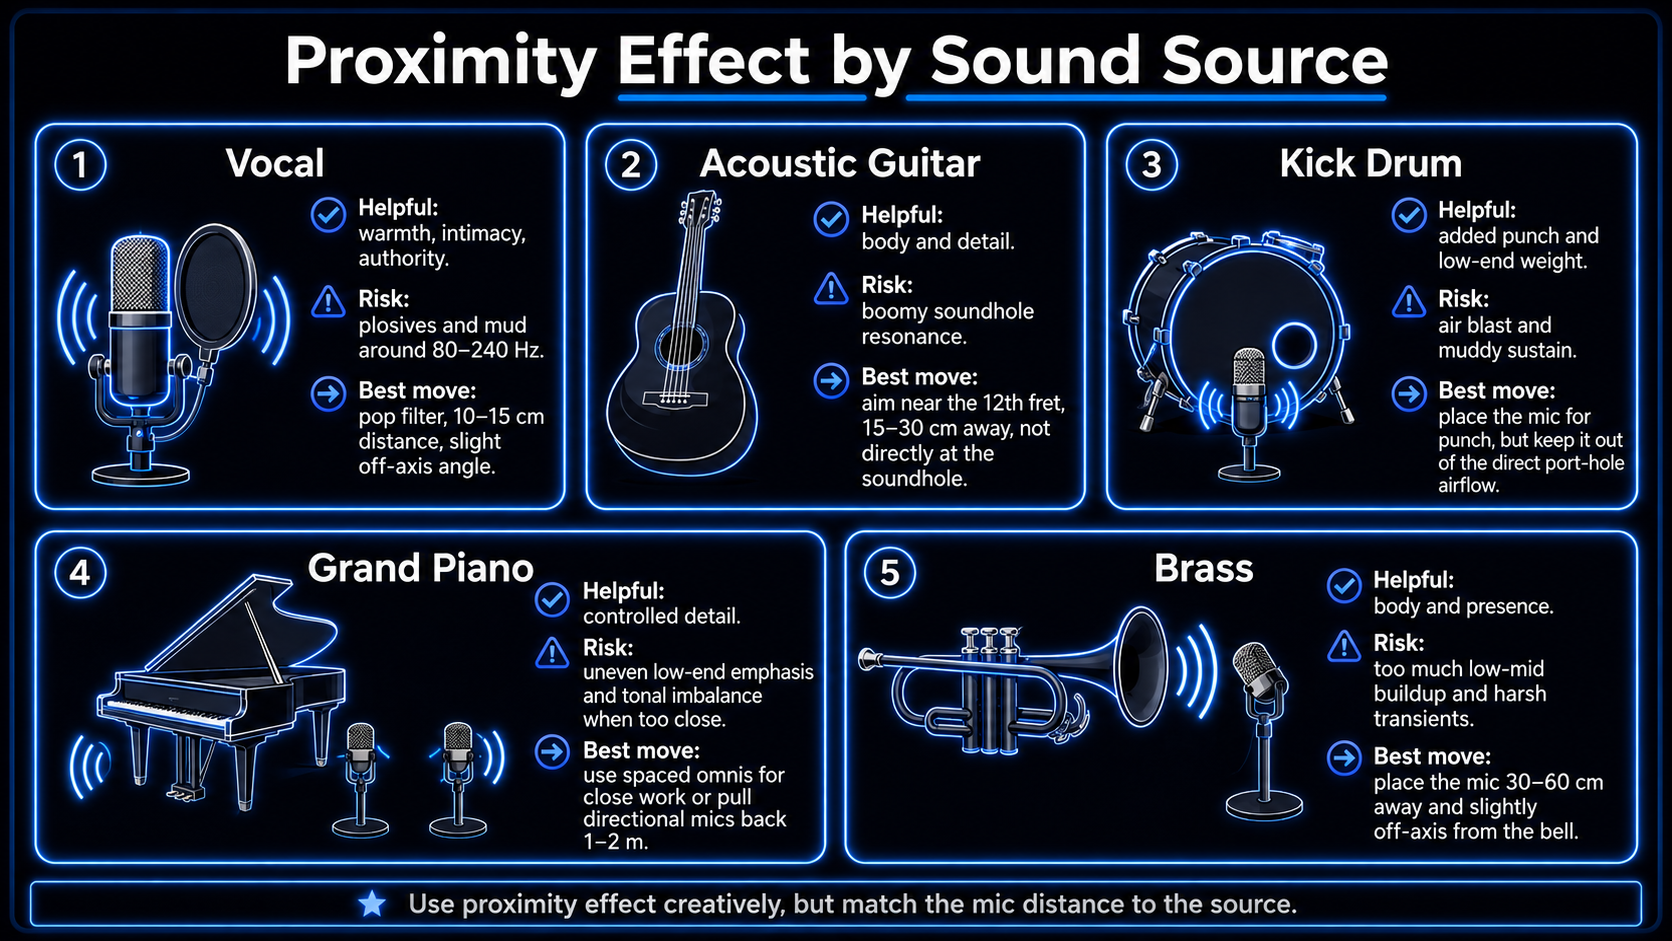
Vocal Recording
Human voices project a complex mix of acoustic energy from the mouth, nose, and chest. Singing within five to ten centimeters of a directional capsule triggers a heavy boost between 80 Hz and 240 Hz.
- Pros: Adds immediate intimacy, authority, and warmth. This is the foundation of modern broadcast speech and up-close pop vocals.
- Cons: Can mask crucial midrange clarity (1 kHz to 3 kHz) and dramatically increases the risk of plosive distortion from consonants like p and b.
Acoustic Guitar
Acoustic guitars disperse sound from the soundboard, the body cavity, and the soundhole (which has a fundamental air resonance between 80 Hz and 120 Hz). Placing a directional mic right next to the soundhole triggers an unmanageable nearfield bass boom.
The Technique: Avoid aiming directly at the soundhole from close range. Position the microphone fifteen to thirty centimeters away, targeted at the twelfth fret or where the neck meets the body to balance wood resonance, string detail, and low-end weight.
Kick Drum
Needs to deliver sub-bass punch (50 Hz to 100 Hz) alongside a sharp transient click (2 kHz to 4 kHz). Placing a large-diaphragm dynamic mic deep inside the drum shell near the batter head leverages the nearfield effect to maximize sub-bass weight.
The Technique: Keep the mic clear of the direct high-velocity air rushing out of a port hole, which can cause capsule turbulence and loose, muddy sustain.
Grand Piano
A massive soundboard radiating frequencies across a large surface area. Pinpointing directional microphones close to the strings causes the proximity effect to unevenly amplify localized notes directly beneath the capsules, destroying the instrument's tonal balance.
The Technique: Use spaced omnidirectional pairs for close-up work, or pull directional microphones back one to two meters so the complex wavefronts can blend naturally.
Trumpet and Brass
Instruments project sound in a concentrated beam from a physical metal flare. Close placement amplifies the lower fundamental frequencies (150 Hz to 400 Hz), which can mask the characteristic bright brass timbre.
The Technique: Position the microphone thirty to sixty centimeters away and slightly off-axis from the direct line of the bell flare to prevent transient distortion and capsule overloading.
Strategic Optimization and Management Techniques
Balancing the Pros and Cons
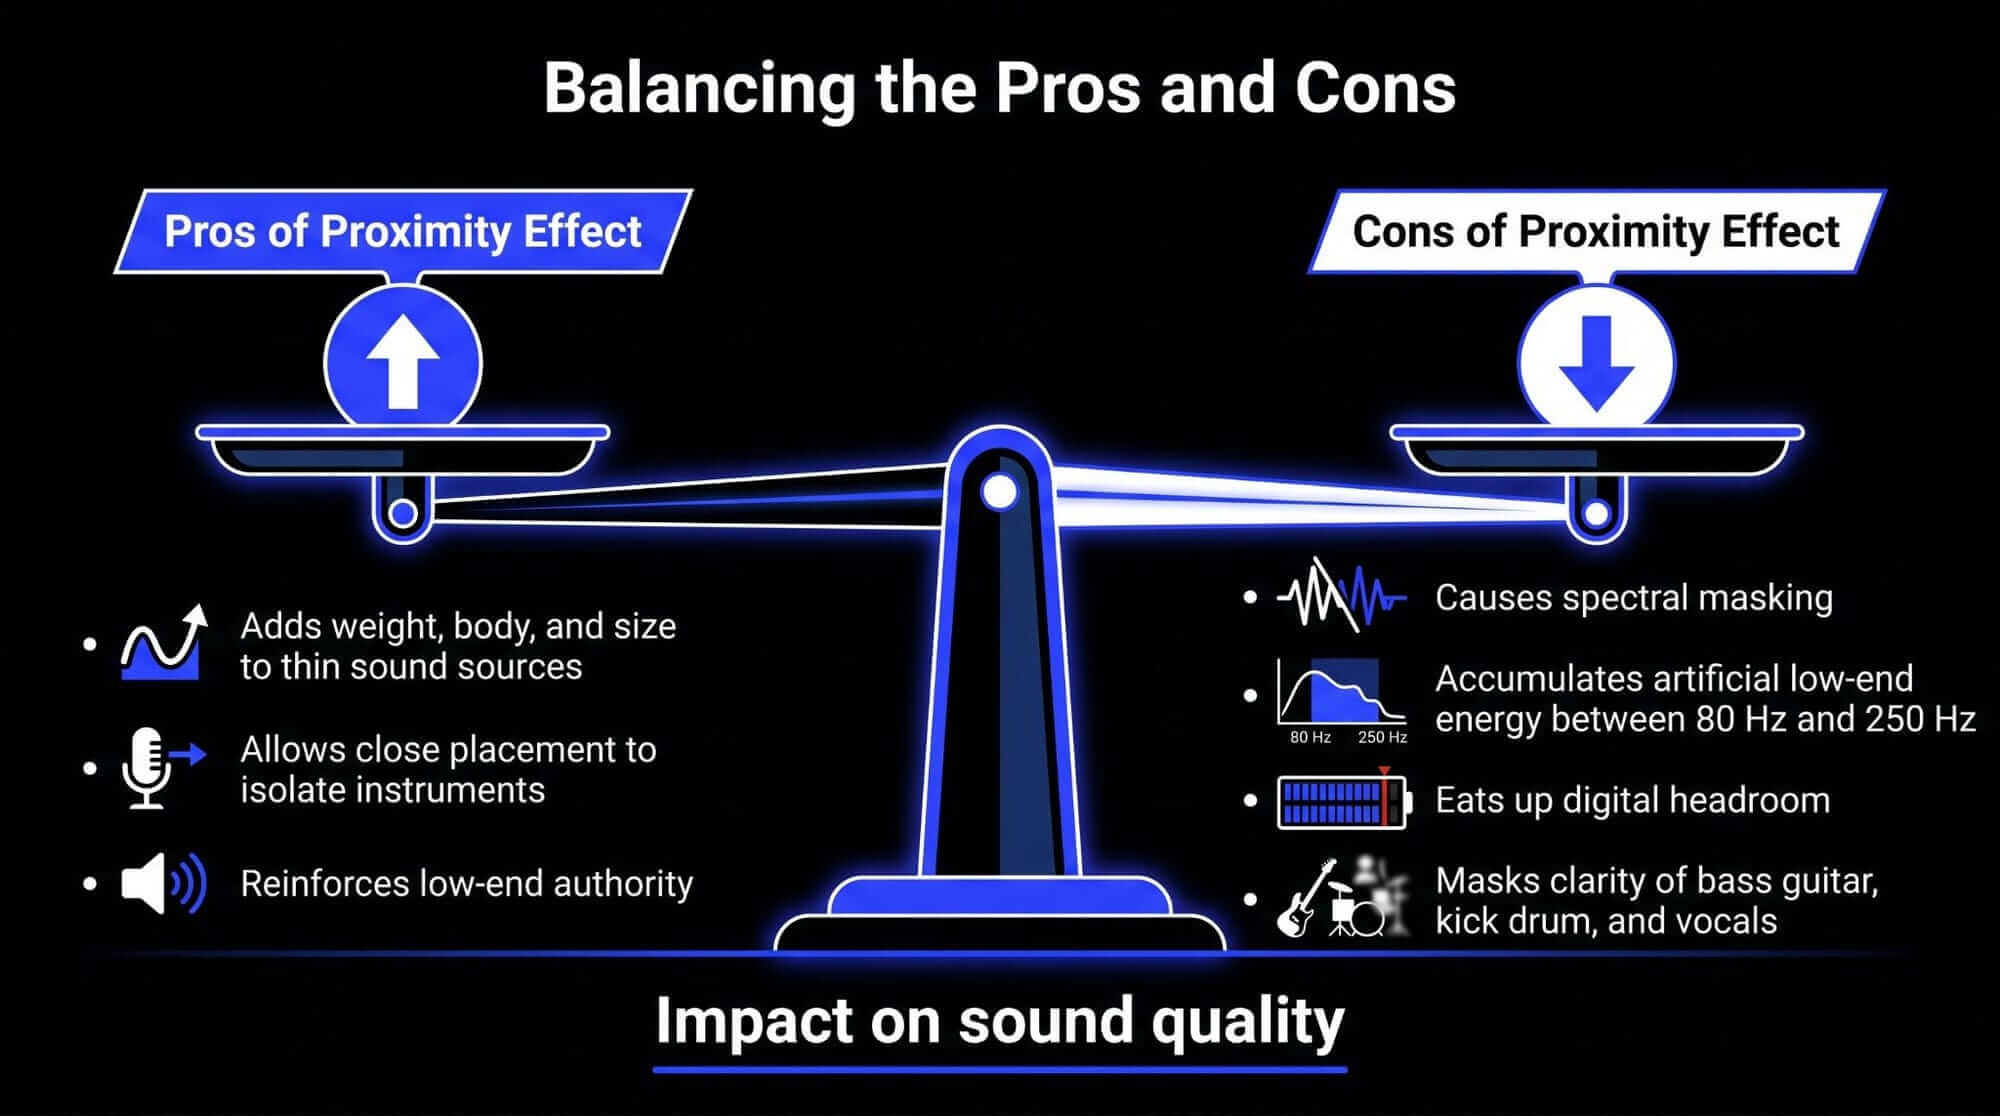
- The Pros: Adds weight, body, and size to thin sound sources. It allows you to use close placement to isolate an instrument from ambient room bleed while using the nearfield effect to reinforce its low-end authority.
- The Cons: Causes spectral masking (a muddy mix). When multiple tracks accumulate artificial low-end energy between 80 Hz and 250 Hz, it eats up digital headroom and masks the clarity of your bass guitar, kick drum, and vocal intelligibility.
4 Methods to Manage Proximity Effect
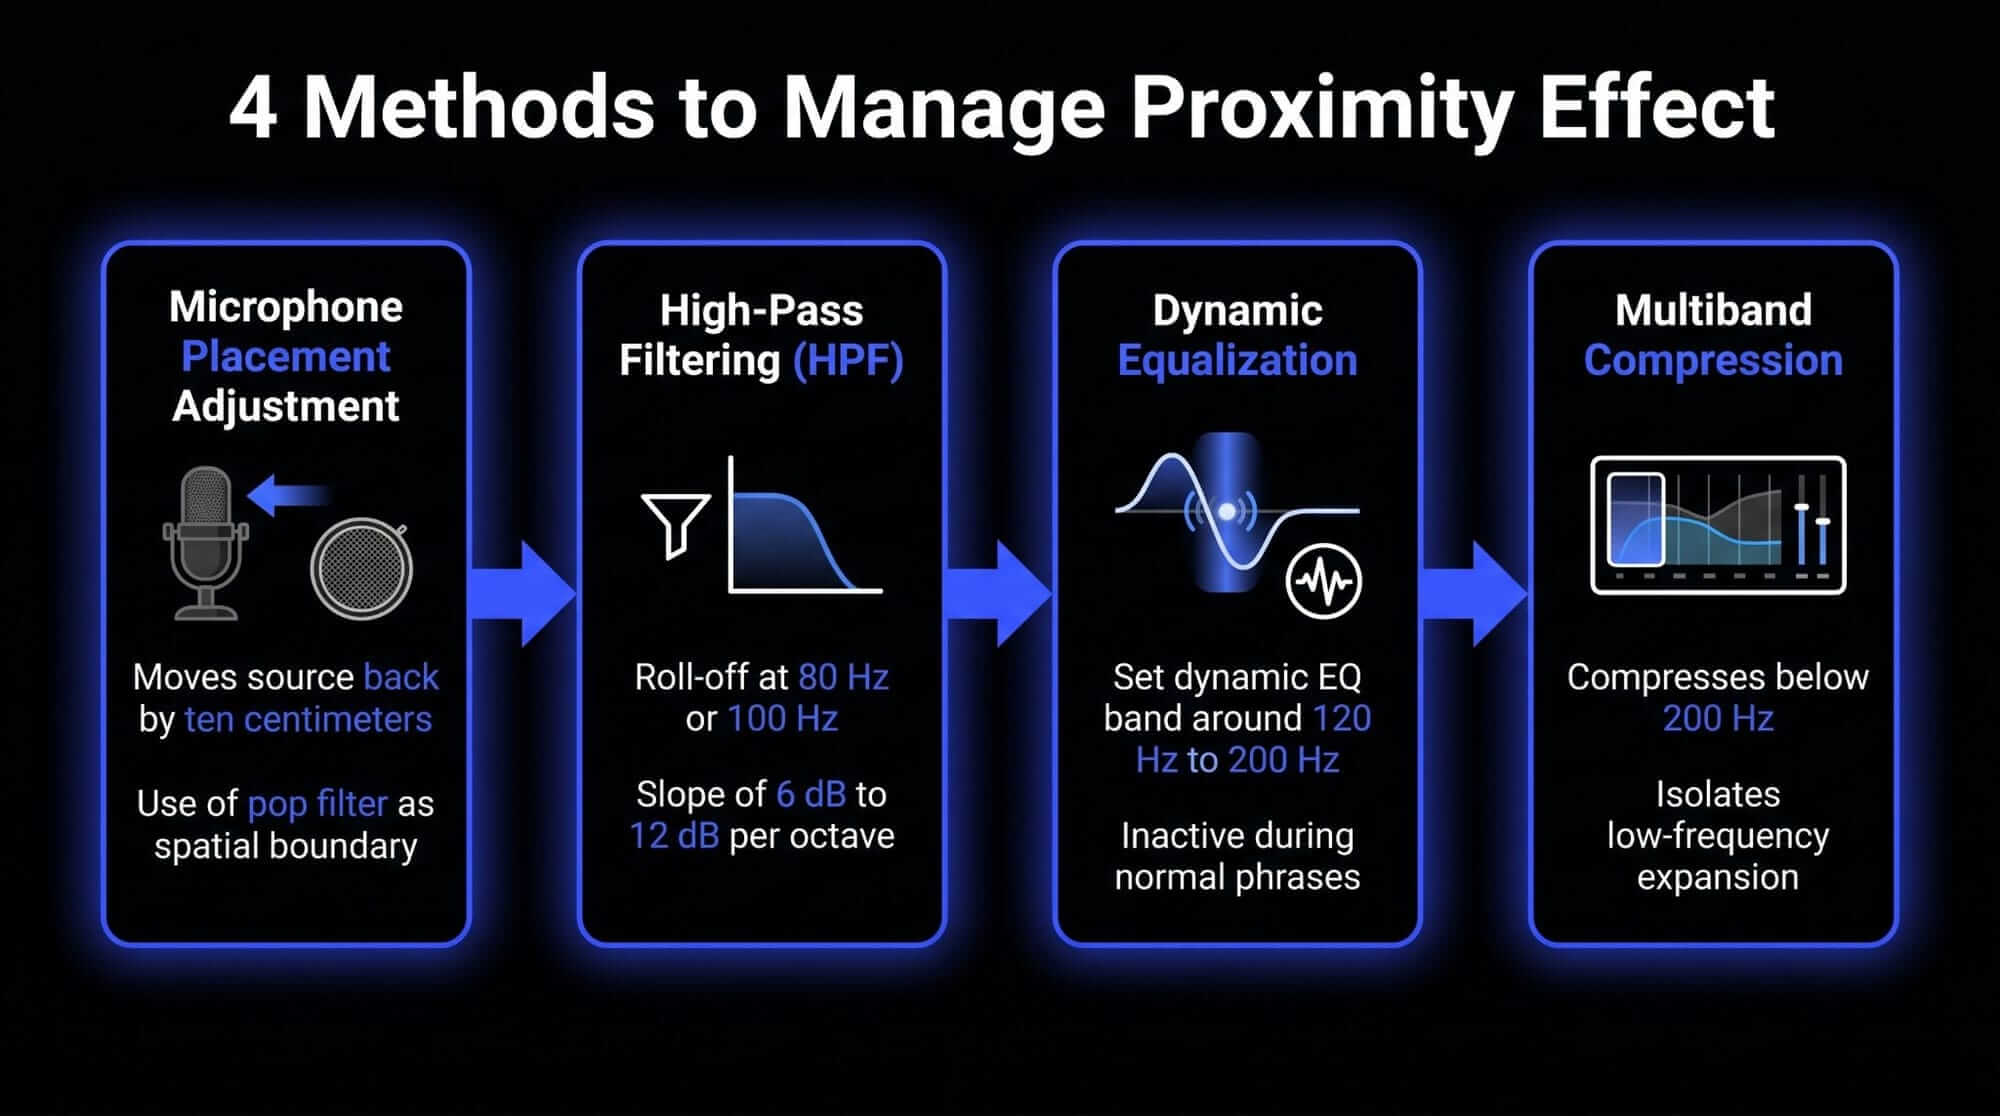
1. Microphone Placement Adjustment
Physically alter the distance. Moving a source back by just ten centimeters significantly drops the nearfield amplitude differential. Use a physical pop filter set twelve to twenty centimeters from the capsule as a spatial boundary to keep vocalists from drifting too close.
2. High-Pass Filtering (HPF)
Clean up low-end clutter at the input stage. Engage the switchable high-pass filter on your microphone or preamp during the tracking phase. Setting a roll-off at 80 Hz or 100 Hz with a slope of 6 dB to 12 dB per octave removes unnecessary sub-bass energy before it hits your converters.
3. Dynamic Equalization
Target low frequencies contextually. Static EQ curves can make a track sound too thin when a performer steps away from the mic. Set a dynamic EQ band around 120 Hz to 200 Hz. The EQ will remain inactive during normal phrases but will automatically pull down the bass only when the performer moves close and triggers a low-end spike.
4. Multiband Compression
Compress localized frequency zones. Isolate and compress everything below 200 Hz. This contains the low-frequency expansion caused by physical movement while leaving the mid-range and high-frequency performance completely uncompressed.
Historical Measurement and Technical Calibration
Our modern understanding of how to manage proximity effect stems from rigorous lab testing established in the mid-twentieth century.
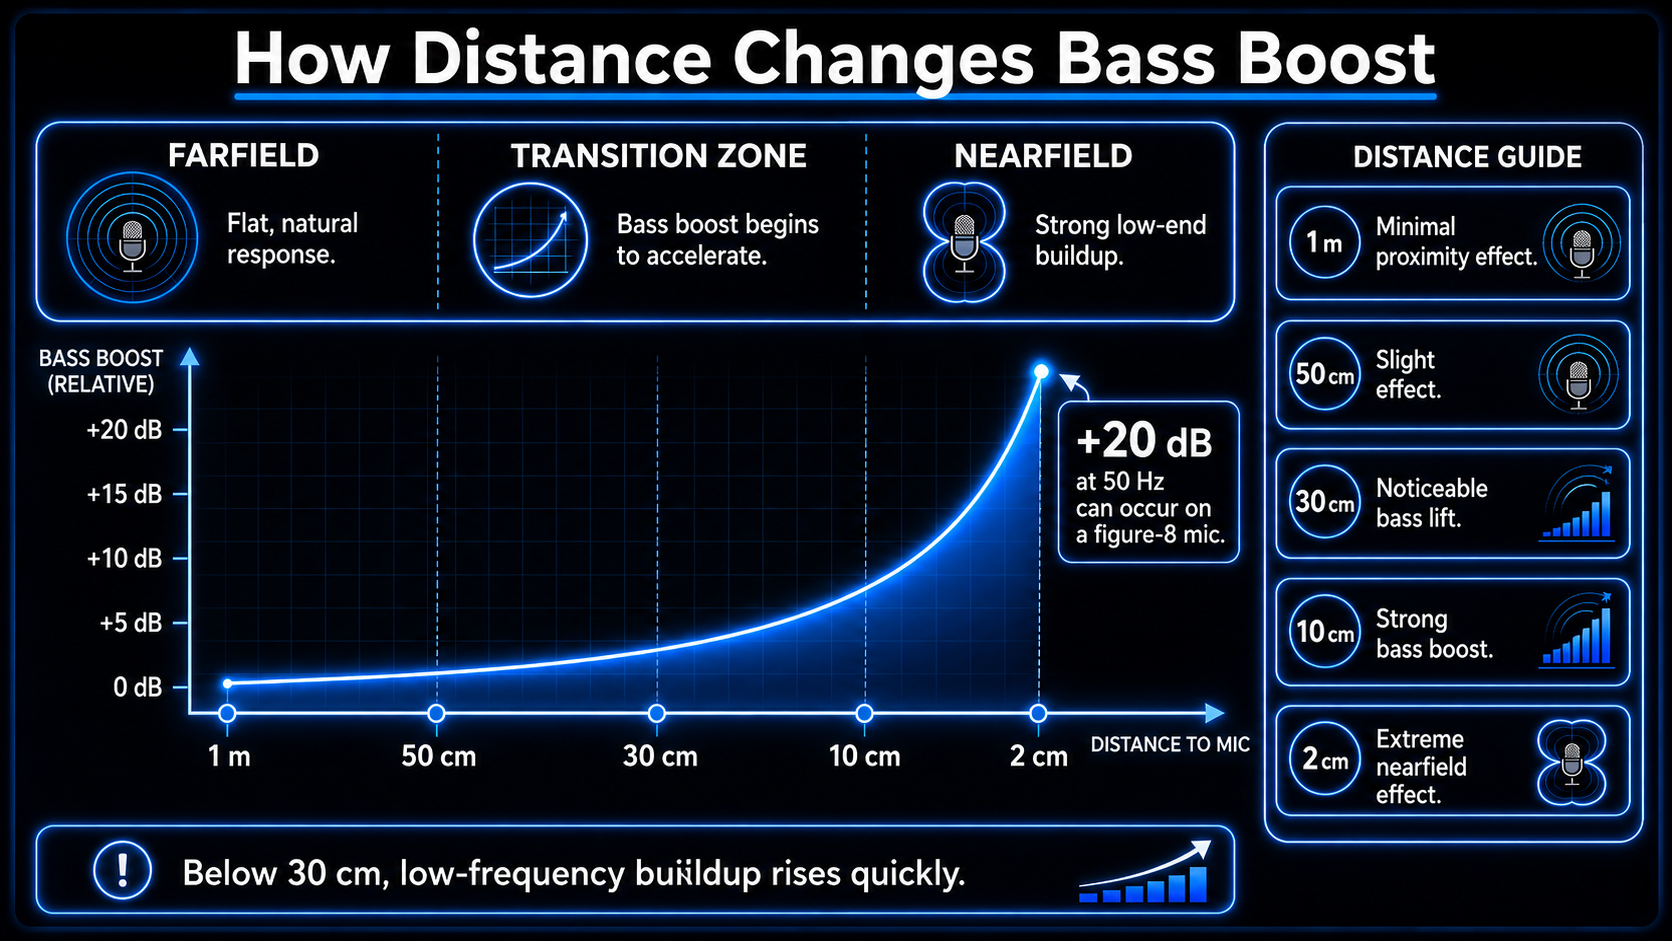
Laboratory Testing in Anechoic Chambers
Technicians use echo-free anechoic chambers to measure capsules without room reflections. A calibrated loudspeaker acts as a point source on a linear rail. The speaker projects continuous frequency sweeps (20 Hz to 20 kHz) at precise distance intervals (1m, 50cm, 30cm, 10cm, 2cm).
The Findings
Data shows that the proximity effect accelerates exponentially once a source drops below thirty centimeters. A pure bidirectional microphone can experience a massive +20 dB spike at 50 Hz when placed two centimeters from a source.
This measurement data allows manufacturers to build internal phase labyrinths that balance directional rejection with a predictable proximity curve. It also led to proximity-compensated microphones, which feature a built-in low-frequency roll-off that flattens out only when spoken into from an ultra-close distance.
Creator Use Cases and Workflow Integration
Studio Recording Workflow
- Analyze the Arrangement: Determine if the track needs low-end intimacy (e.g., a lead vocal) or clarity (e.g., a dense acoustic strumming layer).
- Set the Boundary: Position a pop filter fifteen centimeters away from a cardioid condenser mic to anchor the vocalist's movements.
- Check the Tone: If the low-midrange builds up excessively during tracking, do not reach for an EQ. Rotate the mic chassis fifteen degrees off-axis or move it back five centimeters to let acoustics fix the problem.
- Create Contrast: Keep primary elements close to utilize the nearfield effect, but track backing tracks further away in the farfield to keep the overall mix clean.
Live Sound Strategy
Live vocalists constantly press their lips against the microphone grille to maximize isolation from loud stage monitors. This triggers an extreme proximity effect.
The Execution: Expect this behavior and compensate at the console. Engage a steep high-pass filter between 100 Hz and 150 Hz on every vocal channel, and apply a focused cut around 250 Hz to clear out muddy frequencies before they hit the subwoofers.
Podcasting and Broadcast
Use a broadcast-specific large-diaphragm dynamic microphone. These feature internal distance compensation networks that deliver a smoother bass curve than studio condensers.
The Technique: Maintain a consistent distance of one hand-span (ten to fifteen centimeters) from the capsule. Lean in closer and lower your voice during quiet, narrative passages to consciously use the closeness effect for a warm, conversational intimacy.
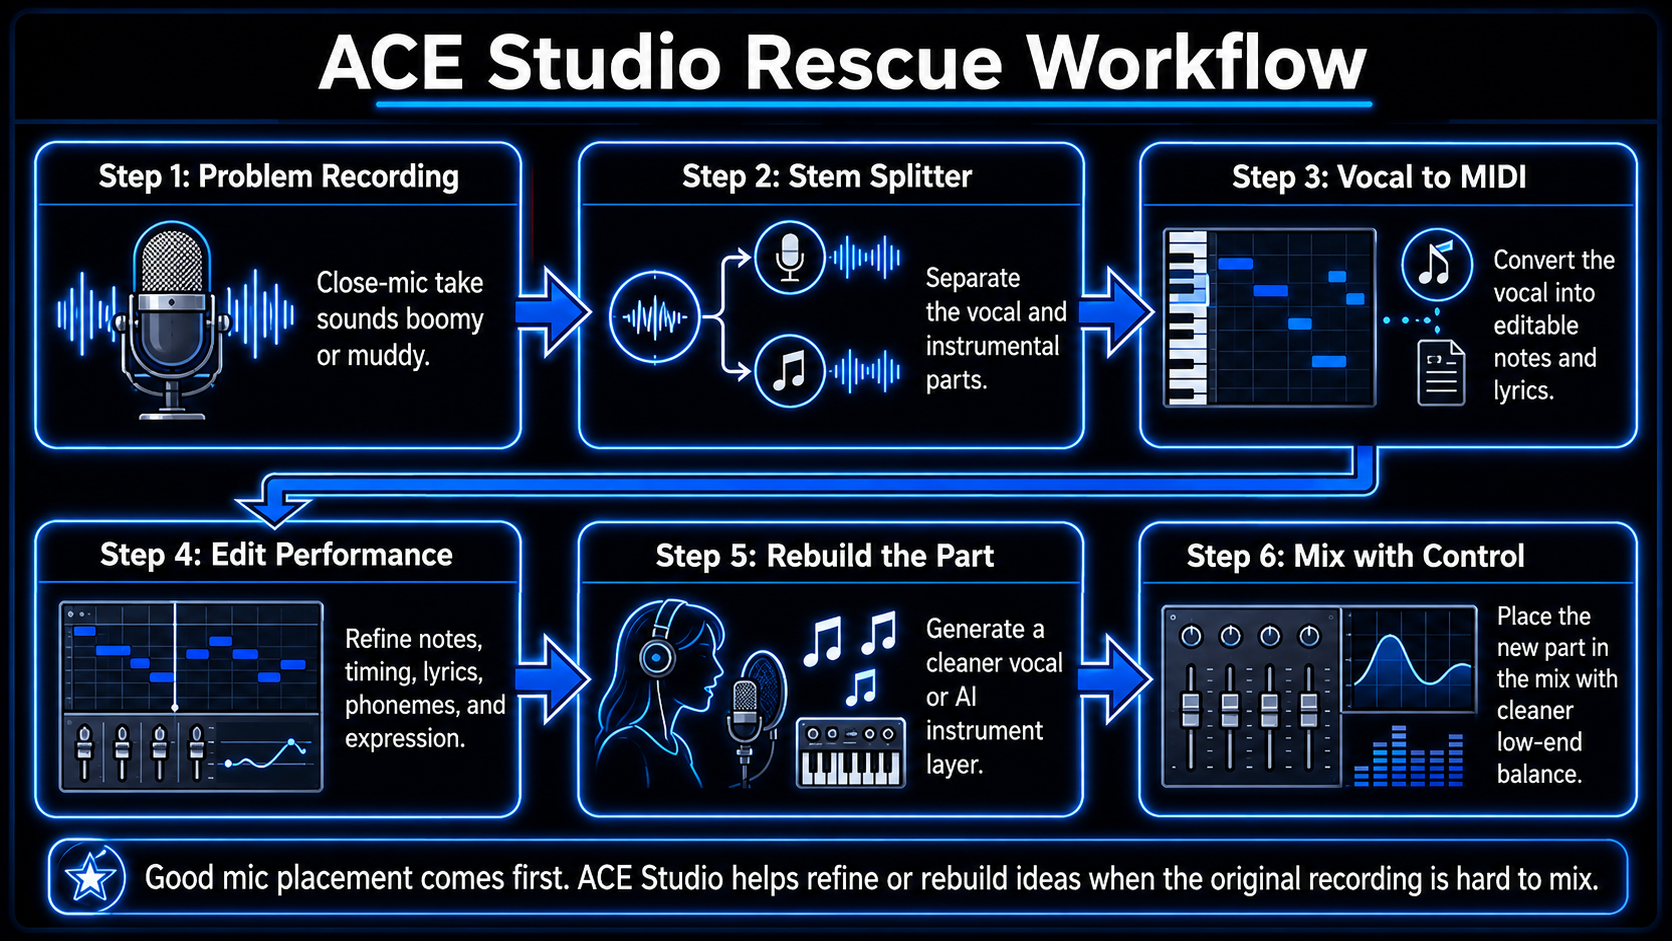
How ACE Studio Helps Producers Shape Clean, Controlled Performances
The proximity effect is a microphone behavior, so no software should be treated as a replacement for good placement, angle, and gain staging. If a vocal or instrument was recorded too close to a directional mic, the smartest fix is still to solve as much as possible at the source. But once you understand what the proximity effect is doing, ACE Studio gives you another practical option: you can rebuild, refine, or layer musical parts with more control over performance detail before committing to another close-mic recording.
This is especially useful when the problem is not just “too much bass,” but a performance that has become hard to balance. A close vocal may feel warm and intimate, but the low-midrange can start masking the lyric. A brass phrase may have the right energy, but too much lower body from close placement. A string or woodwind layer may need expression without adding more room noise, mic bleed, or uneven low-frequency buildup. ACE Studio helps in those moments because it works from musical information – notes, lyrics, timing, phrasing, and expression – rather than forcing you to keep reshaping a problematic audio capture.
For vocals, ACE Studio can generate singing from MIDI notes and lyrics, then let you shape the performance through note editing, lyrics, phonemes, pitch, and vocal control parameters. That makes it useful when a close-mic vocal idea has the right melody but the wrong tonal balance. You can recreate the part, adjust the phrasing, refine the breath and emphasis, and decide how much weight the vocal should carry before it competes with kick, bass, or low piano energy. ACE Studio’s Voice Library includes pre-made, cloned, community, blended, and choir voice options, so the goal is not just “replace the singer,” but choose the right vocal texture for the arrangement.
AI Instruments let you create playable instrument performances from MIDI, with available instrument and ensemble options inside the Instrument Library. For a topic like proximity effect in music, that matters because many home-recorded instruments become difficult to mix when they are tracked too close: acoustic guitars get boomy, brass gets thick in the wrong range, and layered parts can crowd the same 100 Hz to 300 Hz area.
With ACE Studio's AI Instruments, you can sketch or rebuild supporting parts with cleaner tonal intent, then decide whether the song actually needs a recorded close-mic layer, an AI instrument layer, or both. ACE Studio’s current 2.0 instrument updates include strings, saxophones, trumpets, and duduk, with articulation control for more nuanced performances.
Another practical use is rescuing musical ideas from imperfect recordings. If you have a mixed track or rough demo where the vocal was recorded too close, ACE Studio can use Stem Splitter to separate the vocal and instrumental, then Vocal to MIDI to turn the vocal into editable notes and lyrics. From there, you can refine the part instead of fighting the same low-end buildup with endless EQ moves. This is useful when the emotional idea is good, but the microphone distance created too much boom, plosive energy, or low-mid masking.
For producers working in dense arrangements, ACE Studio also helps separate arrangement problems from recording problems. Sometimes the vocal is not actually too boomy on its own – it only feels that way because a low string pad, bass guitar, piano left hand, and close-mic acoustic guitar are all occupying the same range. By rebuilding or testing certain parts as editable MIDI-based vocals or instruments, you can hear which element truly needs body and which one needs space. That leads to cleaner decisions than simply high-passing everything until the mix turns thin.
The benefit is simple: ACE Studio gives you a controlled place to shape performance before proximity effect becomes a permanent tonal commitment. You still decide the melody, lyric, part, register, expression, and final mix placement. ACE Studio provides the editable voice and instrument layer, but the musical judgment stays with you.
Frequently Asked Questions
Why do omnidirectional microphones lack the proximity effect?
Omnidirectional microphones operate as pure pressure systems. Because the rear of the capsule housing is completely sealed from external sound waves, the microphone only measures absolute air pressure at a single point in space. Without a secondary rear entry port, there is no pressure gradient, which makes the capsule completely immune to nearfield amplitude variations.
How does off-axis positioning alter the proximity effect?
When a sound source moves off-axis, it strikes the front and rear entry ports of a directional microphone almost simultaneously along the lateral plane. This drastically attenuates the pure amplitude discrepancy that drives the pressure-gradient system, causing the proximity-induced low-frequency boost to drop off sharply compared to an on-axis performance.
Can I fix proximity effect issues completely during mixing?
While high-pass filters, dynamic EQ, and multiband compression can control excessive low frequencies during a mix, they cannot restore clarity that was lost due to capsule distortion or severe acoustic masking. Fixing the issue at the source using proper microphone placement always yields a cleaner, more natural transient response.