The Ultimate Guide to De-Essing in Audio Production

Key Takeaways
- De-essing is not about removing every sibilant sound. The goal is to control harsh consonants while keeping the vocal clear, natural, and easy to understand.
- Different de-essing methods serve different needs. Manual gain leveling gives the most transparent result, split-band de-essing works well for most vocal mixes, and spectral or smart de-essing is better for detailed or highly dynamic material.
- The best results usually come from fixing harshness in stages. Light manual editing before compression and gentle de-essing after compression often sound smoother than forcing one plugin to do all the work.
- ACE Studio can help reduce vocal harshness before mixing by letting producers shape pronunciation, timing, phonemes, expression, harmonies, choirs, and vocal delivery before heavy processing is needed.
- De-essing also applies beyond lead vocals. Background vocals, acoustic guitars, cymbals, hi-hats, stems, and even mastering chains can benefit from controlled high-frequency reduction when harshness causes listener fatigue.
Foundations of Vocal Sibilance
Defining Sibilance in Voice and Speech
In the discipline of audio engineering, managing the nuances of human speech is one of the most frequent challenges encountered during vocal processing. Vocal sibilance refers to the high-frequency acoustic energy generated by the friction of breath passing through the human vocal tract, specifically when pronouncing fricative and affricate consonants. Examples of these speech sounds include s, z, sh, ch, and j.
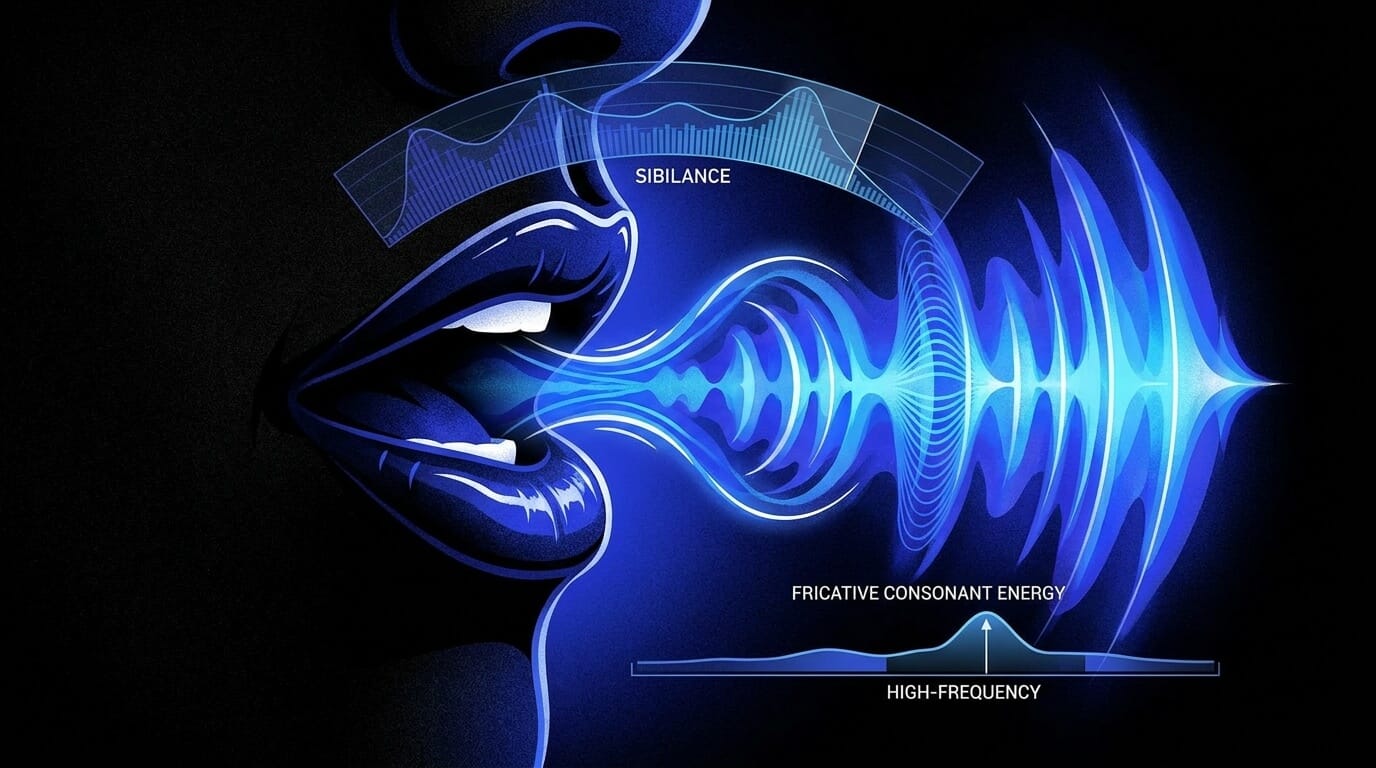
While these consonants are essential for speech clarity and word comprehension, the mechanics of modern recording techniques often exaggerate their presence. When a performer sings or speaks closely into a high-sensitivity microphone, these transient bursts of acoustic energy can become disproportionately loud relative to the vowel sounds, which carry the fundamental harmonic weight of the performance.
Acoustic Physics and Frequency Ranges
From a sound engineering perspective, sibilant energy does not occupy a single static frequency. Instead, it distributes across a broad high-frequency spectrum, typically spanning from 2 kHz to well over 10 kHz. The exact distribution of this energy depends significantly on the biological characteristics of the performer, including vocal tract shape, dental structure, and gender.
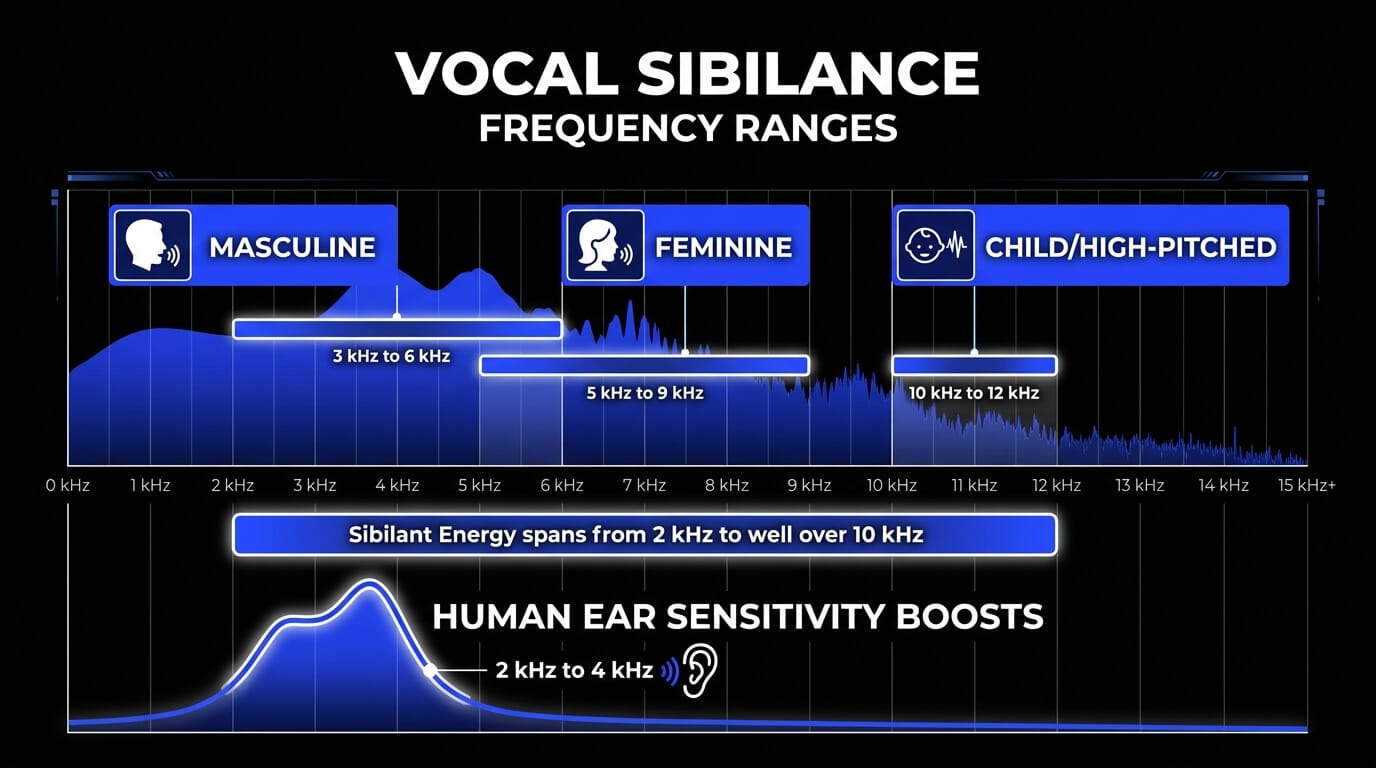
- Masculine Vocal Characteristics: Sibilant energy often concentrates lower in the spectrum, typically between 3 kHz and 6 kHz.
- Feminine Vocal Characteristics: Sibilance generally shifts higher, frequently peaking between 5 kHz and 9 kHz.
- Child or High-Pitched Voices: Energy can extend upward into the 10 kHz to 12 kHz range, creating a piercing hiss if left unmanaged.
When microphones capture these frequencies, the resulting peaks can quickly overload digital systems or cause physical discomfort for listeners, making sibilance reduction a fundamental task during sound mixing.
The Role of Human Perception and Psychoacoustics
The human auditory system is naturally calibrated to be highly sensitive to the frequency range where sibilance occurs. The human ear canal possesses a natural acoustic resonance that boosts frequencies between 2 kHz and 4 kHz—a phenomenon heavily documented in equal-loudness contours such as the Fletcher-Munson curves. This sensitivity evolved to help humans understand speech details and detect environmental threats.
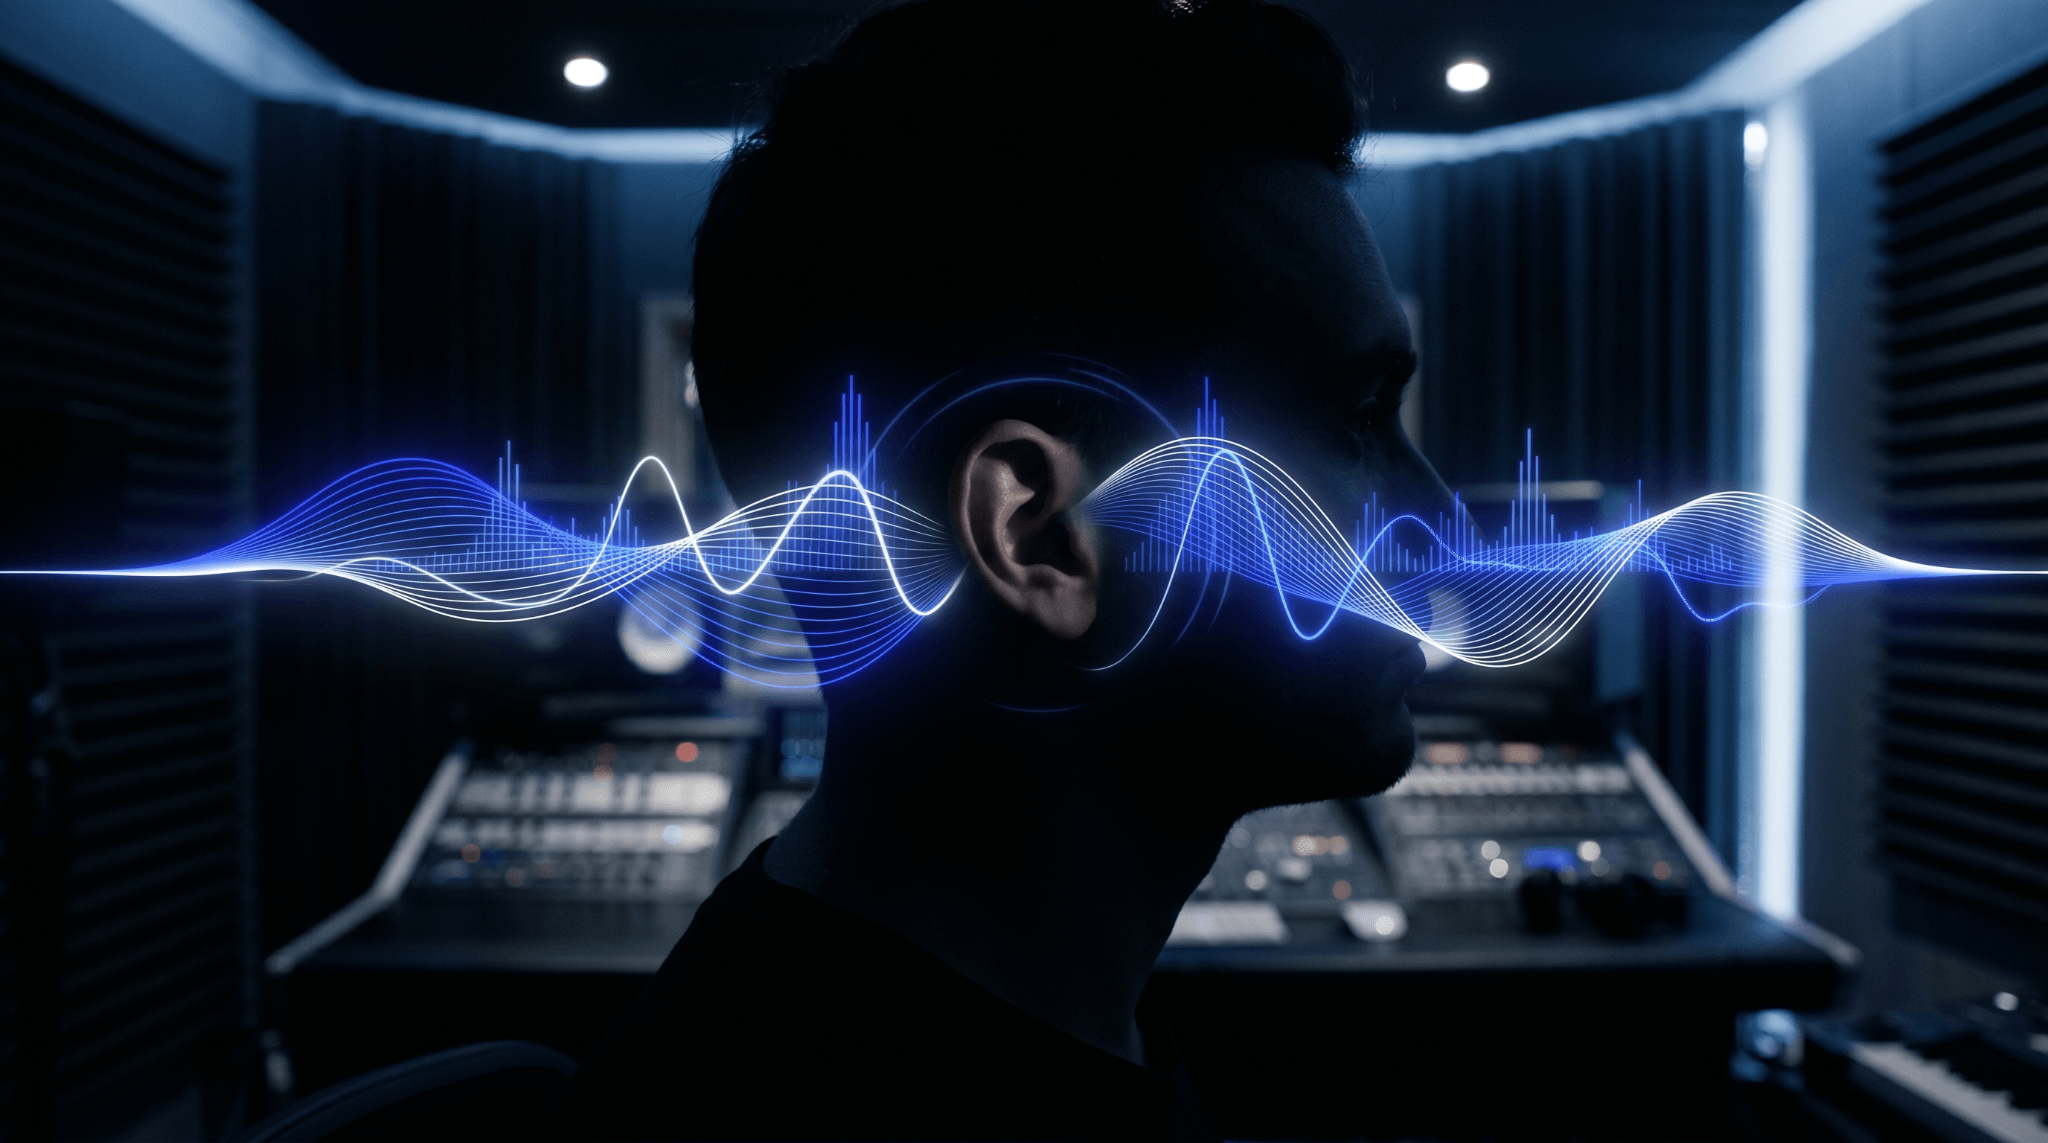
In a modern music production context, however, this means that even a minor surplus of high-frequency energy can cause immediate listening fatigue. If a vocal track contains unmanaged sibilant bursts, listeners will perceive the entire mix as harsh, brittle, or unpolished. Conversely, if an audio engineer removes too much of this energy, the vocal loses its presence, resulting in a muffled performance that sounds as though the vocalist has a speech impediment. Striking the perfect balance between speech clarity and smooth high-frequency response is the core objective of effective vocal mixing.
The Core Mechanism of De-Essing
What Constitutes a De-Esser
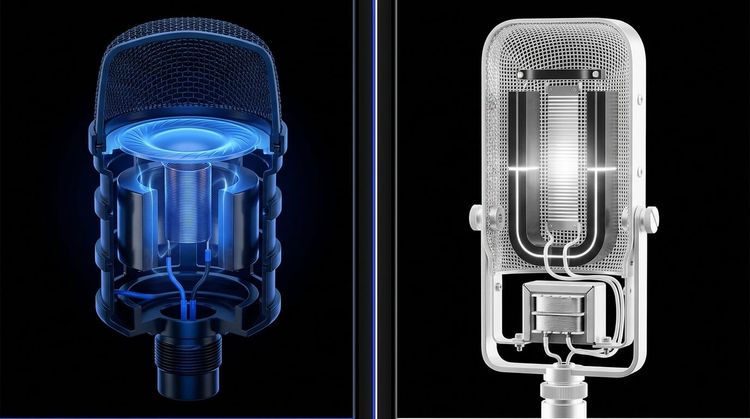
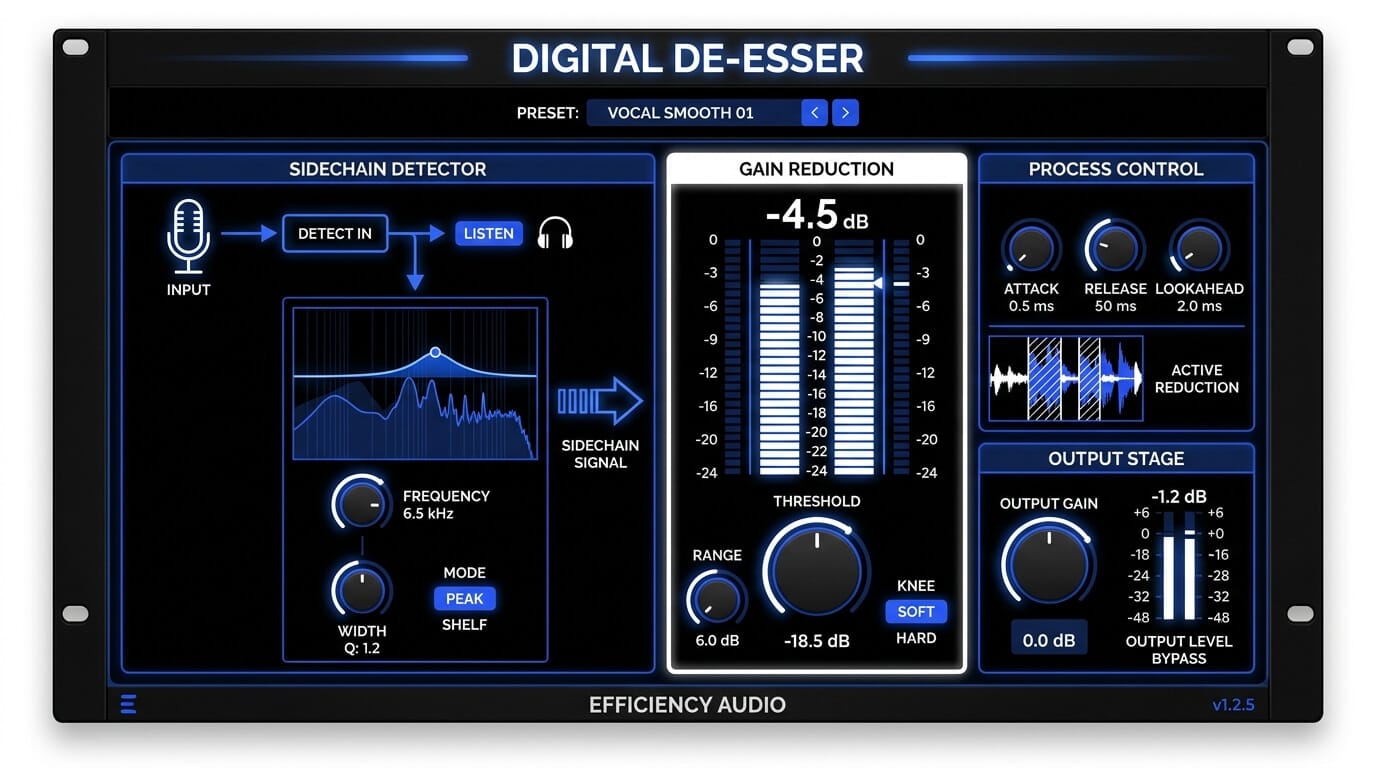
A de-esser is a specialized audio processor designed specifically to automate the attenuation of high-frequency sibilant energy. At its core, a de-esser operates as a frequency-dependent dynamics processor. While a standard compressor reacts to the volume changes of an entire audio signal across all frequencies, a de-esser isolates its detection circuit to focus exclusively on the specific bands where harsh consonants live.
In the modern digital audio workstation, a de-esser plugin streamlines this workflow by integrating advanced filtering and compression algorithms into a single interface. This allows music producers and sound engineers to target and compress problematic areas efficiently without manually rewriting every phrase of a performance.
Signal Processing Architecture
To understand how these tools operate within audio processing, it is helpful to divide their internal architecture into two primary components: the sidechain detector path and the gain reduction element.
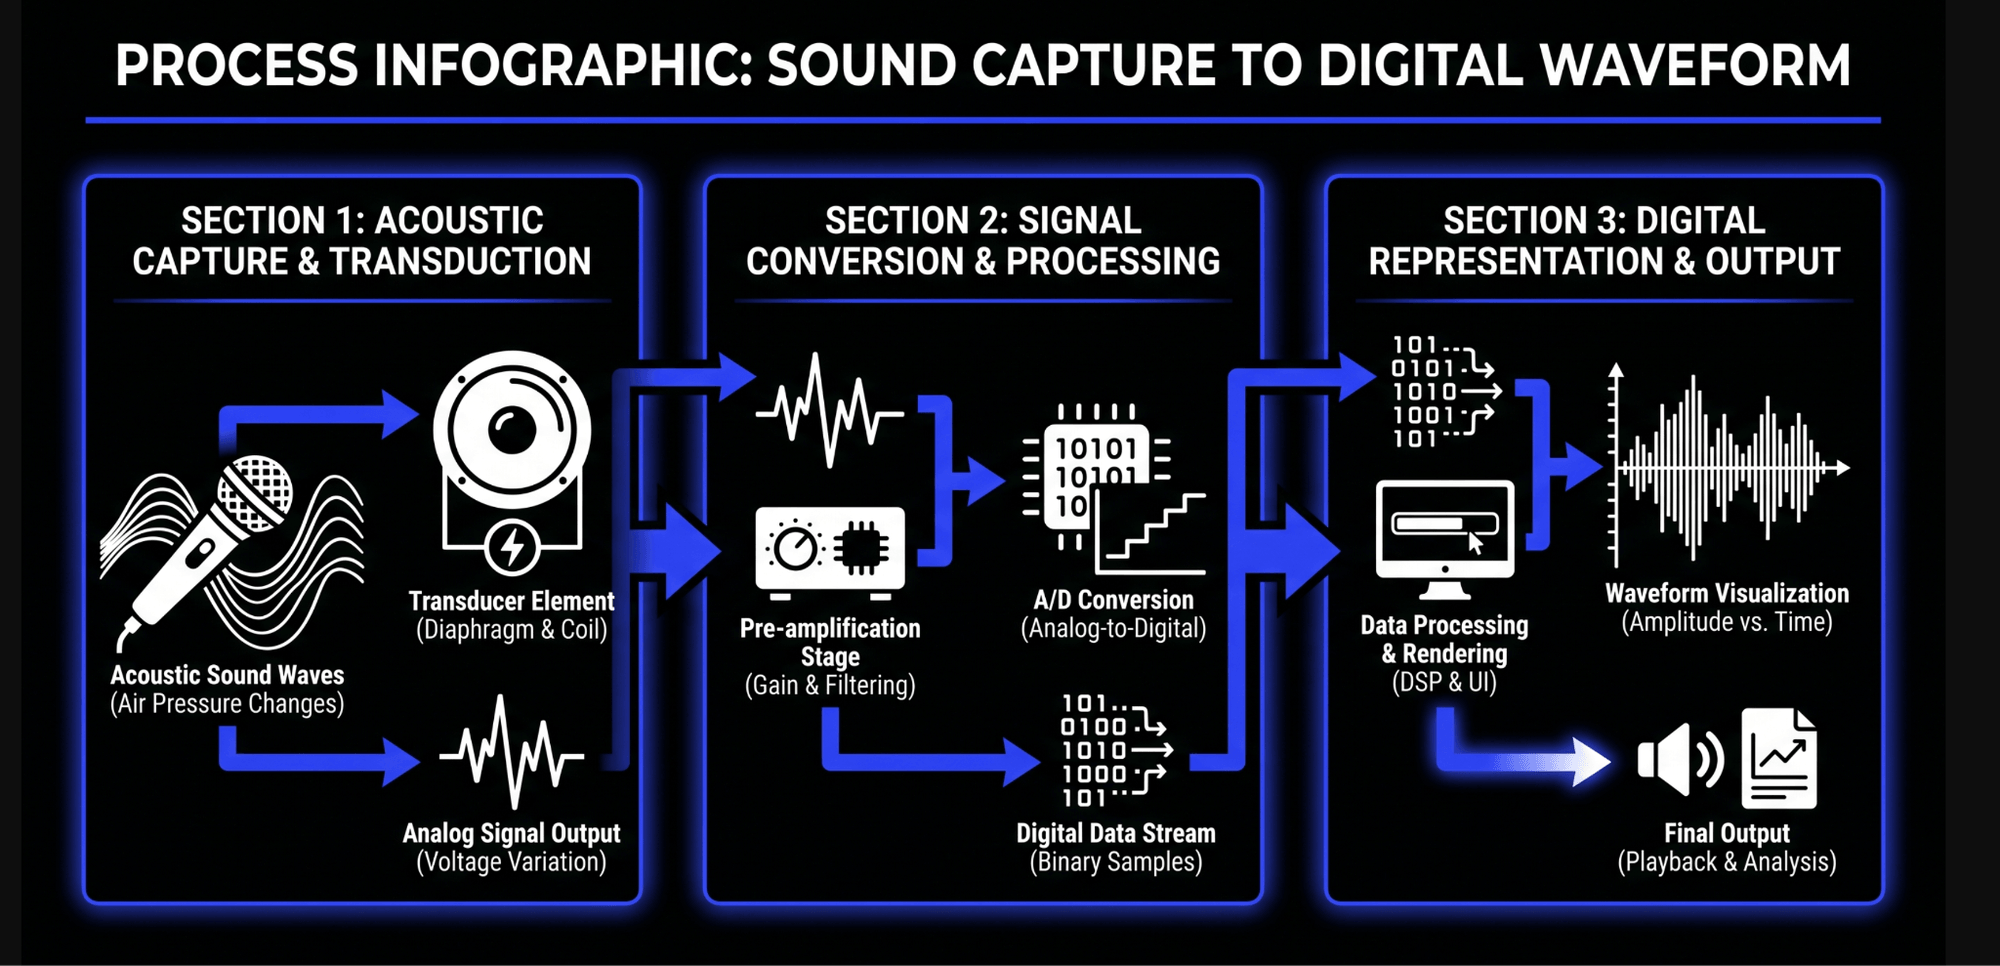
The Sidechain Detector Path
The input signal entering the de-esser splits into two identical paths. The first path is the detector circuit, often referred to as the sidechain loop. This path does not feed directly into the final audio output. Instead, it passes through a specialized equalization stage—typically a high-pass filter or a band-pass filter—to isolate the troublesome sibilant frequencies.
For example, if an engineer tunes the sidechain filter to a band-pass setting centered at 6 kHz, the detector circuit completely ignores the powerful low-end energy of the vocal fundamental tones and the mid-range warmth of the vowels. It only analyzes the energy level within that isolated 6 kHz zone. When a sharp consonant occurs, the energy within this filtered sidechain spikes dramatically, instructing the detector that attenuation is required.
The Gain Reduction Element
Once the sidechain detector determines that the high-frequency energy has surpassed a user-defined threshold, it commands the main signal path to reduce its volume. The main signal path contains the gain reduction element, which historically functioned like a voltage-controlled amplifier (VCA) found in analog compressors.
When the detector registers a sibilant event, it applies ultra-fast gain reduction to the vocal signal. As soon as the consonant ends and the vocal transitions back into a vowel sound, the sidechain energy drops below the threshold, and the gain reduction element releases, restoring the vocal to its original volume. This entire process occurs within milliseconds, ensuring that the processing remains virtually transparent when configured correctly.
Architectural Types of De-Essers
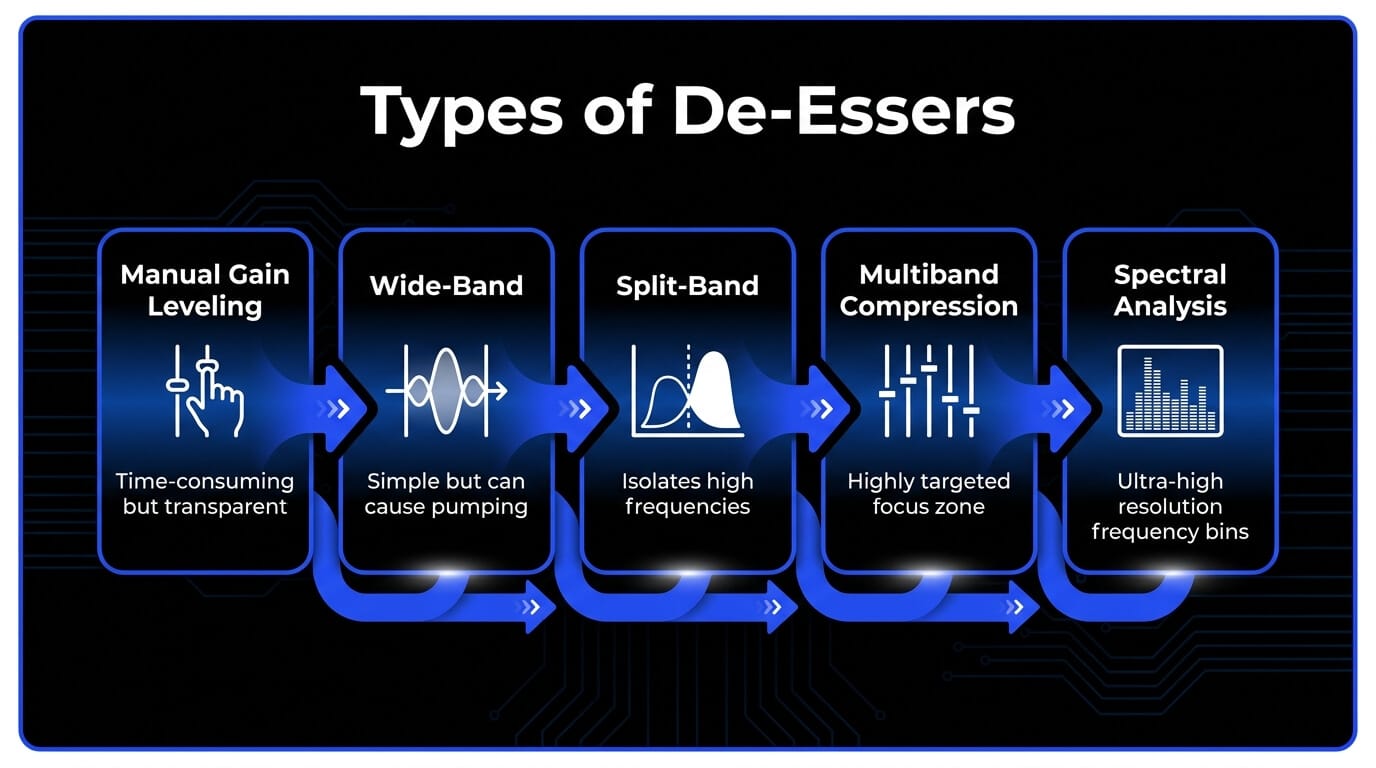
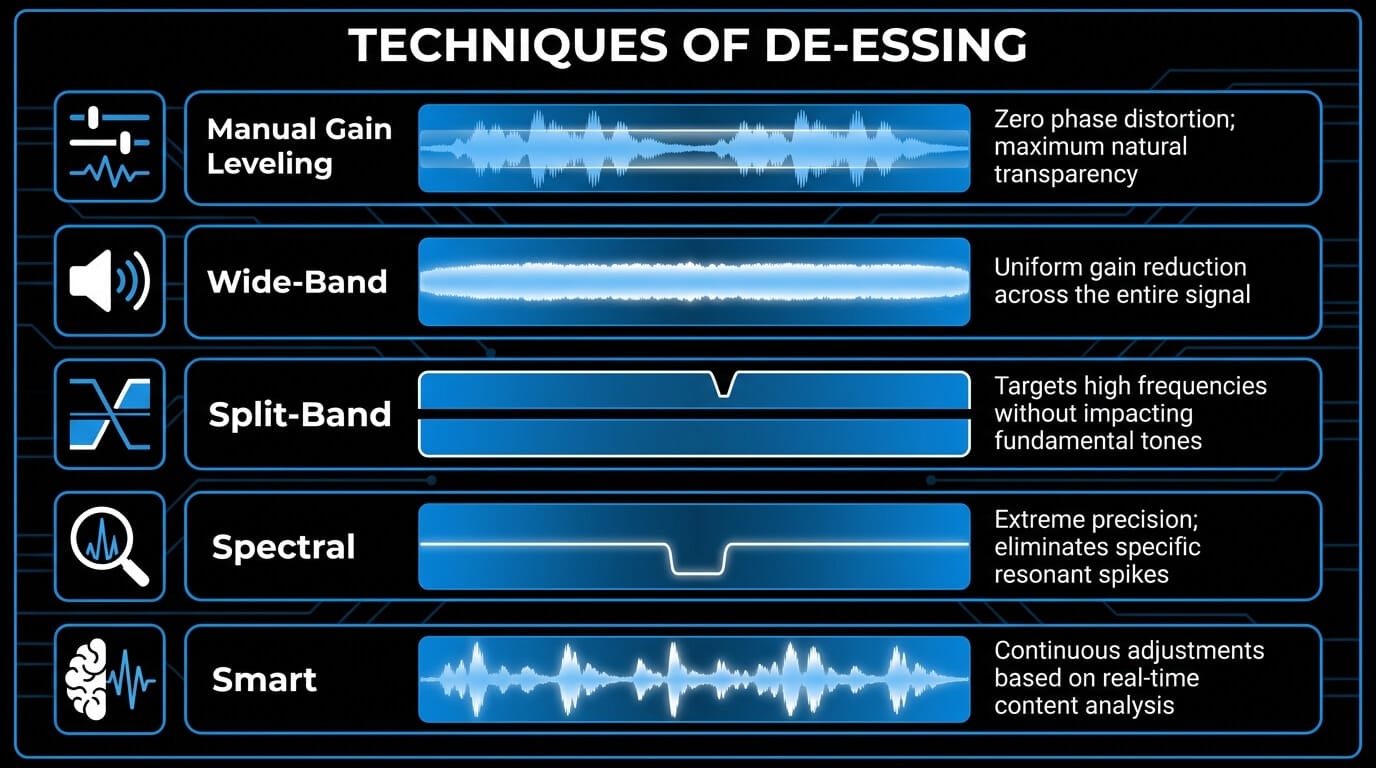
Manual Gain Leveling and Clip Gain
Before exploring automated software tools, it is vital to understand manual de-essing, which remains a preferred technique among high-level audio engineers. Manual de-essing involves using a digital audio workstation's clip gain or volume automation features to isolate and lower individual sibilant waveforms piece by piece.
To execute this technique, an engineer zooms in on the vocal track timeline, visually identifies the distinct, high-frequency hash patterns that represent sibilant consonants, and separates them into independent audio clips. The gain of those specific clips is then lowered by anywhere from 3 dB to 10 dB relative to the surrounding vowels.
The primary benefit of this approach is absolute transparency. Because it does not use a dynamic compressor or a filtering circuit, it introduces zero phase shift, distortion, or artifacting. The natural tonal character of the voice is completely preserved. The obvious drawback is that manual leveling is incredibly time-consuming, often requiring hours of meticulous editing for a multi-track vocal arrangement.
Wide-Band Attenuation
Wide-band de-essing is the simplest automated method available. In a wide-band architecture, the sidechain detector monitors a specific high-frequency band, but when it triggers gain reduction, it turns down the volume of the entire vocal signal across all frequencies.
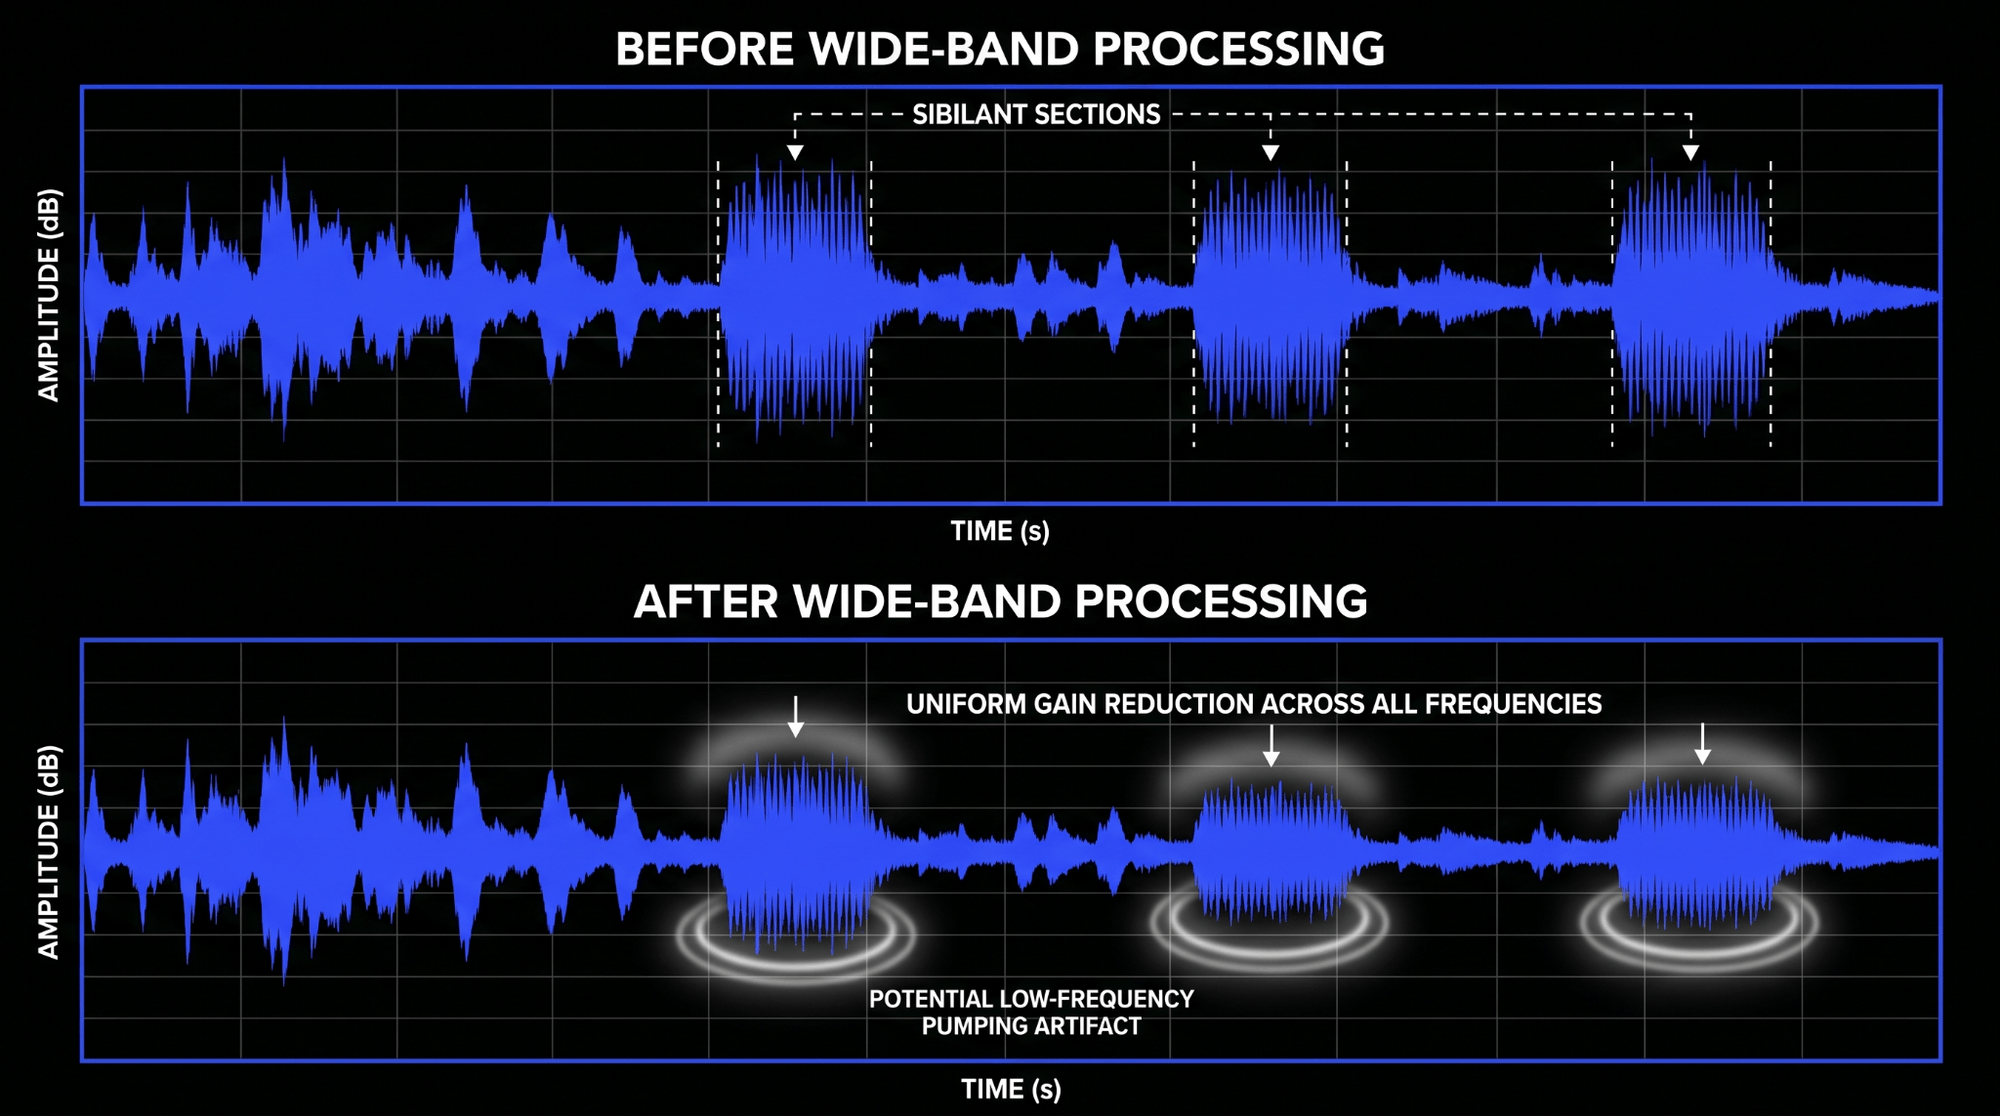
This functions exactly like a fast-acting volume fader pulled down for the duration of the sibilant event. While wide-band processors can sound incredibly cohesive because they preserve the relative tonal balance of the high and low frequencies during attenuation, they carry a distinct risk. If a vocal track requires significant gain reduction, wide-band processing can cause noticeable pumping or ducking in the lower mid-range frequencies, making the vocal sound like it is dipping in volume every time the vocalist utters an s sound.
Split-Band Processing
Split-Band de-essing introduces an internal crossover network to isolate processing strictly to the high frequencies. When the audio signal enters the processor, the crossover splits the signal into two distinct regions: a low band and a high band.
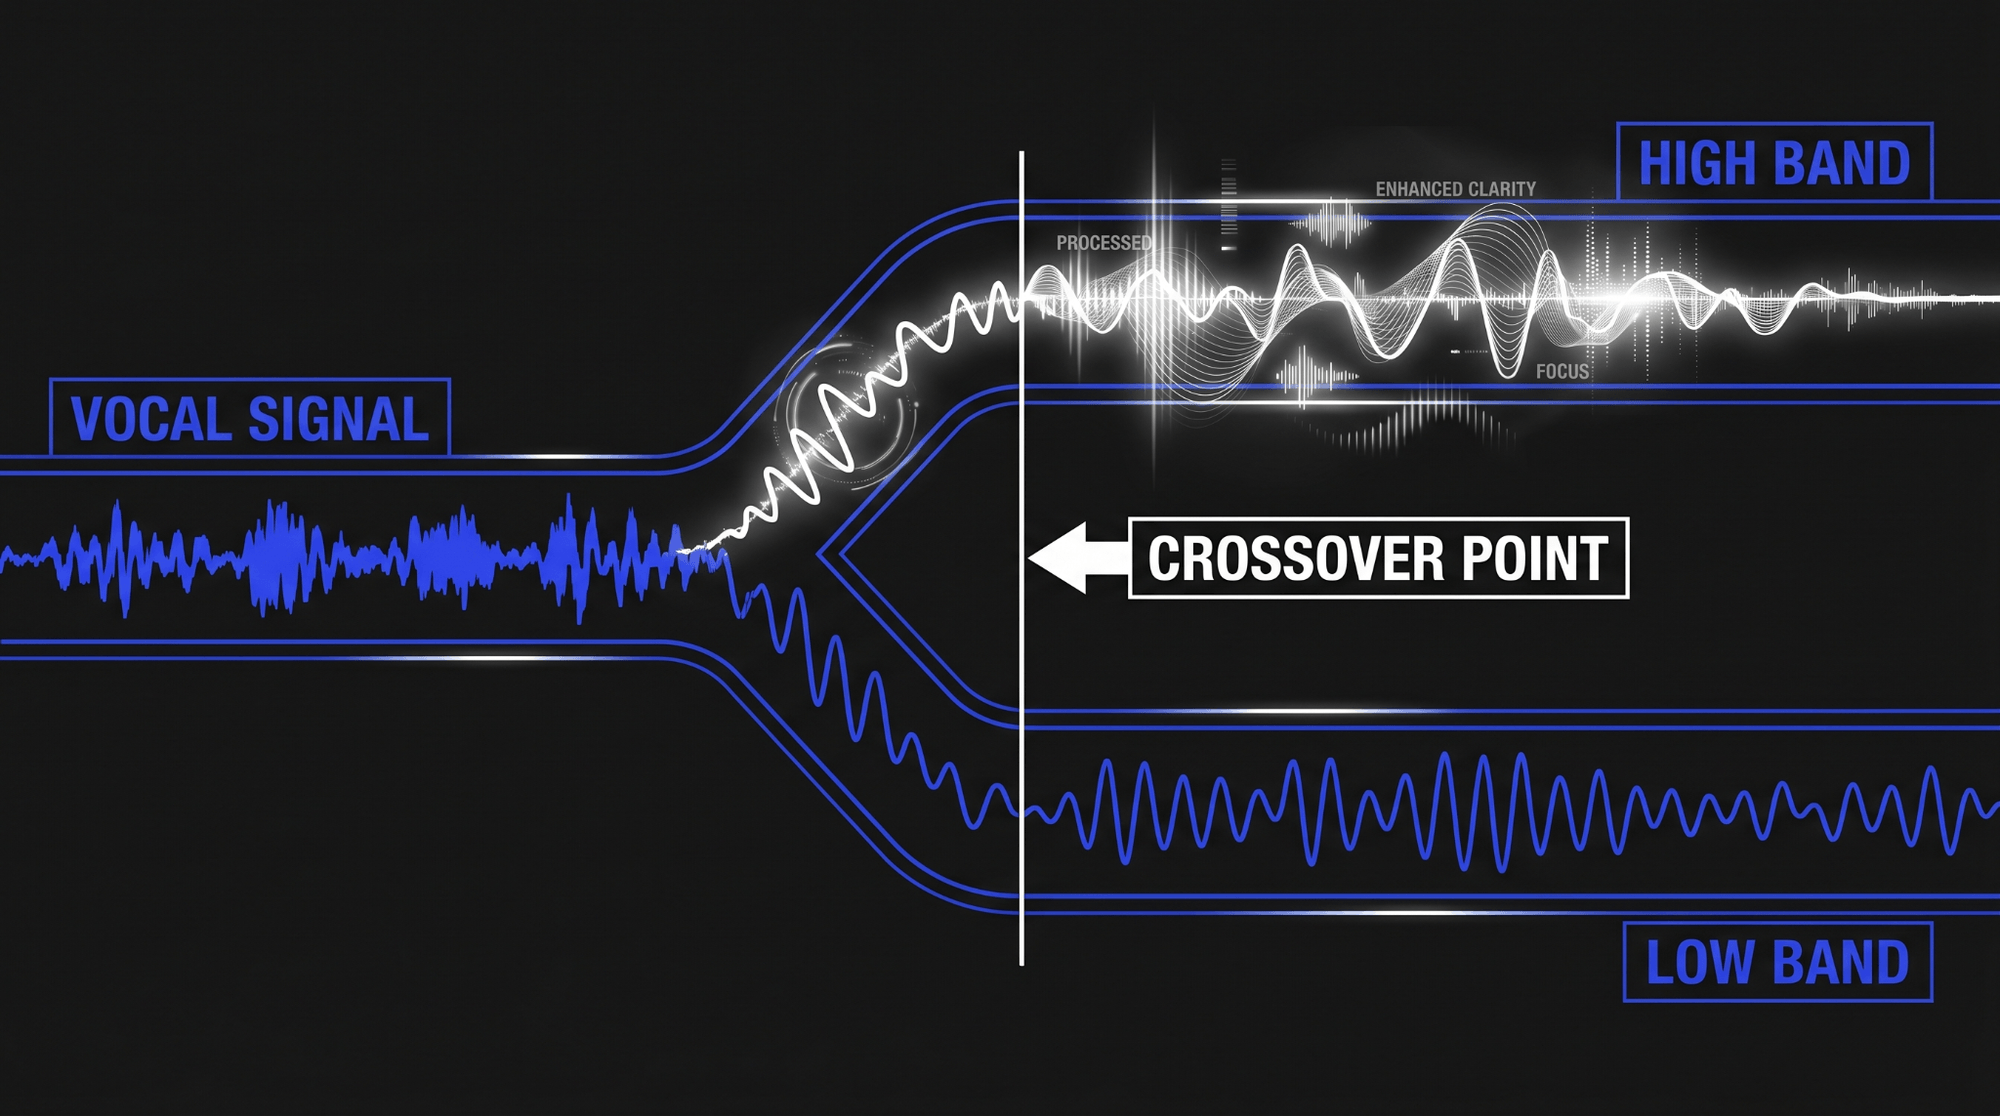
The low band remains completely untouched, allowing the body and fundamental warmth of the vocal to pass through unaffected. The gain reduction element applies its compression exclusively to the high band above the crossover point. This design prevents low-frequency pumping and allows for more aggressive sibilance reduction.
However, minimum-phase crossover filters can introduce minor phase shifts around the crossover frequency. If configured poorly, this phase alteration can slightly smear the transient detail of the voice.
Dynamic Multiband Compression
Multiband de-essing expands upon the split-band concept by using a fully configurable multiband compressor to manage sibilance. Rather than relying on a simple high-frequency shelf split, a multiband compressor allows the engineer to define precise lower and upper crossover boundaries, creating a highly targeted focus zone.
This technique is incredibly effective when dealing with complex vocal recordings where sibilance shifts location depending on whether the vocalist is whispering, singing softly, or belting. By utilizing precision EQ adjustment and flexible dynamic controls within a multiband tool, an operator can manage multiple problematic zones simultaneously without degrading the surrounding high-frequency air.
Spectral Analysis and Processing
Spectral de-essing represents the cutting edge of modern sound engineering software. Instead of splitting the signal into broad bands using standard crossovers, a spectral processor utilizes a Fast Fourier Transform (FFT) algorithm to analyze the incoming audio in ultra-high resolution, breaking the spectrum down into dozens or even hundreds of microscopic frequency bins.
When a sibilant sound occurs, the spectral de-esser identifies the exact resonant frequencies that are spiking abnormally relative to the surrounding audio profile. It then attenuates only those precise, narrow frequency points, leaving adjacent high frequencies completely untouched. This level of surgical precision allows for heavy reduction with virtually no audible artifacts, preserving the crystal-clear clarity of the vocal performance.
Intelligent and Adaptive Systems Like Velvet
As artificial intelligence and advanced machine learning algorithms have integrated into the audio production workflow, smart de-essers have emerged as a significant advancement. A prime example of this technology is Velvet, an intelligent, adaptive processor designed to eliminate the tedious calibration historically required by traditional plugins.
Unlike standard processors that use a static threshold, Velvet analyzes the continuous, real-time relationship between the harmonic content of vowels and the noise-based content of consonants. The software automatically detects sibilant events based on their acoustic signature rather than simple volume levels.
If a vocalist sings a quiet, intimate verse followed by an explosive, belted chorus, a traditional de-esser would under-process the verse and over-process the chorus. Velvet automatically scales its internal parameters to match the changing dynamics of the performance. This ensures consistent, natural-sounding results across the entire track timeline, significantly reducing the need for continuous parameter automation.
Technical Specifications: Typology Feature Sheet
| De-Esser Methodology | Detection Precision | Phase Integrity | Processor Overhead | Best Suited For |
|---|---|---|---|---|
| Manual Gain Leveling | Absolute (User Defined) | Flawless (No Phase Shift) | Zero | Lead vocals in acoustic, jazz, and classical genres |
| Wide-Band Attenuation | Moderate | Excellent | Low | Vintage vocal styles and cohesive acoustic guitars |
| Split-Band Processing | High | Moderate (Crossover Dependent) | Low to Medium | Standard pop, rock, and commercial voiceover work |
| Multiband Compression | Very High | Variable (Linear vs Minimum Phase) | Medium | Dynamic performers with shifting vocal placement |
| Spectral Analysis | Surgical | Excellent (Linear Phase FFT) | High | Audio mastering and problematic, resonant recordings |
| Intelligent Adaptive (Velvet) | Automated / Dynamic | Excellent | Medium to High | Rapid mixing workflows and diverse, highly dynamic vocal tracks |
Practical Workflow for Processing Vocals
1. Locating Problematic Frequency Bands
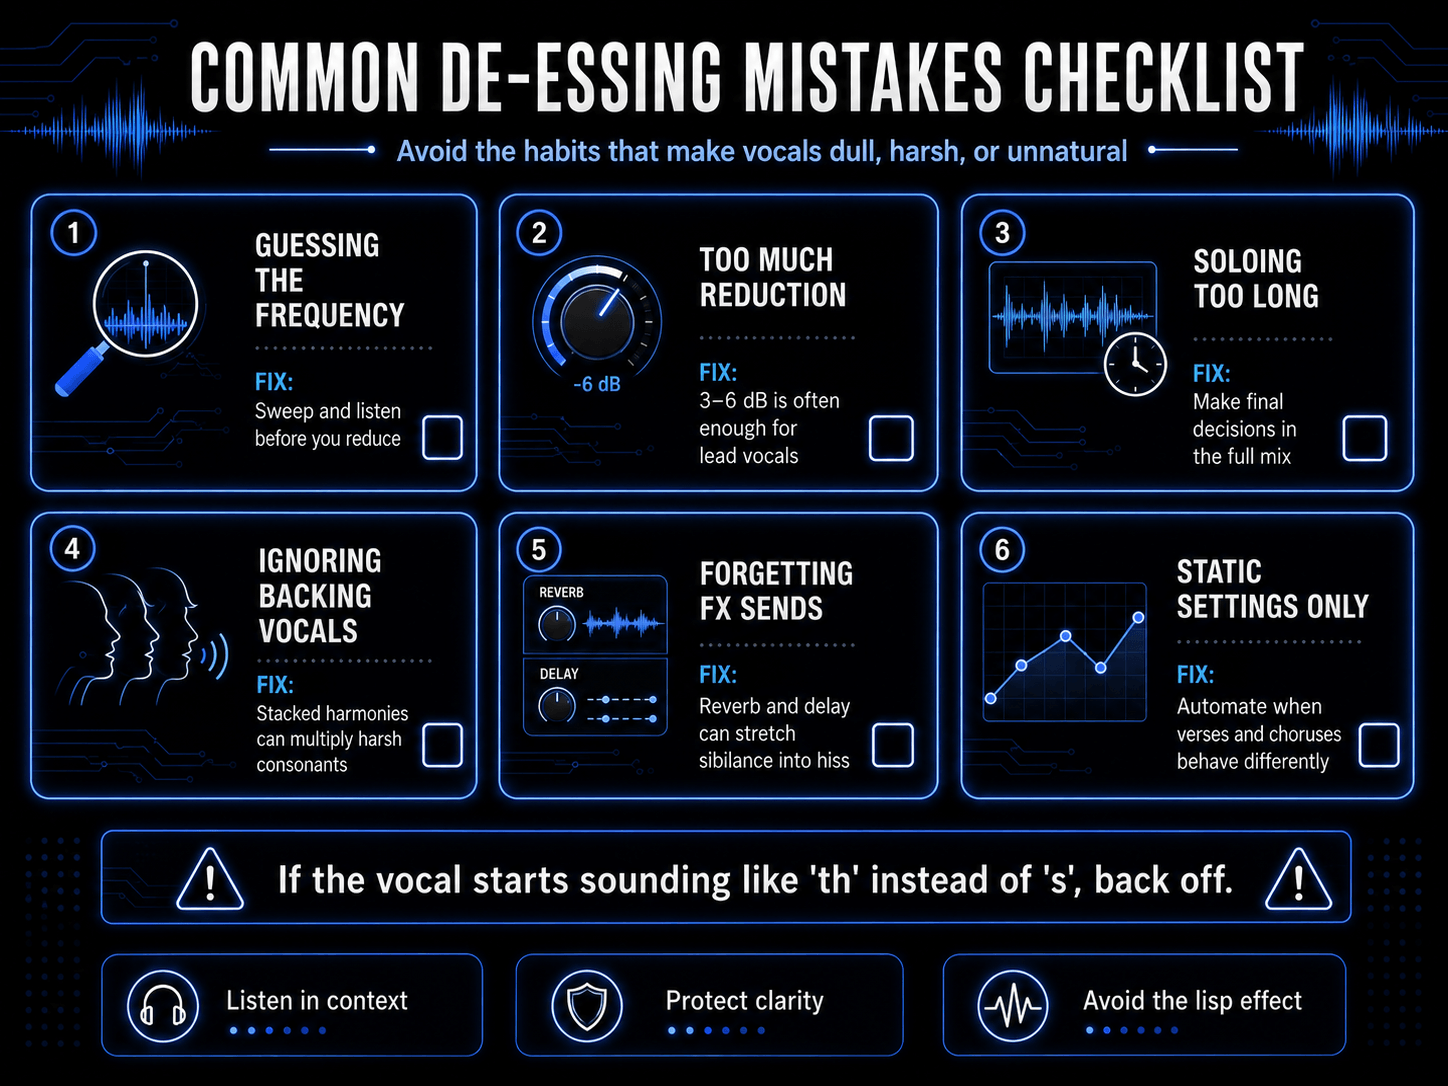
The first step in any successful sibilance reduction workflow is accurately identifying the specific frequency bands where the harshness resides. Never guess where the sibilance is located, as processing the wrong frequency range will dull the vocal without fixing the core problem.
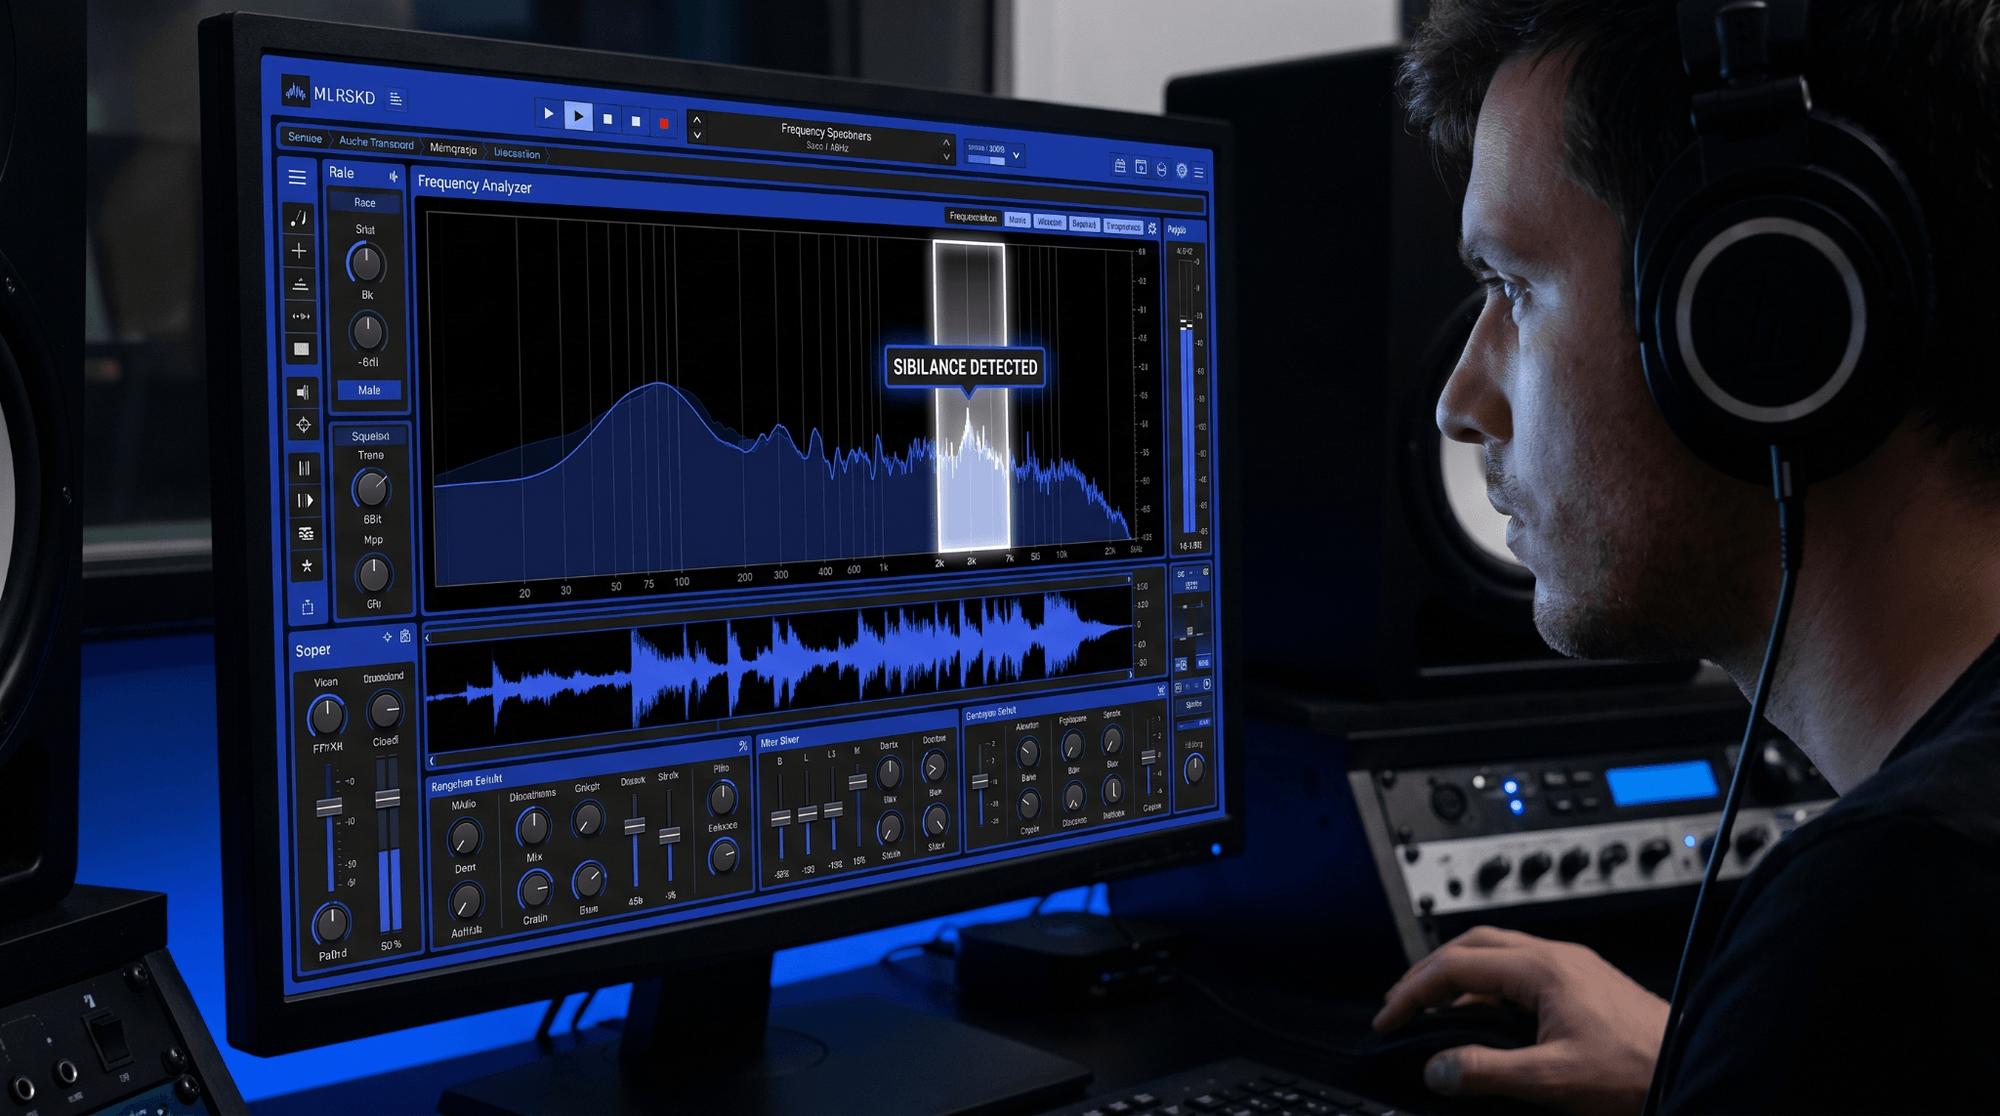
To locate the problem, insert your processor of choice onto the vocal track and engage its sidechain monitor or listen function. This soloes the filtered sidechain signal, allowing you to hear exactly what the detector circuit hears. Sweep the center frequency control slowly up and down across the high-mid spectrum while the vocal plays. Listen for the frequency zone where the s clicks, whistles, and hisses sound the most piercing and abrasive. Once that unpleasant zone is isolated, disengage the sidechain monitor.
2. Setting Filters and Center Frequencies
After finding the peak of the sibilance, configure your filter type based on the shape of the problem. If the vocal exhibits a broad, generalized high-frequency hiss that extends all the way to the top of the audible spectrum, select a high-pass filter configuration. This ensures that everything above your chosen cutoff frequency is monitored and managed.
If the sibilance is characterized by a sharp, whistling resonance at a specific frequency point—for example, a piercing whistle right at 6.5 kHz—select a band-pass filter configuration. Narrow the bandwidth or Q control around that center frequency to isolate the problem with laser precision, ensuring that the processor ignores surrounding air frequencies.
3. Tuning Threshold and Reduction Parameters
With the frequency boundaries properly set, you must now adjust how much reduction occurs. Begin with the threshold control at its maximum setting (0 dB), where no processing is taking place. While the vocal track plays in real time, slowly decrease the threshold. Watch the gain reduction meter closely.
The meter should remain completely still at 0 dB during vowel sounds and long harmonic notes. It should actively dip downward only when a sibilant consonant passes through the circuit.
Adjust the range or depth control to limit the maximum allowable attenuation. For a natural-sounding lead vocal, aim for a peak reduction of 3 dB to 6 dB on the loudest sibilant events. Anything beyond 6 dB of dynamic reduction should be approached with caution, as it risks introducing audible artifacts.
4. Continuous Parameter Automation
Even the most advanced static settings can fail if a vocal performance covers a wide emotional range. To combat this, do not hesitate to automate your parameters over the timeline of your mix. If a vocalist transitions from a soft, breathy verse to an aggressive, belted chorus, the ideal threshold and frequency center will inevitably shift.
Use your digital audio workstation's automation lanes to lower the threshold during sections where sibilance becomes more prominent, or to bypass the plugin entirely during instrumental sections or spoken interludes where processing is unneeded. Automating these parameters ensures that your processing stays transparent and tailored to every moment of the song.
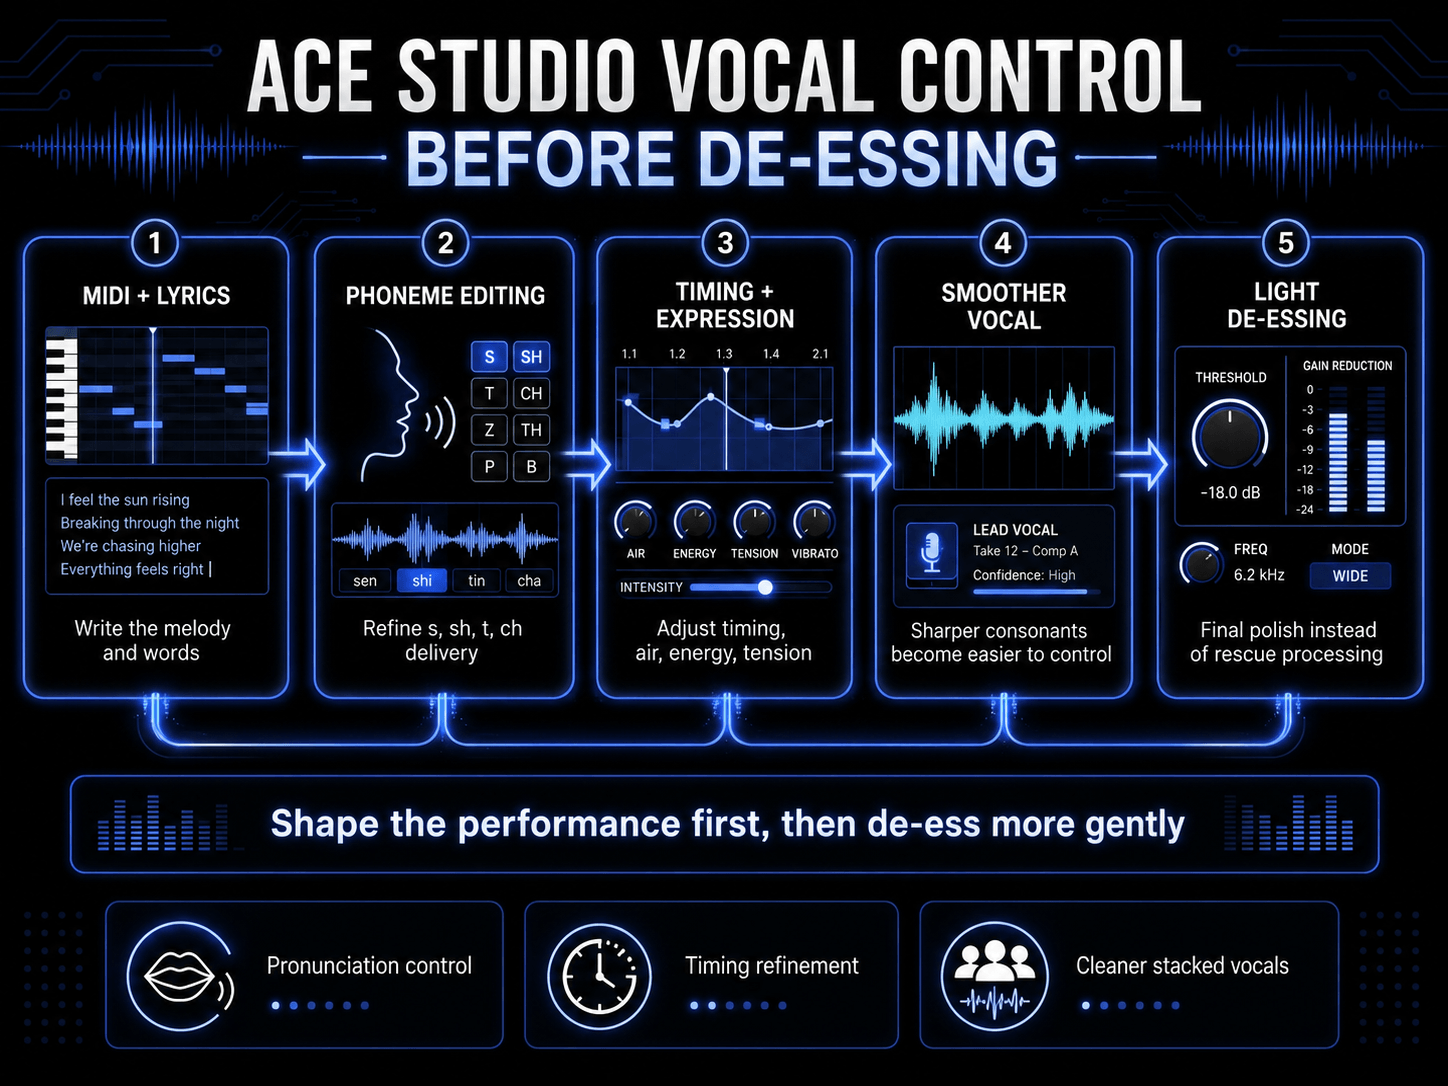
How ACE Studio Helps You Control Vocal Harshness Before De-Essing
De-essing usually happens late in the production process, after the vocal has already been recorded, compressed, brightened, and placed inside the mix. That is often necessary. But in many sessions, the smoother result comes from shaping the performance before the harshness becomes a technical problem.
That is where ACE Studio gives producers a different kind of control. Instead of only treating sibilance after the fact, you can shape how a vocal line is performed at the MIDI, lyric, phoneme, timing, and expression level. ACE Studio generates AI vocals from MIDI notes and lyrics, but the important part for de-essing is not just generation. It is editability. You decide the melody, the words, the timing, the pronunciation, and the emotional delivery before committing the part to a final mix.
For example, if a vocal phrase has repeated s, sh, t, or ch sounds, you can refine the way those syllables land before reaching for a heavy de-esser. ACE Studio allows phoneme-level pronunciation editing, so you can adjust how lyrics are delivered instead of forcing a plugin to flatten every sharp consonant later.
This is especially useful for dense pop hooks, fast rap sections, stacked harmonies, and bright electronic tracks where consonants can pile up quickly. You still may use a de-esser at the end, but it does not have to do all the work. The vocal can arrive at the mix already more balanced, more controlled, and easier to polish.
Smoother Lead Vocals Through Pronunciation, Timing, and Expression Control
A de-esser reduces high-frequency bursts. ACE Studio helps you shape the source of those bursts.
When you create or refine a vocal in ACE Studio, each note carries lyrics and pronunciation data. That means a vocal phrase is not treated as one fixed audio file. You can adjust the musical and linguistic details that affect how harsh or smooth the performance feels. If a consonant jumps forward too hard, you can check the lyric delivery, timing, and phoneme behavior before relying on aggressive high-frequency reduction.
This matters because sibilance is not only a frequency problem. It is also a performance problem. A consonant that starts too early, lands too hard, or cuts across a quiet vowel can feel sharper than it actually is. By refining the delivery, you keep the vocal clear without shaving away too much brightness.
ACE Studio also gives you vocal controls for shaping qualities such as air, tension, energy, falsetto, and formant in supported vocal models. These controls affect how the voice feels in the track: softer, tighter, brighter, heavier, more intimate, or more powerful. Used carefully, they help you build a vocal that has presence without becoming brittle.
A practical example:
- Write the vocal melody with MIDI and lyrics.
- Listen for syllables that feel too sharp.
- Refine pronunciation or timing on those words.
- Adjust expression so the phrase still carries emotion.
- Use light de-essing later only where the final mix needs it.
The benefit is simple: the vocal keeps its breath, clarity, and detail. You are not dulling the whole top end just to control a few harsh consonants.
Using ACE Studio for Background Vocals, Choirs, and Layered Parts
Sibilance becomes harder to manage when vocals are stacked. One lead vocal may only need light treatment, but five harmony layers singing the same lyric can create a sharp buildup of s and t sounds across the stereo field.
ACE Studio is useful here because it lets you build and refine backing vocals with more intention before they become a harsh cluster in the mix. You can create vocal parts from MIDI and lyrics, choose voices that support the arrangement, and shape how each layer performs the words.
ACE Studio also includes AI Choir features for building grouped vocal textures, which is valuable when you want width and emotion without letting consonants dominate the chorus.
For backing vocals, the goal is usually different from the lead. The lead needs articulation and emotional focus. The background layers need blend, support, and smoothness. In ACE Studio, that means you can make practical choices early:
| Vocal Part | What to Shape in ACE Studio | Why It Helps De-Essing |
|---|---|---|
| Lead vocal | Pronunciation, timing, pitch, expression | Keeps clarity without harsh edges |
| Doubled vocal | Slight timing and tone differences | Reduces stacked consonant buildup |
| Harmony layers | Softer delivery and lower presence | Keeps backing vocals behind the lead |
| Choir parts | Balanced voice placement and blend | Prevents group sibilance from becoming messy |
This gives you more control than simply inserting the same de-esser on every vocal track. The backing parts can be shaped to support the lead instead of competing with it. Then, when you apply de-essing, you can use it gently and musically.
Beyond Vocals: Harshness Control for Stems, Instruments, and Bright Arrangements
De-essing is often discussed as a vocal tool, however the same idea applies to any sharp high-frequency material. Acoustic guitar squeaks, brittle cymbals, piercing hi-hats, and overly bright synth layers can all create the same kind of listener fatigue.
ACE Studio is not only for vocals. ACE Studio 2.0 expanded into AI instruments, including expressive instrumental performances generated from MIDI, with articulation control for nuanced playing. That matters for harshness control because many bright sounds are not just EQ issues. They come from the way a part is performed: the attack of a note, the density of a layer, or the way a high instrument cuts through the arrangement.
ACE Studio also includes Stem Splitter, which can separate a full mix into core components such as vocals, drums, bass, and other instruments. If you are working with a mixed track and the harshness is coming from the vocal, cymbals, or a bright instrumental layer, stem separation gives you a more practical starting point than processing the entire stereo file. You can isolate the problem area, shape it more carefully, and avoid dulling parts of the song that already sound balanced.
For producers who move between ACE Studio and a DAW, ACE Bridge 2 connects ACE Studio with major plugin formats and supports audio streaming, MIDI recording, and synchronization. That means you can shape vocals, instruments, and stems in ACE Studio, then continue detailed mix decisions in your main session.
ACE Studio also includes a built-in De-esser inside its Basic Effects rack, with threshold, frequency, and listen controls. That gives you a direct way to tame harsh s, sh, and t sounds while staying close to the performance itself.
The strongest use case is not replacing careful mixing. It is giving you cleaner, more intentional material before the final mix stage. When the vocal pronunciation, harmony layers, instrument parts, and stems are already shaped with control, de-essing becomes a finishing move instead of a rescue operation.
Strategic Integration in the Signal Chain
Interactions Between De-Essers and Compressors
One of the most heavily debated topics in audio engineering is the relationship between different dynamic processors in a vocal chain. To make informed decisions, you must understand how a standard compressor interacts with high-frequency energy.
A compressor typically reacts most strongly to the most powerful parts of an audio signal, which are almost always the low-mid frequencies and fundamental vowel tones. When a vocalist hits a loud vowel, the compressor clamps down. However, when an s sound occurs, it has very little low-frequency energy, which can cause the compressor to back off.
Furthermore, because compressors reduce the overall dynamic range of a performance, they bring up the quietest details of a track. Fricative consonants are physically quieter than belted vowels, so when a compressor lifts the low-level details of a recording, it inherently accentuates the perceived loudness of the sibilance.
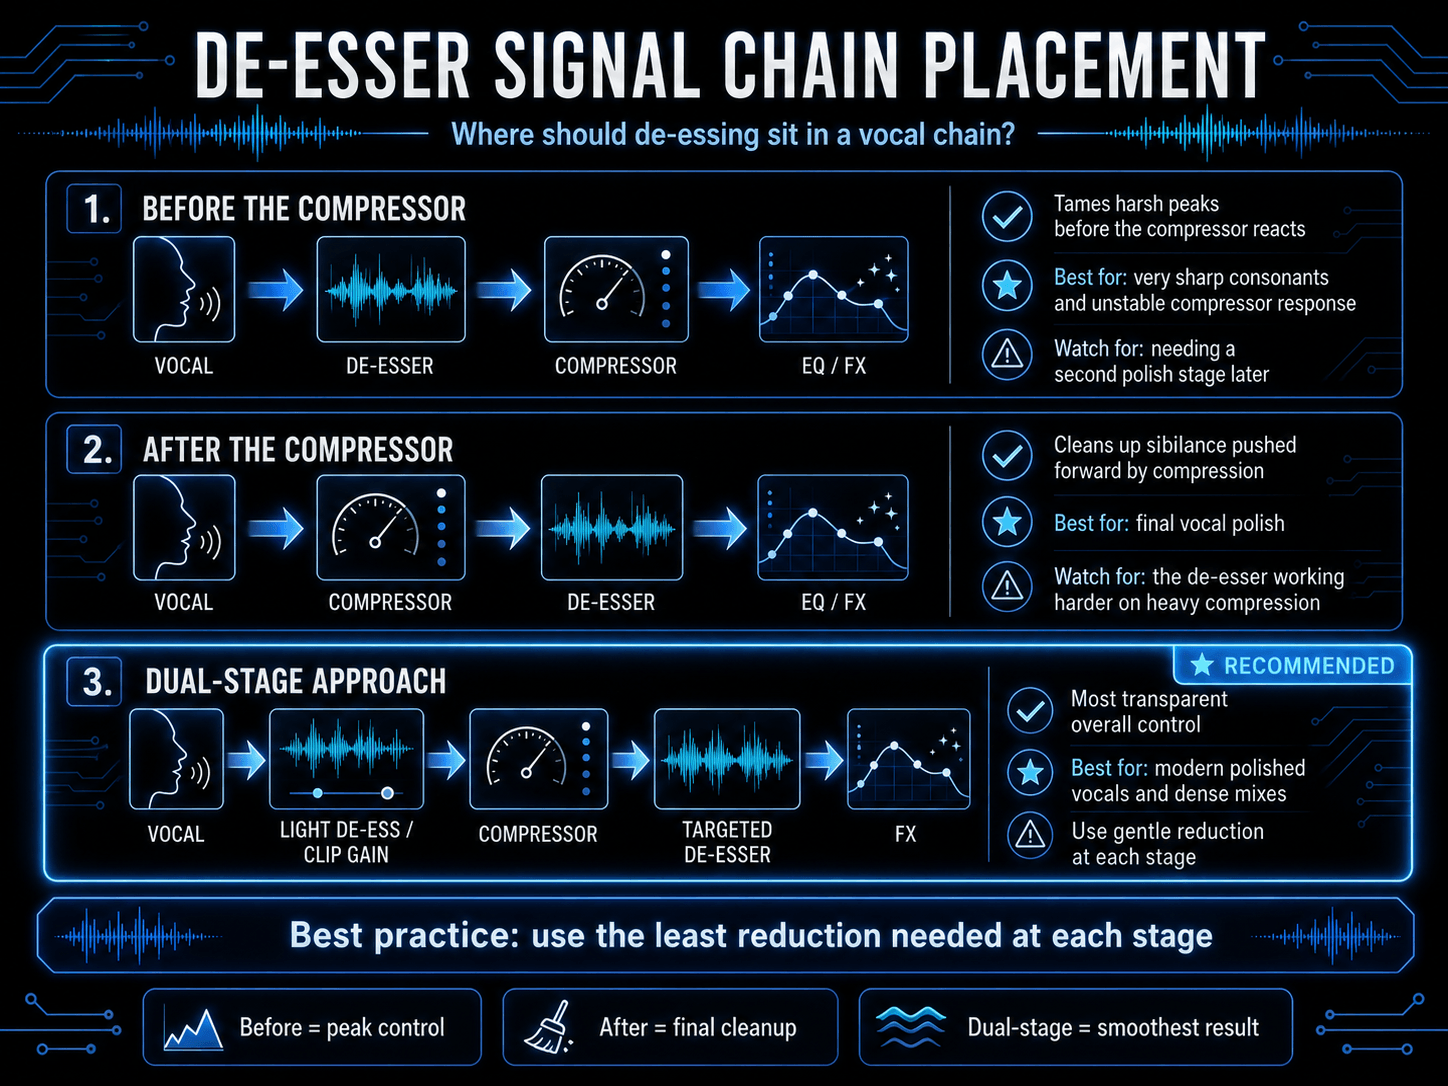
Sequential Ordering and Processing Order
The question of whether a de-esser should go before or after a compressor depends entirely on the specific sonic goals of your session. Both positions are valid, and understanding their unique behaviors is key to building an effective vocal chain.
Placing the De-Esser Before the Compressor
Positioning your processor early in the chain, prior to compression, is an excellent strategy for stabilizing a vocal track. If a recording features exceptionally harsh, sharp sibilant spikes, these high-frequency transients can accidentally fool your compressor’s detector circuit, causing it to overreact and clamp down too hard on the vocal.
By applying sibilance reduction first, you tame those aggressive peaks before they ever reach the compressor. This allows the subsequent compressor to behave much more smoothly and predictably, resulting in a more stable dynamic footprint.
Placing the De-Esser After the Compressor
Positioning your processor after the compression stage is the traditional approach for final vocal polishing. Because compression naturally exaggerates sibilance, placing a de-esser later in the signal chain allows you to catch and clean up any harshness pushed forward by the compressor. This location is ideal for surgical intervention, as it addresses the final, compressed version of the vocal that the audience will ultimately hear.
The Dual-Stage Solution
In professional audio production, engineers rarely rely on a single processor to do all the heavy lifting. The most elegant solution is often a dual-stage processing strategy.
- Place a gentle de-esser or use manual clip gain before your compressor to shave 2 dB to 3 dB off the harshest peaks.
- Follow your compressor with a second, highly targeted spectral or split-band de-esser to catch an additional 2 dB of compressed sibilance.
Dividing the workload across multiple stages yields a significantly smoother, more transparent vocal than forcing a single plugin to apply 6 dB or more of aggressive reduction.
Integrating Equalization and Dynamics
Equalization adjustments can also heavily impact your workflow. It is incredibly common during sound mixing to use a high-shelf or parametric EQ boost to add air, brightness, and modern radio sheen to a lead vocal. However, boosting everything above 8 kHz will inevitably amplify the sibilant frequencies right along with that desirable air.
To manage this, always view your EQ adjustment and your dynamics processors as a complementary system. If you apply a significant high-frequency boost, place your surgical de-esser after that EQ plugin. This allows you to enjoy the benefits of a bright, clear vocal track while instantly clamping down on the specific frequencies that become harsh because of the EQ boost.
Managing Effects Sends and Reverb Busses
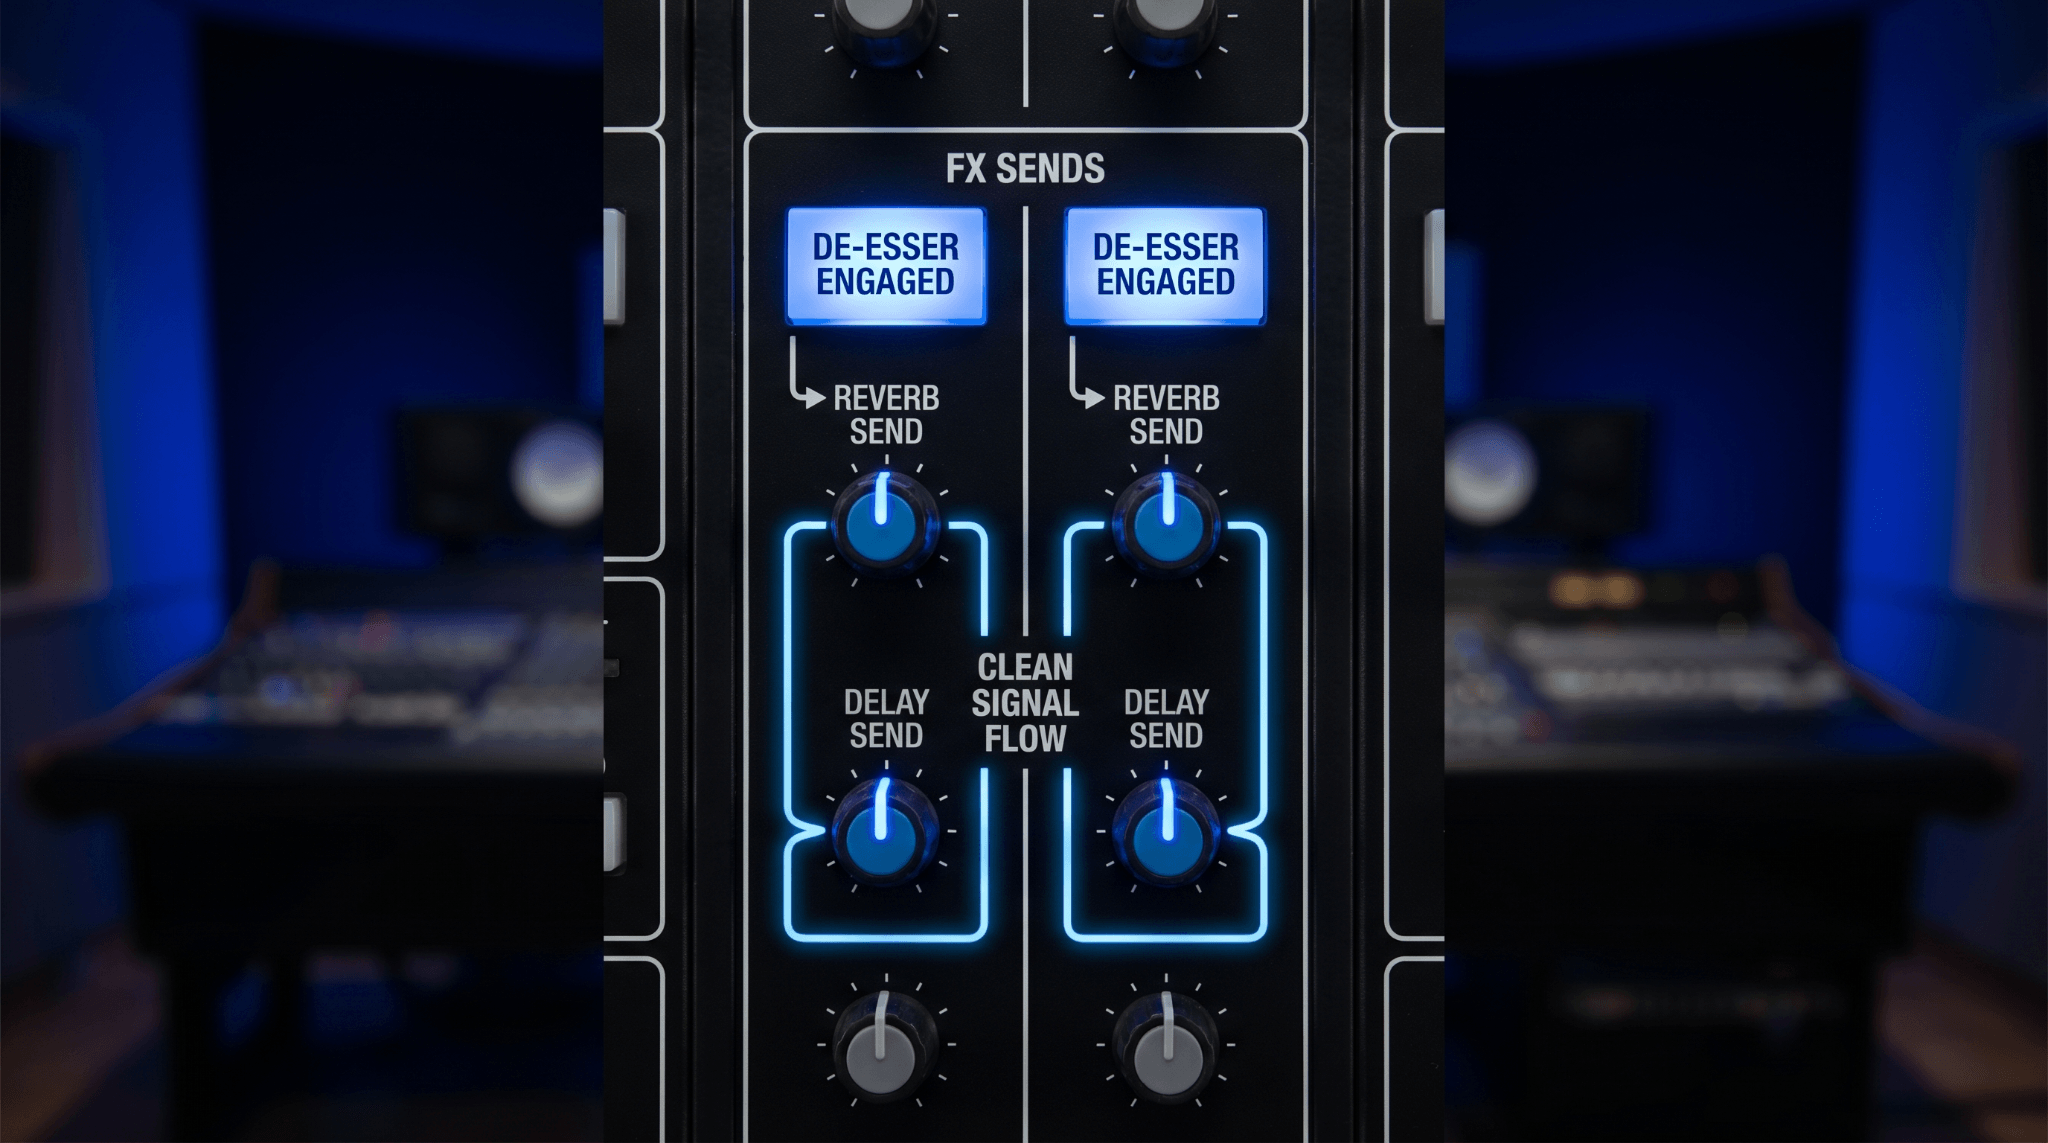
A classic mistake in audio processing is neglecting to manage sibilance on auxiliary effects sends. When you route a vocal track to a stereo reverb or a long delay bus, the high-frequency sibilant energy feeds into those effects processors as well.
Reverb algorithms, particularly bright plate reverbs or digital hall emulations, tend to catch sharp sibilant bursts and stretch them out over time. This creates a long, metallic hiss that rings out in the background of your mix, muddying the sound even if the dry vocal itself is perfectly controlled.
To resolve this issue, instantiate a dedicated de-esser as the very first plugin on your auxiliary reverb or delay track, placed directly before the effect plugin itself. Configure this instance to be significantly more aggressive than the one on your lead vocal track, reducing the high frequencies by as much as 10 dB to 12 dB. Because this processed audio is feeding entirely into a wet reverb algorithm, you do not need to worry about creating a lisping effect on the dry vocal. The result is a lush, wide space that remains clean, smooth, and completely free of distracting background hiss.
Applications Beyond Traditional Lead Vocals
Instrument Processing and Percussion Taming
While these tools are primarily associated with vocal processing, their utility in audio production extends far beyond the human voice. Any acoustic source that produces sharp, unharmonic high-frequency transients can benefit from frequency-dependent compression.
- Acoustic Guitars: High-quality condenser microphones often capture excessive pick noise or harsh string squeaks when a guitarist moves across the fretboard. Placing a split-band processor centered between 4 kHz and 7 kHz can elegantly tame these distracting performance noises without dulling the natural resonance of the wooden guitar body.
- Drum Overheads and Cymbals: In rock and electronic music styles, cymbal recordings can easily become brittle and overwhelming, masking the clarity of the snare and tom-toms. A de-esser configured to monitor the 8 kHz to 10 kHz region can soften harsh cymbal crashes, making them sound silky and expensive.
- Close-Micked Hi-Hats: Can often sound too piercing in a modern sound mix. A gentle touch of high-frequency attenuation balances their transient bite within the groove.
Master Bus and Audio Mastering Applications
In the final stage of the audio engineering workflow—audio mastering—the entire mixed stereo track is processed as a single stereo file. Mastering engineers frequently encounter mixes where the vocals, cymbals, or synthesizers are globally too bright, but standard equalization adjustments would ruin the mid-range balance of the song.
In this scenario, a mastering engineer will employ an ultra-precise spectral de-esser or a linear-phase dynamic EQ on the master bus. By configuring the processor with a very high threshold and a gentle reduction ratio, they can subtly catch occasional high-frequency overloads across the entire stereo landscape.
This master-bus application ensures that the final product translates smoothly to consumer playback devices, including car stereos, Bluetooth speakers, and high-fidelity headphones, without causing listener fatigue.
Approaches Across Music Genres
Different musical genres require distinctly tailored strategies for managing vocal sibilance. There is no one-size-fits-all preset in professional audio production.
Pop and Contemporary Commercial Music
Modern pop music demands an exceptionally bright, intimate, and upfront vocal presentation that cuts through dense, layered electronic arrangements. Pop vocals are typically subjected to extreme compression and dramatic high-shelf EQ adjustments to achieve a polished sound.
To maintain speech clarity under these conditions, pop producers utilize a rigorous, multi-tiered approach. They begin with extensive manual clip gain to level out sibilant consonants by hand, followed by multiple stages of subtle, high-resolution spectral processing. This ensures the vocal remains smooth, bright, and expensive-sounding without a hint of piercing edge.
Hip-Hop and Trap Music
In hip-hop and trap production, the vocal track must command absolute authority, sitting aggressively on top of heavy 808 sub-bass elements and complex, fast-moving hi-hat patterns. Rap performances feature dense, fast-paced lyrical delivery with rapid-fire consonants that can easily overload a standard compressor.
Producers in this genre favor fast-acting, split-band de-essers or intelligent tools like Velvet. The goal is to retain the biting transient energy and crisp enunciation necessary for lyric comprehension while preventing the high-frequency consonants from clashing with the crisp synthetic hats of the instrumental beat.
Rock, Metal, and Alternative Genres
Rock and metal recordings are defined by raw energy, aggressive wall-of-sound electric guitars, and heavy drumming. Vocals in these styles—whether sung, shouted, or screamed—often exhibit intense mid-range harshness between 3 kHz and 5 kHz due to the sheer physical strain on the vocalist's performance.
Engineers working in alternative styles lean toward broad, wide-band processors or dynamic equalization adjustments. They prioritize preserving the raw emotion and power of the performance, using processing subtly to prevent the vocal from sounding brittle or disconnected from the dense rock instrumentation.
Acoustic, Jazz, and Classical Music
Acoustic genres rely completely on realism, depth, and sonic purity. Any audible artifacting, pumping, or artificial filtering will immediately ruin the suspension of disbelief for the listener.
Consequently, automated plugins are used sparingly, if at all, in high-end acoustic sessions. Sound engineers instead rely almost exclusively on manual volume automation and careful microphone placement during the recording phase, ensuring the high frequencies remain entirely organic and untouched by digital compression artifacts.
Strategic Diagnostics and Mistake Prevention
Determining When Processing is Required
A critical milestone in an audio engineer's development is learning when to leave a track alone. Do not apply processing blindly out of habit. To evaluate whether your project genuinely requires sibilance reduction, perform a simple self-assessment of your mix balance.
Listen to the vocal track inside the context of the full mix at a moderate volume level. Does the sibilance pull your attention away from the musicality of the song? Do the s consonants pop out uncomfortably compared to the snare drum or the melody instruments?
If the answer is yes, processing is necessary. If the vocal sounds slightly bright in solo mode but sits beautifully and intelligibly within the full arrangement, skip processing entirely. Treating a problem that does not exist in the final mix only introduces unnecessary phase distortion and filtering.
Over-Processing and Signal Degradation
The most common mistake made by developing producers is over-de-essing. It is incredibly easy to over-adjust settings while focusing intently on a problematic vocal line, leading to a dull, lifeless performance.
The unmistakable sign of over-processing is when the vocalist begins to sound like they are singing with an artificial lisp, turning clean s consonants into muddy th sounds. For instance, a lyric like sweet sister will begin to sound like tweet thither.
If you detect this tonal shift, your threshold is too low, or your range control is set too deep. Back off the parameters immediately until the natural enunciation returns. The goal is never to eliminate sibilance entirely—it is an essential element of human language. The goal is simply to balance its volume relative to the rest of the performance.
Evaluating Tracks in Solo Isolation
Another critical pitfall is making your final adjustments while listening to the vocal track in solo isolation. When a vocal is soloed, your ears naturally adapt to its isolated frequency profile, causing you to over-analyze every minor detail. A sibilant peak that sounds slightly sharp in solo mode will often be completely masked and softened by the cymbals, guitars, and synthesizers present in a full mix.
Always fine-tune your threshold, frequency center, and depth controls while listening to the entire mix playing together. This is the only way to accurately judge how the high frequencies of the voice interact with the surrounding instruments.
Mitigating Issues During the Recording Phase
The absolute best way to solve a sibilance problem is to prevent it from ever happening during the recording phase. Relying on digital cleanup tools to fix a poorly tracked vocal is an inefficient approach to audio engineering. By making deliberate adjustments in the studio before pressing record, you can achieve a naturally smooth top-end that requires very little digital processing later.
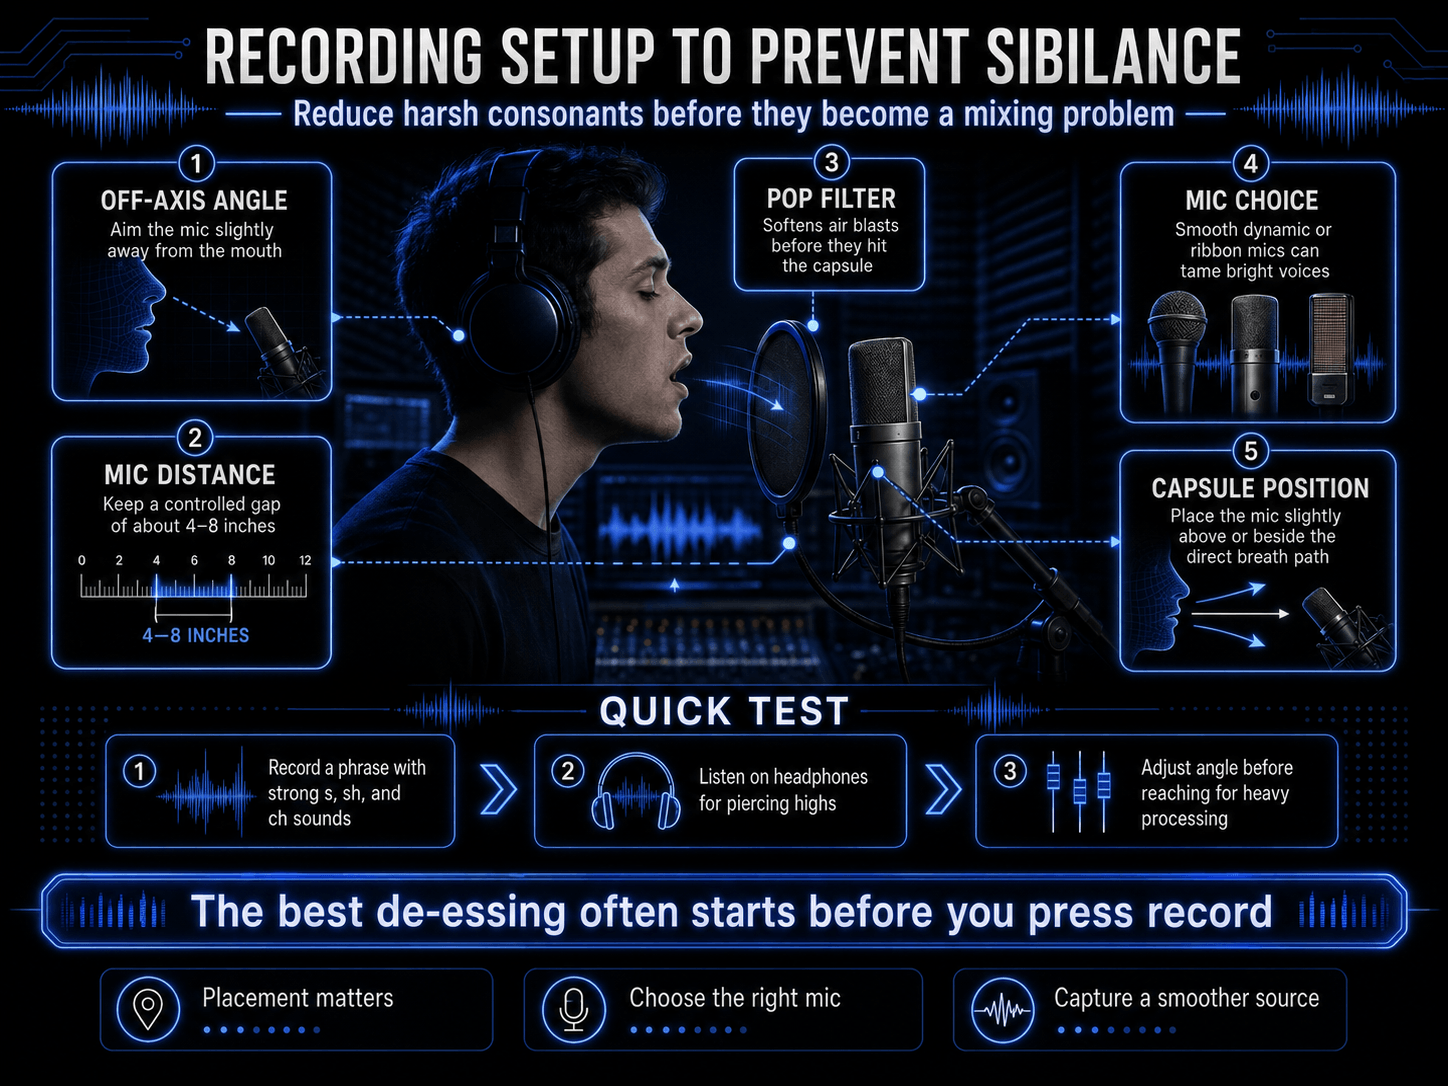
- Microphone Selection: Avoid inexpensive condenser microphones that feature cheap, mass-produced capsules. These microphones often incorporate an intentional, harsh high-frequency boost between 5 kHz and 12 kHz designed to sound impressive in a store showroom, but this boost inevitably accentuates vocal harshness. Instead, opt for a high-quality dynamic microphone (such as a Shure SM7B or Electro-Voice RE20) or a smooth, rich ribbon microphone for naturally sibilant vocalists.
- The Off-Axis Placement Technique: Never position a microphone directly in front of a vocalist's mouth where the direct, high-velocity blast of breath hits the capsule head-on. Instead, employ an off-axis placement technique. Angle the microphone capsule slightly away from the performer's mouth, or position the microphone about two inches above the vocalist's bridge of the nose, angling down toward their mouth.
This arrangement allows the direct blast of air friction to pass harmlessly underneath the capsule, while the microphone still captures the full harmonic warmth and resonance of the performance, naturally reducing harsh transients by design.
Frequently Asked Questions
What is the ideal frequency to target when de-essing a vocal?
There is no single ideal frequency because every human voice is unique. However, a helpful general rule of thumb is to look between 4 kHz and 7 kHz for masculine voices, and between 6 kHz and 9 kHz for feminine voices. Always use your plugin’s sidechain audition feature to sweep the spectrum and locate the exact point of peak harshness for your specific recording.
Can I use a traditional compressor as a de-essser?
Yes, you can construct a classic de-esser using a standard compressor if the compressor features an external sidechain input. To set this up, duplicate your vocal track onto a hidden channel and apply a drastic equalization adjustment to that duplicate track, completely cutting out the low end and boosting the harsh sibilant frequencies by 10 dB.
Why does my vocal sound like it has a lisp after processing?
An artificial lisp occurs when the de-esser is over-processing the vocal track, applying too much gain reduction or covering too wide a frequency range. When you reduce the sibilant frequencies excessively, you remove the acoustic detail required to distinguish an s sound from a th sound. To fix this, lift your threshold level, reduce your range or depth parameter, or narrow your band-pass filter until the performer's natural enunciation is restored.
Should I apply de-essing to my background vocals as well?
Yes, and you should generally be much more aggressive with your background vocal tracks than your main lead vocal. When multiple background vocal layers sing the same lyrics together, their sibilant consonants multiply, creating a harsh, chaotic accumulation of s sounds that can easily ruin a mix.
Will de-essing fix plosive sounds like p and b pops?
No. Plosive sounds occur at the opposite end of the frequency spectrum, generating low-frequency energy bursts below 150 Hz when a blast of air hits the microphone capsule. Because de-essers are designed to target high frequencies (typically above 3 kHz), they will completely ignore low-frequency plosive pops. To fix plosives, use a high-pass filter, a dedicated de-plosive plugin, or manual clip gain to lower the low-frequency energy bursts by hand.